Is your Windows 11 machine keeps changing the desktop background, even when you haven’t opted for changing wallpapers? A handful of users have reported this issue. This can be quite annoying as most of us get back to the desktop every once in a while and found our favorite wallpaper is now gone! There are a handful of ways you can take care of this.
Fix 1 – Set the background to a Picture or Solid Color
You may have set the background settings to SlideShow or Windows Spotlight. So, the wallpapers keep changing at regular intervals.
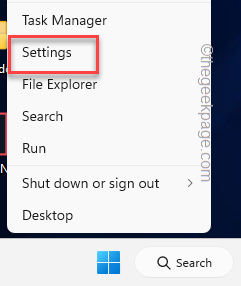
Step 1 – If you press the Win+X keys together, the power user menu should open up.
Step 2 – There, click “Settings” to open that up.

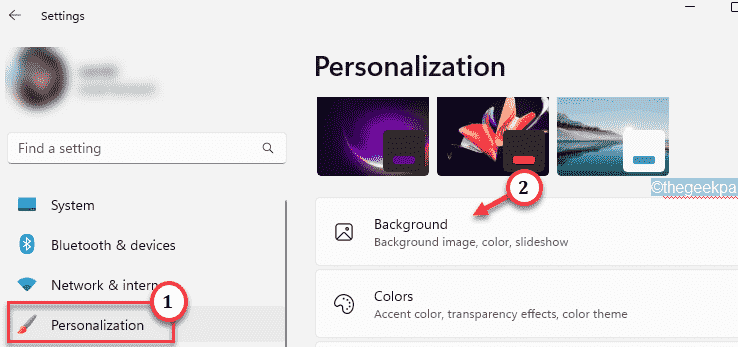
Step 3 – Windows has a separate section called “Personalization“. Head on to that.
Step 4 – There, click “Background” settings to open that up.
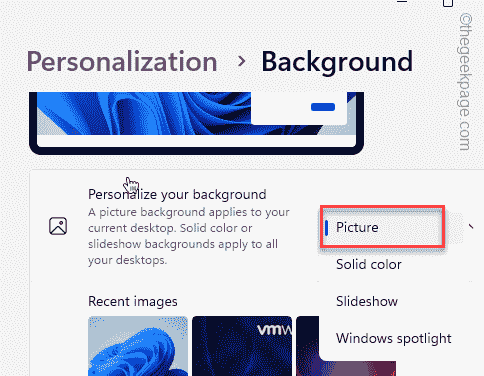
Step 5 – Set the “Personalize your background” to either “Picture” or “Solid Color“. Do not opt for Slideshow or Windows Spotlight.
Once you have set the background to Picture, you may use the ‘Browse’ button to reach a picture and set it as the desktop background.
It won’t change automatically.
Fix 2 – Check the Theme you are using
If the theme you are using contains multiple pictures, they will keep changing on a regular basis.
Step 1 – Open Settings.
Step 2 – Switch to the “Personalization” tab.
Step 3 – On the right side of the pane, you can find the “Themes” option. Open that up.
Step 4 – On the same side of the screen, check whether you use a theme containing multiple images.
These themes have a setting that alternates pictures at regular intervals.
Step 5 – Select a theme with only a single picture.
Go back to your desktop. Wait for a while and check whether the desktop wallpaper keeps changing.
Fix 3 – Lock wallpaper-changing ability with regedit
If your computer has multiple users, you can keep others from changing the wallpaper with just a registry tweak.
Step 1 – Begin to write “regedit” in the search bar.
Step 2 – Then, tap “Registry Editor” to open it up.
Step 3 – When Registry Editor appears on your screen, get to this point –
HKEY_CURRENT_USER\Software\Microsoft\Windows\CurrentVersion\Policies
Step 4 – As you reach the specified location, right-tap the “Policies” key and tap “New>” and tap “Key” to create a new key.
Step 5 – Then, name this new key “ActiveDesktop“.
Step 6 – Make sure you have selected the “ActiveDesktop” key on the left pane.
Step 7 – Then, go to the right-hand pane, right-click on the space and tap “New>” and tap “DWORD (32-bit) Value” to create a new value.
Step 8 – Name this new value “NoChangingWallPaper“.
Step 9 – After creating this value, just double-tap it to modify that.
Step 10 – Now, set the value to “1“.
Step 11 – Then, click “OK” to save the change.
After creating this value, exit Registry Editor. Now, set a picture that you would like on your desktop. You won’t be able to change the wallpaper after you restart the system.
Restart your computer.
Now, no one can manually change the wallpaper on your computer.
Fix 4 – Change the sync settings
Sync settings allow you to have the same wallpapers on all the computers signed in with your account.
Step 1 – Head on to Settings once more.
Step 2 – Click “Accounts” on the left-hand pane.
Step 3 – On the opposite side of the screen, click “Windows backup” to open it.
Step 4 – Now, scroll down through the right-hand pane and leave the “Remember my preferences” option in “On” mode.
Step 5 – Make sure “Other Windows settings” is unchecked.
This will ensure Windows doesn’t sync the wallpaper and the other settings from your other devices.
This should fix your issues.
Fix 5 – Remove Corrupted Themes files
Sometimes corrupted theme files stored locally on your computer may cause this aberration.
Step 1 – Using the ⊞ Win+R keys together, call the Run box.
Step 2 – Paste this there and hit Enter.
%USERPROFILE%\AppData\Roaming\Microsoft\Windows\Themes\
Step 3 – Inside the Themes folder, you may not find all the components as some of those are hidden.
Step 4 – In that case, tap “View>” and tap “Show“. Select “Hidden items” from the drop-down list.
Step 5 – Now, you shall see all the items, including “slideshow.ini“.
Step 6 – Select all the files together and tap 🗑️ to empty the Themes folder.
Exit File Explorer after this.
Now, set your favorite image as the desktop background.
The image on your desktop won’t change automatically from now on.
Fix 6 – Remove the background images
There is an ease of access setting that may help you resolve the issue.
Step 1 – Open another Run dialog box.
Step 2 – Paste it there in the blank box and hit Enter to directly go to the Ease of Access Center.
control /name Microsoft.EaseOfAccessCenter
Step 3 – On the right-hand pane, click “Make the computer easier to see” to open it up.
Step 4 – There are so many settings inside here. So, head down to the Make things on the screen easier to see section.
Step 5 – Here, make sure that you have unchecked the “Remove background images (where available)“.
Step 6 – Don’t forget to tap the “Apply” and “OK” buttons to see the effect.
Exit Control Panel. Switch to the desktop and check whether the images are getting changed regularly or not.
Fix 7 – Use a local account
Are you facing this issue only while using a Microsoft account? Then, log in using a local account to test.
Step 1 – Just right-tap the ⊞ Win and tap “Settings“.
Step 2 – Then, on the left side, click “Accounts” to open that up.
Step 3 – On the opposite side of the screen, click “Your info” to open that section.
Step 4 – Now, just scroll down and you can view the Microsoft account that you have used to log in. Besides that, click “Sign in with a local account instead“.
Step 5 – Now, tap “Next“.
Step 6 – Just input your username and password in their designated boxes.
Step 7 – Finally, tap “Next” to proceed.
Step 8 – Tap “Sign out and finish” to complete the process.
This will automatically sign you out of your current MS account.
Step 9 – Tap on the new local account from the left-hand corner to use it.
Step 10 – Next, click on “Sign in” to sign in to the system.
Now, the desktop wallpaper won’t get affected again.
Additional Suggestions –
1. Sometimes certain bugs may cause this issue. So, it will be best to keep the machine updated.
Settings > Windows Update > Check for updates
Restart the system once you are prompted to complete the process.
2. Some tools like Bing Wallpaper automatically change the wallpaper on your Desktop. If you are indeed using the tool, uninstall it from your computer. Then, check the status of the issue.


