Settings is the most important part of the Windows 10 system. If Settings is not working on your computer then that is a problem you should not neglect. Follow these easy fixes on your computer to solve this issue quickly. If clicking on the Settings icon on the taskbar isn’t working you may try these alternative apporaches~
1. Press the Windows key along with the key I to access the Settings.
2. Right-click on the Windows icon and click on the gear-shaped icon to open the Settings.
Fix 1 – Run an SFC scan
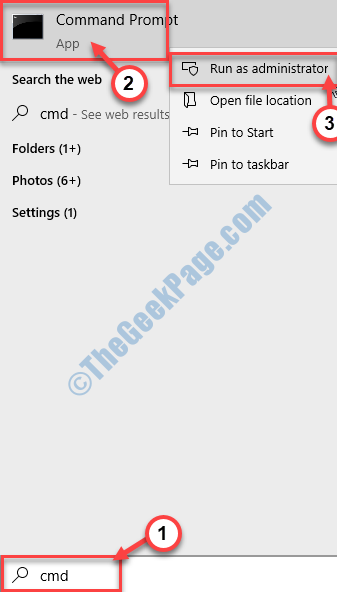
1. Press the Windows key and write “Command Prompt“.
2. After that, right-click on the “Command Prompt” in the search result. After that, click on the “Run as administrator“.

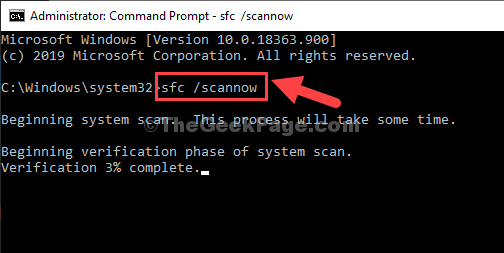
3. When the Command Prompt appears on your window, to run a System File Checker (SFC) scan, type this code and hit Enter.
sfc /scannow

This process may take 2-5 minutes.
Close the terminal and restart the system. Check the Settings.
Fix 2 – Create a new user account
You have to create a new account on your system and then try to access the Settings on your computer.
1. Press Windows key+S. Then, type “cmd“.
2. After that, right-click on the “Command Prompt” and then click on “Run as administrator“.

3. When the terminal appears on your screen, type this command and hit the ‘Enter’ key to create a new account on your system.
net user Adam password /add

[NOTE– Here, ‘Adam’ is the new user name of the account. Now, the ‘password’ is the password of the account. You can modify both according to your personal choice. ]
4. After executing the previous command, run this command in a similar fashion.
net localgroup administrators Adam /add

[NOTE– ‘Adam’ is the account name: as explained before. If you want you can modify according to the modification you have made previously.]
5. When the ‘The command completed successfully‘ message appears, close the CMD terminal.
Restart your computer and log in using the new account (Adam in this case).
You will be able to access the Settings again.
Fix 3 – Add Settings with PowerShell
Sometimes you may need to add the Settings using PowerShell.
1. Right-click on the Windows icon. After that, you need to choose “Windows PowerShell(Admin)“.

2. When the PowerShell appears, simply copy the below mentioned-code and hit Enter.
PowerShell -ExecutionPolicy Unrestricted -Command "& {$manifest = (Get-AppxPackage *immersivecontrolpanel*).InstallLocation + '\AppxManifest.xml' ; Add-AppxPackage -DisableDevelopmentMode -Register $manifest}"

Upon executing the code, close the window and reboot your computer.
Fix 4 – Check for Windows Update
Check for pending Windows Update on your computer.
1. Log in to your computer using the new account.
2. After that, press Windows key+I.
3. After that, click on the “Update & Security”.

4. After that, click on “Check for updates“.

Check if any updates are pending or not. Once the update process is over try to log in with your original account and check Settings is working or not.
Fix 5 – Run Windows Apps troubleshooter
Running Windows Apps troubleshooter will solve the issue.
1. Download the Windows Apps troubleshooter on your computer.

2. When it is downloaded, double click on the “Appsdiagonstic10.diagcab” file.

3. What you need to next is to follow the on-screen instructions.

Let Windows fix the problem itself.
Fix 6 – Reset Windows 10
If you can’t access the Settings from any of the accounts there is none option except to reset your device.
1. Shut down your device.
2. Then, boot up your system again. At the moment you see the manufacturer’s logo has appeared on the screen, press the power button to shut down your computer.
3. Again start it up and force shut down it.
Repeat these steps 3 times. At the time of booting up, you will notice that Automatic Repair has appeared.
4. In the Automatic Repair window, click on the “Advanced options“.

5. Click on the “Troubleshoot” to start the troubleshooting process.

6. To reset your device you have to choose the “Reset this PC” option.

7. Here you will notice two options~
a. Refresh your PC– If you want to retain all your files after refreshing the device, choose this option (recommended).
b. Reset your PC– Choosing this option will reset the whole device.

All you need to do is to wait for Windows to reset your device. Once it is complete, you will be able to access the Settings once again.