Is the HDMI Audio device not working on your computer? If you can’t hear any sound from the HDMI audio device you are using, there may be a problem with the audio device settings on your computer. Don’t worry. There are some easy fixes available to solve the problem very easily. Just follow these steps –
Fix 1 – Restart the Windows Audio service
Try restarting the Windows Audio service on your computer.
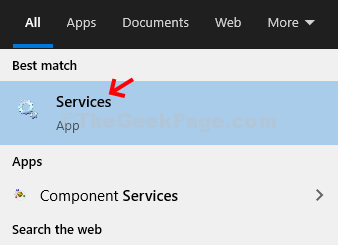
1. Type “Services” in the search box.
2. After that, click on the “Services” in the search results.

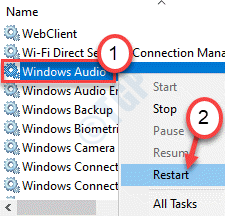
3. When the Services opens up, look for the “Windows Audio” service.
4. Right-click on the service and click on “Restart“.

Once you have restarted the Windows Audio service, close the Services window.
Fix 2 – Check all the hardware devices
Check if all the hardware devices are correctly connected to your system.
1. Check all the cable connections. Usually, if the cable has become older or worn out, try replacing it with a new cable.
2. If there is no problem with the cable, put the audio device connecting cable in any of the multiple HDMI output ports.
3. After that, check for the monitor is functioning properly or not.
Check if the HDMI audio device is working. If these checks don’t fix your issue, go for the next fix.
Fix 3 – Update the HD driver
You have to update the HD audio drive from the Device Manager.
1. Press the Windows key+R keys together.
2. Once the Run opens up, type “devmgmt.msc” and click on “OK“.

3. When the Device Manager opens up, click on the “Audio inputs and outputs” device.
4. Then, right-click on the High Definition audio driver and click on “Update driver” to update the driver on your computer.

5. After that, click on the “Search automatically for drivers“.

Just wait for the Windows to complete the installation process. Restart your computer, if needed.
Fix 4 – Use Intel Driver & Support assistant
If you are facing this issue on a laptop running on Intel processors, this fix is just for you.
1. Go to the Intel Driver & Support Assistant website.
2. Then, click on “Download” to download the Intel-Driver-and-Support-Assistant-Installer application.

3. Go to the location where you have downloaded the installer.
4. Double click on “Intel-Driver-and-Support-Assistant-Installer” to run it.

Complete the installation process.
5. Come back to the desktop.
6. Double click on the “Intel Driver & Support Assistant” to launch it.

6. This will automatically scan your machine for missing driver updates.
7. Once the scanning process is complete, check all the driver updates and click on “Install“.
This will download all the driver packages (including the driver for the HDMI audio device) one by one and install them on your machine. Wait for the process to complete.
Restart your machine to complete the process. This should solve the problem with the HDMI no sound issue.
Fix 5 – Set the HDMI audio as the default
Sometimes just setting the HDMI audio device as the default audio device may solve the problem.
1. Right-click on the Windows icon and click on “Run“.
2. Write “mmsys.cpl” in the box and click on “OK“.

3. Once the Sound window opens up, go to the “Playback” tab.
4. In the Playback tab, right-click on the HDMI audio device and click on “Set as default device“.

This should set the device as the default audio driver on your computer.
NOTE–
There is a slight chance that may be you won’t see the HDMI Audio device in the list of devices, follow these steps-
Once you have opened the Sound panel, right-click and check the options “Show Disabled Devices” and the “Show Disconnected Devices“.

Fix 6 – Update sound card driver
You have to update the sound card driver on your computer.
1. Press the Windows key+R keys together.
2. Once the Run opens up, type “devmgmt.msc” and click on “OK“.

3. When the Device Manager opens up, expand the “Sound, video and game controllers“.
4. After that, right-click on the audio device and click on “Update driver“.

5. Next to that, click on the “Search automatically for drivers“.

Wait till Windows downloads and install the latest update for the HDMI audio device.
Fix 7 – Uninstall Hyper-V
If you have updated your Windows recently, you may see that the HDMI audio device is not working.
1. You need to right-click on the Windows key and then, click on “Run“.
2. After that, write this code and hit Enter.
optionalfeatures

3. When the Windows Feature screen opens up, uncheck the “Hyper-V” option.
4. After doing so, click on “OK“.

Windows will now start the process of disabling the HyperVisor on your computer.
5. Then, click on “Restart now“.

After your machine restarts, check if the HDMI audio device is working or not. Otherwise, go for the next fix.
Fix 8 – Run the Audio Troubleshooter
The audio troubleshooter can help you to resolve this issue.
1. At first, you just need to press Windows key+R.
2. Then, to access the Troubleshooter settings, paste this code, and hit Enter.
ms-settings:troubleshoot

3. After the troubleshooter window appears , on the right-hand side, scroll down and click on “Additional troubleshooters“.

4. In the list of troubleshooters, scroll down and click on the “Playing Audio“.
5. After that, click on “Run the troubleshooter“.

Now Windows will detect and fix the audio issue on your computer. Wait patiently. This will surely solve your problem with the