Is your Windows 10 or Windows 11 computer not waking up from sleep? If it is not waking up from sleep, don’t worry, restart your computer and try these simple fixes and the problem will be gone pretty soon. This problem is usually caused due to the wrong Power Settings on your computer. But before going on ahead for the main fixes, make sure you have gone through these workarounds to try out some simpler workarounds-
Workarounds–
1. Check the mouse and keyboard are working properly. You can test these just by plugging them into your device.
2. Reboot your computer and check if it helps.
3. Check if any Windows Update is pending or not.
If the workarounds didn’t do much go for these solutions-
Fix – 1 Adjust Advanced Power Settings-
Adjusting advanced power settings from Control Panel will solve this issue.
1. To launch a Run window, press Windows key+R together.
2. In the Run window, execute this code by pasting it in the Run window and then clicking on “OK“.
control.exe powercfg.cpl,,3

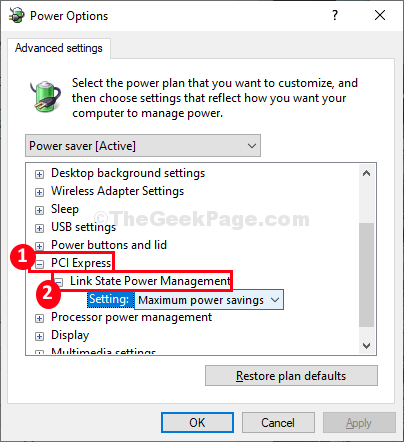
3. In the Power Options window, expand “PCI Express” in the list of settings.
4. Again click on “Link State Power Management” to expand it.

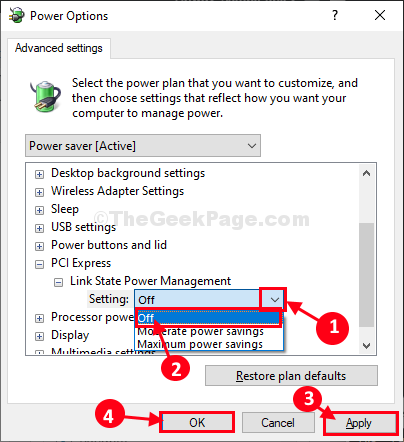
5. Now, under the Link State Power Management option, click on the drop-down of ‘Settings‘ and choose “Off” from the listed options.
6. Finally, click on “Apply” and then on “OK ” to apply these changes.

7. Now, Go to Multimedia settings -> When Sharing media and choose “Allow the computer to sleep“.

8. Now, Expand Sleep , then Expand Sleep After.
9. Now, Turn Allow hybrid sleep to Off and Set Allow wake timers to Enable.

9. Now, Double click on USB Settings > USB selective suspend settings.
10. Choose Enabled.

Now, Click on Apply and Click OK. Then, close the Power Options window.
Restart your computer to save the changes on your computer.
After rebooting your computer, put your computer in sleep mode and then check if it is waking up or not.
Fix 2 – Allow the keyboard and mouse to wake up
It may happen is that the power management keyboard and mouse settings are corrupted on your computer.
1.Right-click on the Windows key and click on the “Device Manager“.

2. After that, expand the “Keyboards” device.
3. Then, right-click on the keyboard driver and click on “Properties“.

4. As same as the previous steps, go to the “Power Management” tab.
5. Check the box “Allow this device to wake the computer“.

Do not forget to click on “OK” to save this change.
Same way, you have to repeat this for the mouse settings.
1. Expand the “Mice and other pointing devices“.
2. Right-click on the mouse and click on “Properties“.

3.Next, locate the “Power Management” tab. Click on it.
4. Then, check the “Allow this device to wake the computer” option.

Once you are done, you have to modify the USB controller devices.
5. Expand the “Universal Serial Bus controllers” section.
3. After that, right-click on the first driver in that section and then click on the “Properties“.

4. Again go to the “Power Management” tab.
5. Similarly , Check the “Allow this device to wake the computer“.
Close the Device Manager and put your computer in to sleep and test it out.
Fix 3 – Enable hibernation-
Enabling hibernation on your computer may fix this issue.
1. Click on the Windows icon and write “cmd“.
2. Then, what you need to do is to right-click on “Command Prompt” and choose “Run as administrator“.

3. To enable the hibernation, simply execute this code from the CMD terminal.
powercfg.exe /hibernate off && powercfg.exe /hibernate on
Close Command Prompt window.
Reboot your computer.
After rebooting your computer, put your system on sleep. Now, try to wake your computer.
If the problem is still there, reboot and try the next fix.
Fix-3 Disable Fast startup
1. Press Windows + R key combination together from the keyboard and open run.
2. Write powercfg.cpl in it and click Ok.

3. Click on Choose what the power buttons do from the left menu.

4. Now, click on Change settings that are currently unavailable.
5. Uncheck Turn on Fast Startup.

Fix-4 Change value of CsEnabled string-
1. Press Windows key+R to launch a Run terminal.
2. Type “regedit” in Run window and then click on “OK“.

Registry Editor window will be opened.
3. In Registry Editor window, on the left-hand side, navigate to this header-
HKEY_LOCAL_MACHINE\SYSTEM\CurrentControlSet\Control\Power
4. Now, on the right-hand side of the window, find and double click on “CsEnabled” to edit the value data of it.

5. In Edit D-WORD (32-bit) Value window set the ‘Value data:‘ to “0“.
6. Now, click on “OK” to save the changes on your computer.

Once you have changed the value, close Registry Editor window.
After closing it, restart your computer to witness these changes.
Your problem will be solved.