You install Warzone to play Warzone. Simple enough, right? But Call of Duty HQ has other plans — it drags Modern Warfare II, MWIII, and Black Ops content along for the ride, balloons past 200GB, and then crashes after updates anyway.The size problem comes from bundling: every recent CoD lives inside one shared install now. And the crashes mostly trace back to texture streaming and corrupted update leftovers. Two problems, one launcher. The fixes below handle both (and yes, you can get the install down to about 70GB).
Fix 1 – Trim the Fat With Modify Install
Wondering why a battle royale needs 200GB? It doesn’t. The bundle keeps campaigns and multiplayer modes you might never touch, and you can strip them out from the launcher.
On Steam:
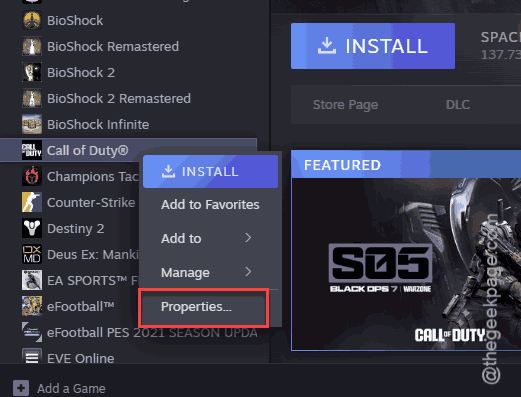
1 – Right-click Call of Duty in your library.
2 – Click Properties.
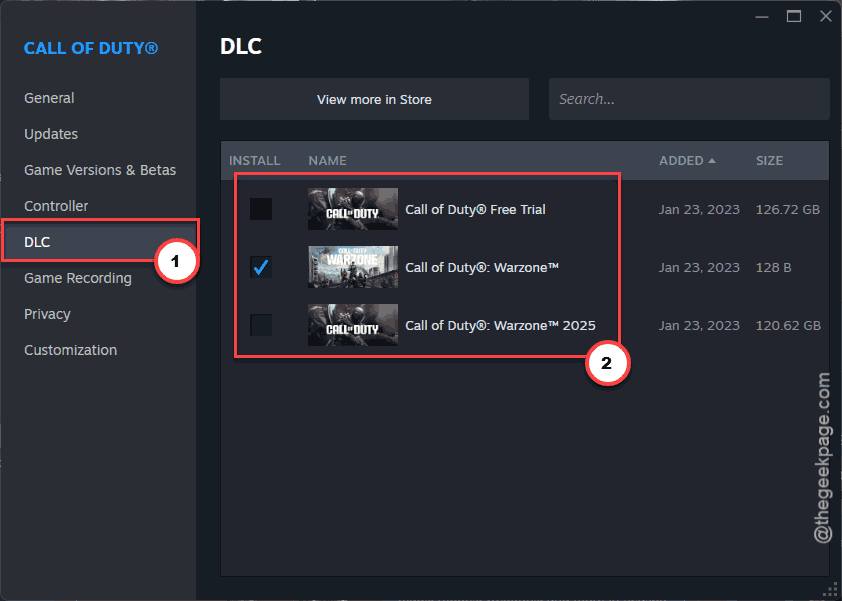
3 – Open the DLC tab on the left.
4 – Uncheck everything except the base game and the mode you actually play (say, just Warzone).
On Battle.net:
1 – Open the Call of Duty page in the launcher.
2 – Click the gear icon next to the blue Play button.
3 – Click Modify Install.
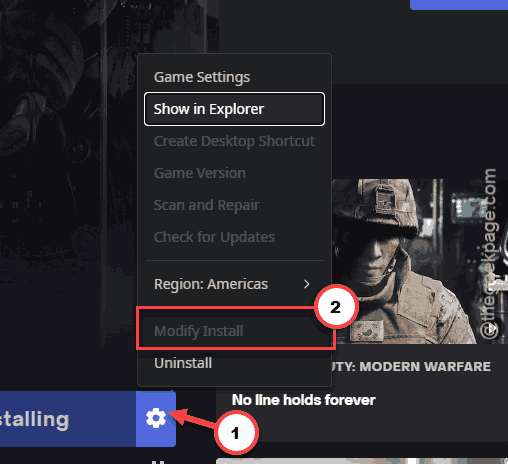
4 – Click Modify Install again under the Game Content section.
5 – Uncheck the campaigns, co-op modes, and older games you no longer play.
6 – Click Confirm and let the client delete the unused files.
That deletion can free over 100GB on the spot. Watch the free-space number climb. Oddly satisfying.
One warning though: players report the launcher corrupting when certain modules get unchecked (the newest BO7 module especially). If the launcher starts misbehaving after this, Fix 2 is the clean way out.
Fix 2 – The Nuke Reinstall
Sounds drastic. But it’s actually the most reliable space fix there is. Instead of fighting the launcher’s module system, you remove the whole thing and reinstall only Warzone. A fresh install lands at roughly 70GB.
1 – Press Windows + I to open Settings.
2 – Click Apps, then Installed apps.
3 – Find Call of Duty, click the three dots (⋯) next to it, and choose Uninstall.
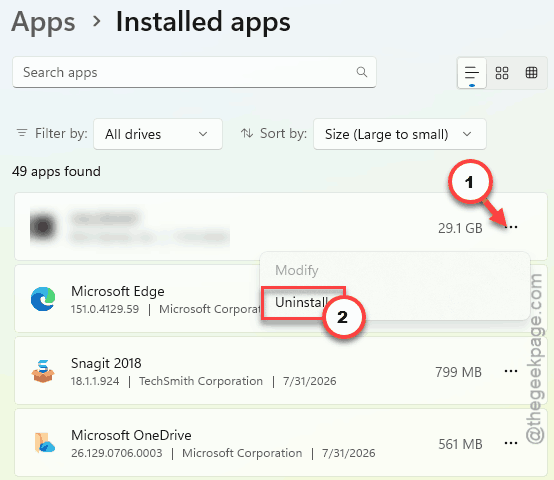
4 – Once it’s fully gone, open your launcher and start a fresh install.
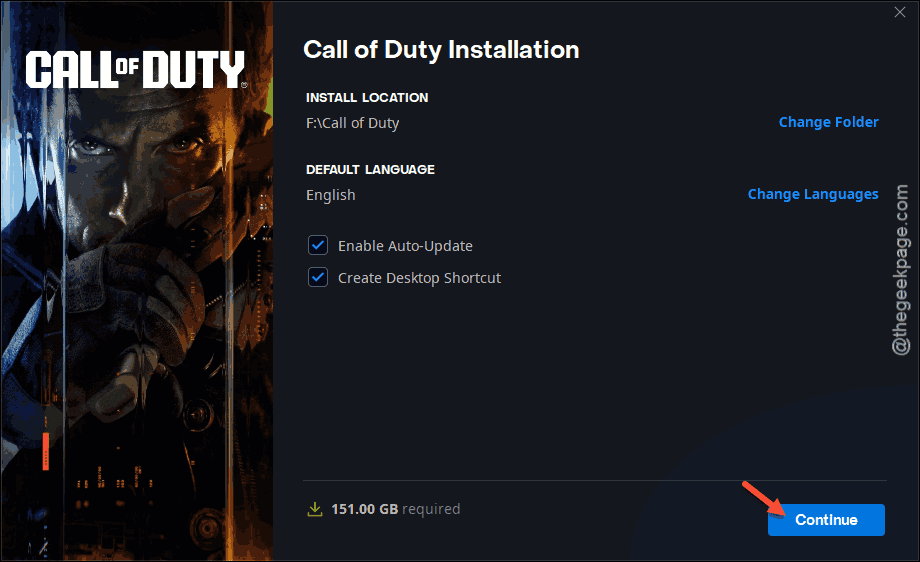
5 – During the install, select only Warzone. Leave every other mode unchecked.
The download takes a while (70GB is still 70GB). But you end up with a clean install at a third of the size — and it clears out the corrupted leftovers that cause crashes too.
Fix 3 – Turn Off Texture Streaming
Crashing mid-match since the last update? This setting is the usual suspect. Texture streaming pulls high-res textures from the internet while you play, and right after updates it’s been crashing the game outright.
1 – Launch Warzone.
2 – Open Settings, then go to the Graphics menu.
3 – Find the Texture Streaming option and turn it off.
4 – Restart the game.
Textures look a touch softer up close. And honestly? You will not notice mid-firefight, but you’ll definitely notice not crashing.
Fix 4 – Force DirectX 11
Still crashing? Try running the game on the older DirectX 11 instead of 12. It takes one launch flag (a short instruction the launcher passes to the game at startup).
1 – Open Battle.net.
2 – Click the gear icon and choose Game Settings.
3 – Tick Additional command line arguments.
4 – Type -DD11 in the box.
5 – Click Done and launch the game.
DirectX 12 is faster on paper. But those extra frames aren’t worth much if your setup keeps crashing — DX11 trades a little speed for a lot of stability.
Fix 5 – Give Windows More Virtual Memory
Warzone is memory-hungry. When your RAM fills up, Windows leans on the paging file (a chunk of disk space it uses as backup RAM). Too small a page file? Crashes.
1 – Click Start, type “advanced system”, and open View advanced system settings.
2 – Under the Performance heading, click Settings.
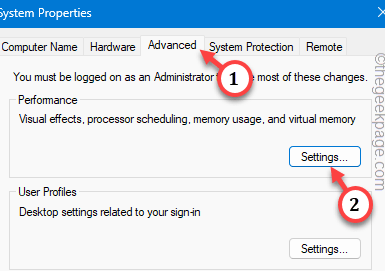
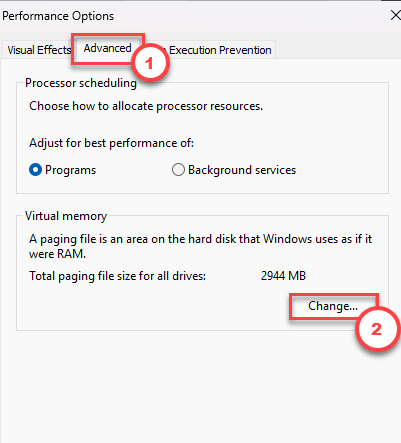
3 – Open the Advanced tab.
4 – Click Change under the Virtual memory section.
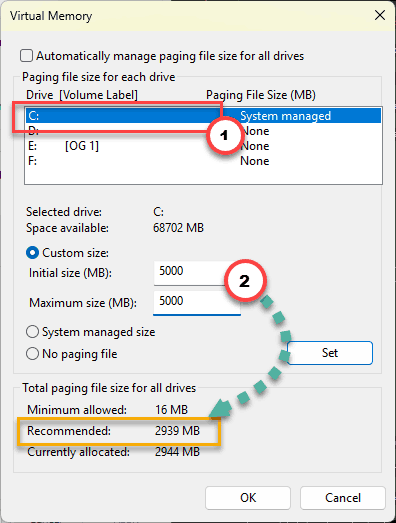
5 – Untick Automatically manage paging file size for all drives.
6 – Select your C: drive and choose Custom size.
7 – Set both size boxes higher than the “Currently allocated” number shown at the bottom of the window.
8 – Click OK and restart your PC.
Check if this works.
Fix 6 – Force a Fresh Executable
If the game’s main .exe file got mangled during an update, no settings change will save it. But there’s a neat trick: rename the file, and the repair scan is forced to download a clean copy.
1 – Open the game’s install folder. In Battle.net, click the gear icon and choose Show in Explorer.
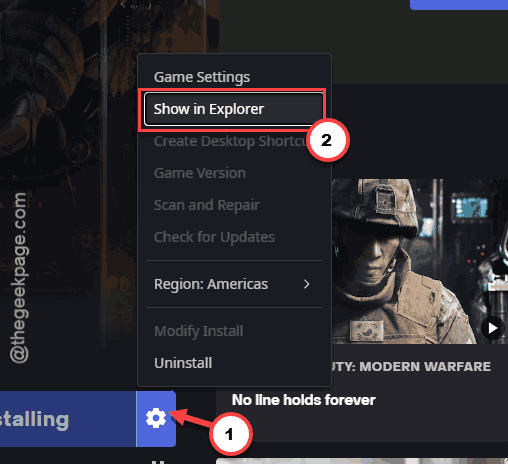
2 – Find ModernWarfare.exe in the folder.
3 – Rename it to ModernWarfare.exe1.
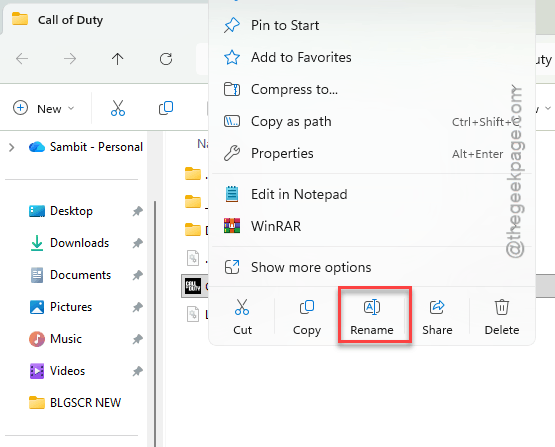
4 – Back in Battle.net, click the gear icon and choose Scan and Repair.
5 – Wait for the scan to finish. It spots the missing file and pulls down a fresh one.
Keep It From Coming Back
– Re-run Modify Install after each season update. New content sneaks back in, and the install regrows fast.
– Keep 100GB or more free on the game drive. Updates and the paging file both need room to breathe.
– Trim through the launcher like in Fix 1, never by deleting game folders by hand. Manual deletion breaks the install.
– Turn texture streaming back on only after a patch specifically fixes it — and test one match first.