WhatsApp is one of the most popular messaging applications being used worldwide, undoubtedly. Though being at the top of the list, WhatsApp is not flawless. There are many issues that are being reported by many WhatsApp users globally. One such issue is the downloaded WhatsApp media not showing in the gallery issue. Though this might sound like a bug, it is actually a feature! Oh, I know I sound like the software developer guy now. Jokes apart, this is totally a really cool feature that WhatsApp has rolled out. Using this feature, you can enable or disable showing the downloaded WhatsApp media in your device’s gallery.
In this article, we have explained in detail how you can master this simple trick and get that big bug of yours resolved instantly; though that bug is actually a feature! So, what are you waiting for? Let’s dive in, shall we?
Note: Well, there is a small possibility that it is actually a bug and not a feature. In that case, you can follow our solutions to get that bug killed!
Solution 1: By Changing Media Visibility Settings
Section 1: How to Enable Showing Downloaded WhatsApp Media in Gallery
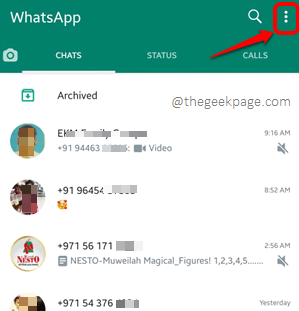
Step 1: Launch WhatsApp Messenger and click on the More Options icon at the top right corner of the screen.
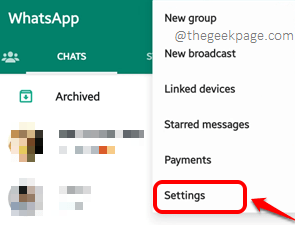
Step 2: From the little menu that pops out, click on the Settings option.
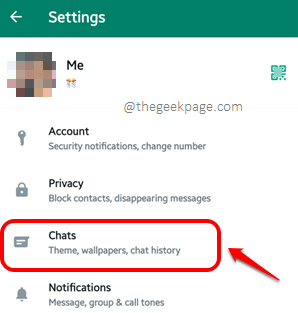
Step 3: Now on the Settings screen, click on the Chats option.
Step 4: On the Chats screen, under the Chat settings section, turn the toggle button to On state against the option Media visibility.
This should instantly enable showing the downloaded WhatsApp media on your Gallery. Enjoy!
Section 2: How to Disable Showing Downloaded WhatsApp Media in Gallery
Now if you would like to disable showing the downloaded WhatsApp media in your Gallery, you just need to follow the same steps as in the section above. But in the last step, turn off the toggle button against the Media visibility option. Yes, it is as simple as that.
If the above solution doesn’t fix the issue for you, then it could actually be a bug than a feature. In that case, please try out the solutions listed below one by one to get your issue resolved in a matter of seconds.
Solution 2: Change Media Auto-download Settings
Step 1: Launch WhatsApp and click on the More Options icon located at the very top right corner of the screen.
Step 2: Click on the Settings option next.
Step 3: From the Settings screen, click on the Storage and data option.
Step 4: Now under the Media auto-download section, click on the option that says When using mobile data.
Step 5: Check the checkbox corresponding to the option Photos and click on the OK button.
Step 6: Do the same for the other 2 options, When connected on Wi-Fi and When roaming options under the Media auto-download section.
That’s it. You can now check whether the issue is resolved or not.
Solution 3: Check your Internal Storage
Every Android device would have an application to manage the files and folders. On some phones, it could be in the name My Files, on some other phones, File Manager, etc. Find the file manager on your device and launch it to check the internal storage remaining in your device. You should have at least 500 MB of storage available. Though it is preferred to have at least 1 GB of storage remaining always.
Solution 4: Update WhatsApp Messenger to the Latest Version Available
Step 1: Launch the Play Store application and search for WhatsApp using the search bar at the top.
From the search results, click on the WhatsApp Messenger application.
Step 2: If you have any pending updates available, then you will have the Update button on this screen. Click on the Update button to get your WhatsApp updated to the latest version available.
Note: I don’t have the Update button available because my WhatsApp application is up-to-date.
Solution 5: Delete the .nomedia File
Step 1: Launch the My Files application.
Step 2: Click on the Internal Storage option.
Step 3: Hit the Search bar at the top of the screen.
Step 4: Start typing in WhatsApp on the search bar and click on the WhatsApp folder from the search results that start to appear.
Step 5: As next, at the top right corner of the screen, click on the 3 vertical dots icon.
Step 6: Now click on the Settings option from the list of options available.
Step 7: Under the section File management, turn on the toggle button corresponding to the option Show hidden system files. Then hit the Back button at the top.
Step 8: You will be able to see all the hidden files now. Open the .Shared folder.
Step 9: Inside the .Shared folder, find and long press on the .nomedia file to select it. Once it is selected, hit the Bin icon at the bottom to delete it.
Solution 6: Restart the Device
If none of the above solutions fixed the issue for you, try restarting your Android device once. This might fix the issue readily. If the issue is still not gone, please head on to the last and final solution.
Solution 7: Uninstall and Re-install the Application
The very last solution that you can try is to uninstall the application and then install it back. Before proceeding with this solution, make sure you have taken a backup of WhatsApp chats and files. Once everything is ready, go ahead and uninstall the WhatsApp application. After that, try installing the application back and check if your issue is resolved or not.
Please tell us in the comments section which method fixed the issue for you.
Stay tuned for more simple and super useful technical solutions, how-tos, hacks, tips, and tricks! Happy Geeking!


