Visual Studio, an integrated development environment, is used by many Windows apps. Sometimes, due to some reasons, access to Microsoft Visual Studio may be denied with just an error prompt “Unable to start program” on the screen. As a result, the app may won’t startup on the system without sufficient access to Visual Studio.
Workarounds –
1. Disable the antivirus program. Then, run the app once more. Test if that works.
2. Run the Visual Studio with administrative privileges. This should help you resolve the issue.
Fix 1 – Relocate the installer to the system drive
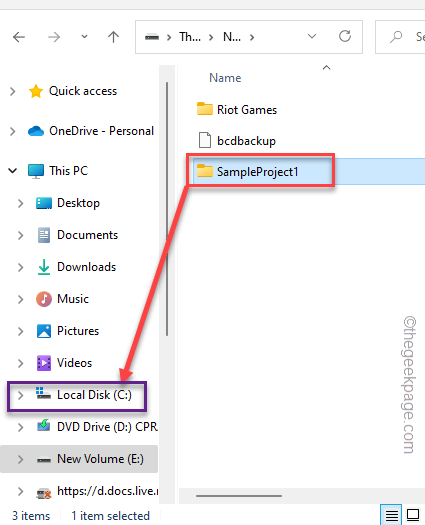
You should move the installer file to the C: drive. Check if this works.
1. Open the File Explorer and locate the installer file on the drive.
2. Once you have located it, select it and copy it from there.
3. Now, navigate to the C: drive.
4. Then, press the Ctrl+V keys together to paste it there.
Now, you can easily run this on your system. After that, check if this works.
Fix 2 – Make sure the path is correct
Before you delve into the bigger solutions, make sure you are executing on the correct path.
Sometimes users tend to execute the directory of the compiled executable, instead of the executable file. Make sure that isn’t the case.
Fix 3 – Use the administrator account
You should use your administrator account to perform this operation, the local account won’t work.
If you have the credentials of an administrator account, use it to log in and try to run the application.
Otherwise, you can invoke the hidden administrator account, this way –
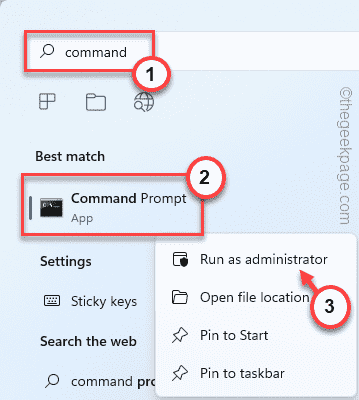
1. Click on the Win icon on the taskbar and type “command” there.
2. Then, just right-tap the “Command Prompt” and click “Run as administrator” to access the terminal.
3. Once the terminal appears, just put this line and hit Enter to activate the administrator account.
net user administrator /active:yes
Once you have done that, close the terminal.
Now, launch the Visual Studio project and test whether it is working or not.
[
NOTE –
Once the need for the account is over, you can disable it using this command –
1. Launch the Command Prompt with administrative rights.
2. Then, run this code to deactivate the administrator account.
net user administrator /active:no
]
Fix 4 – Check the startup project
Along with the proper execution path, you have to make sure that you have selected the correct startup project.
1. Go to the project location.
2. Then, right-click it and tap the “Set StartUp Projects…” option from the context menu.
Hope this resolves your problem.
Fix 5 – Disable the real-time protection
Real-time protection can detect the executable file as a malicious file and cause this issue.
[These are the steps to disable the Real-time protection on Windows Security. The term “real-time protection” may differ in other antivirus software. ]
1. Type “Windows security” in the search box beside the Windows icon.
2. Then, click on “Windows Security” to open it up.

3. In the Windows Security window, tap on “Virus & Threat protection“.
4. Now, scroll down and tap on the “Manage settings“.
5. Now, on the next screen, toggle the “Real-time protection” option to “Off” mode.
6. This way, turn the “Cloud-delivered protection” setting to “Off“.
Once you have switched off these protections, close the Windows Security page. Then, run the build again on your system and test.
[
NOTE –
Windows Security provides protection for your system from outside threats. So, it is recommended you turn on the Real-time protection and Cloud-delivered protection. Test if this works.
]
Fix 6 – Exclude the new exe in antivirus
Antivirus software can presume the executable file as a threat and quarantine it automatically.
We have shown how to put Settings.exe in the exclusion list of the antivirus in Windows Security. The steps should be the same for any other antivirus software as well.
1. Open the Windows Security app.
2. On the left-hand pane, tap the “Home icon“ and then click on the “Virus & threat protection“.
4. If you scroll down to the ‘Virus & threat protection settings’ click on the “Manage settings“.
5. Here, if you scroll down a bit, you will see the ‘Exclusions’ section. Click “Add or remove exclusions“.
7. Now, tap the “Add an exclusion“.
8. You are going to select a particular file. So, choose the “File” from the drop-down.
9. Then, navigate to the location of the executable file.
10. Select it and tap “Open” to add the file to the exclusions list.
Now, you can close the Windows Security and try to run the executable file again.
Fix 7 – Reset the Visual Studio Settings
You can reset the Visual Studio settings.
1. Launch the Visual Studio IDE.
2. Now, tap the “Tools” in the menu bar and tap the “Import and Export Settings…” option.
3. Then, choose the “Reset all settings” option.
4. After that, tap “Next” to proceed.
5. At the next step, choose “Yes save my current settings”.
6. After that, click “Next“.
7. Coming to the final step, select the “General” from the list.
8. Finally, tap “Finish” to complete the whole process.
Once the Visual Studio is reset, try to run the build again. Check if the issue still persists.
Fix 8 – Change the UAC settings
You can change the User Account Control (UAC) settings to fix the problem
1. You have to press the Windows key and write “UAC“.
2. Then, click the “Change User Account Control settings“.
This will open up the User Account Control settings.
3. On the Choose when to be notified about changes to your computer screen, slide the slider down to the “Never notify“.
4. Then, click “OK“.
Try to run the build again and this time you won’t see the error message again.
Fix 9 – Run SFC, DISM scan
1. You can initiate both scans from the CMD terminal. So, press the Windows key and the R key.
2. When the Run box appears, write “cmd” in the Run panel. Just press the Ctrl+Shift+Enter keys together.

3. Paste this code in the terminal and hit Enter.
sfc /scannow
Allow Windows a while to run and complete the scanning process.
4. Once the scanning completes, run this code to restore the system files with a DISM check.
DISM.exe /Online /Cleanup-image /Restorehealth
Once you have run the DISM check, close the terminal. Once the test is complete, run the build again.

