DDE or Dynamic Data Exchange server protocol allows the applications on your device to exchange data within the OS. Usually, this old technology works well and doesn’t hinder any usual essential functions like system startup or shutdown. But, some users have recently complained about an error that has prohibited the system shutdown. It reads like this “DDE Server Window: explorer.exe – Application Error” on the system screen. Try out these solutions one by one and check which works for you.
Fix 1 – Use the alternative shutdown feature
If you want a quick workaround, this solution is just for you. Use the Run box to quickly shut down the system.
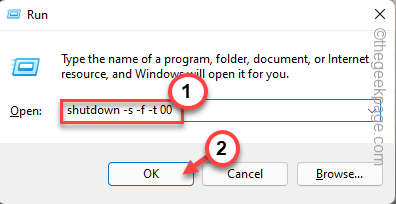
1. At first, tap the Windows key+R keys together to call the Run box.
2. There, just write this and click “OK“.
shutdown -s -f -t 00
Wait for the system to shut down quickly. This trick should work on your Windows device.
Fix 2 – Use the Registry
Windows take a little while to close all the background services, and process threads even after you have closed the main app. Create this value to quicken this process.
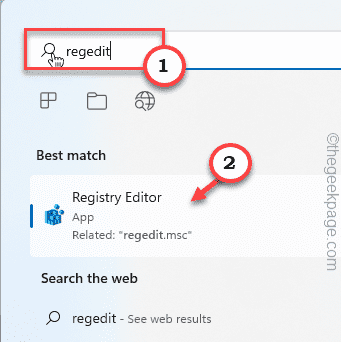
1. At first, press the Windows key and type “regedit” in the search bar.
2. Then, tap “Registry Editor” to open the Registry Editor utility.
Warning – System registry is one of the most important parts of your system. So, before you make a single change in the registry, we suggest you create a system registry backup.
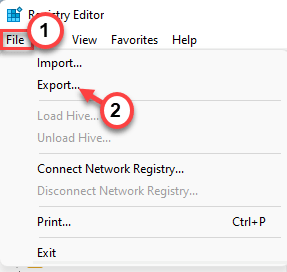
a. When you have opened the Registry Editor page, click “File” and “Export“.
b. Then, store the backup on your computer.
This backup will be helpful if your system crashes.
3. Go to this specified location through the left-hand pane
Computer\HKEY_LOCAL_MACHINE\SYSTEM\CurrentControlSet\Control
4. Go to the right-hand side.
5. Look for the “WaitToKillServiceTimeout” string value.
6. Just, double-tap the value to edit it.
7. Next, input the value in the ‘Value Data:’ box.
2000
8. Then, click “OK” to save it.
Exit the Registry Editor and restart your machine. Now, when your system restarts try shutting down the system.
Check whether you can see the error message.
If the error returns, follow these steps –
1. Open the Registry Editor, once again.
2. But this time, head on to this location –
HKEY_USERS\.DEFAULT\Control Panel\Desktop
3. When you have reached that location, take a look on the right-hand pane to find the “AutoEndTask” value.
If you can’t find any such value, you have to create one.
4. Just right-tap and click “New>” and tap “String Value” to create a new string value.
5. Then, rename this string as “AutoEndTask“.
6. After this, double-tap this new value to adjust it.
7. Next, set the value to “1“.
8. Then, click “OK” to save the change.
Close the Registry Editor screen again and restart your computer. This registry edit won’t take effect until you restart the system.
Once the machine boots up, you won’t face any DDE Server issues again.
Fix 3 – Restart the File Explorer
Restart the process that is causing the problem. Usually, it is the File Explorer which is the main culprit. So, restart it.
1. You can only restart File Explorer if it is already running. Otherwise, you can just press the Windows key+E keys together to open it.
2. Now, right-tap the Windows key in the middle of the taskbar and click Task Manager.
3. This brings up the Task Manager.
Once it does open up, look for the “Windows Explorer” process in the Processes tab or in the Background Processes tab.
4. Then, right-click on “Windows Explore” and tap “Restart”.
Your system may appear to be unresponsive just for a while. But, everything will become normal within 5-10 seconds.
This will reboot the Windows Explorer process. Now, again try shutting down the system.
Check if this works.
Fix 4 – Pause the antivirus
Try stopping the antivirus software on your computer and try shutting down the system.
1. On your taskbar, tap the arrowhead to see the list of hidden app icons there.
2. Then, you have to right-tap the antivirus software and tap “Pause protection” to pause the antivirus temporarily.
This way, you can pause the antivirus and check. If the issue still persists, go to the next solution.
Fix 5 – Disable the automatic hide taskbar
Some users have pointed out the automatic hide settings of the taskbar as the real reason behind this issue.
1. Right-click on your desktop and tap the “Personalize” option on the context menu.
This will directly lead to the Personalization settings page.
2. Here, tap “Taskbar” on the right-hand pane.
3. Now, click on the “Taskbar behaviors” settings to explore it.
4. This taskbar setting comprises various taskbar-related toggles.
5. So, ensure the “Automatically hide the taskbar” setting is in the unchecked state.
Now, just reboot the system once. Check if the issue still persists.
Fix 6 – Update the system
You should install the latest updates on your device and test them.
1. At first, open Settings. Pressing the Windows key+I keys together should do it.
2. Then, tap “Windows Update” settings on the left pane.
3. Now, just tap the “Check for updates” to check for the latest updates available for your system.
Wait for Windows to download the packages and install it on your system.
4. Once Windows has finished installing the update package, it will prompt you to restart the system.
5. So, just click the “Restart now” option to restart the system.
As the machine is rebooting your system completes the update process.
Once the process is complete, test if the issue still persists. Check if this works.
Fix 7 – Disconnect the second monitor
If you are using multiple monitors, try disconnecting the second monitor from your computer and try shutting down your system. It can be a quick workaround that solves the issue.
Fix 8 – Uninstall the Adobe Acrobat
Uninstalling Adobe Acrobat Reader has resolved the issue for some users.
1. You can open the Run dialog box using the Win key and the R key.
2. Then, type this in the box and hit the Enter key from the keyboard.
appwiz.cpl
3. When you reach the Programs & Features utility page, find out the “Adobe Acrobat” application.
4. Just right-click that app and tap “Uninstall“.
5. Then, tap the “Yes” prompt to uninstall it.
Now, just follow the on-screen steps to uninstall the app and its components from your computer.
Check if this solves your problem. You won’t face any further issues again.


