The Local Security Authority Protection is responsible for the application and maintenance of security policy across devices in a domain. So, if you are seeing this message “This change requires you to restart your device.” then there is a problem implementing this on the devices.
Workarounds –
1. It is normal that the Local Security Authority Protection needs the system to be restarted for initialization. So, restart the system once for this to work.
2. Some antivirus like Avast, gives LSASS protection for their devices. In that case, disabling it from the antivirus settings or uninstalling the software should help you activate it in Windows Security.
Fix 1 – Configure the LSASS group policy settings
The LSASS-protected process policy overwatches the configuration under which these policies enact on the system.
Step 1 – Open Group Policy Editor. Now, type “group policy” in the search box.
Step 2 – Then, tap “Edit Group Policy” to open it.
Step 3 – Go ahead straight to this point –
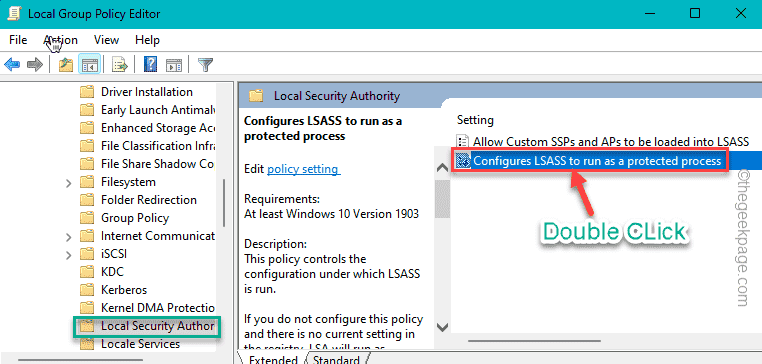
Computer Configuration > Administrative Templates > System > Local Security Authority
Step 4 – On the opposite side of the page, you will find the “Configure LSASS to run as a protected process“. Just double-tap the service to open it.
Step 5 – On the Configure LSASS to run as a protected process page, set it to “Enabled” mode.
Step 6 – In the Options tab, set the “Configure LSA to run as a protected process” to “Enabled with UEFI Lock“.
Step 7 – After this, click “Apply” and “OK” to apply the policy on your system.
The policy change won’t take effect until the system restarts. So, you must restart the system.
After restarting, make some changes in the Security and check what it says.
Fix 2 – Modify LSA registry values
You can edit the LSASS registry values to fix the issue.
Step 1 – Just tap the “Search 🔎” box and begin to write “registry” in the search box.
Step 2 – In the elevated search results, tap “Registry Editor” to open that up.
Warning – You are going to alter a particular value in the Registry Editor. It usually works well and doesn’t go wrong. But sometimes, it may lead to other issues, like part of the system not working properly. So, we suggest you create a registry backup before you make any changes.
a. Once you have opened the Registry Editor screen, tap on “File” from the menu bar.
b. From that context menu, tap “Export” to make a new registry backup.

Just store this backup in a discrete location on your computer. You can restore the system back to normal again if this goes wrong.
Step 3 – After this, copy this address from here and paste & hit Enter to navigate to it –
Computer\HKEY_LOCAL_MACHINE\SYSTEM\CurrentControlSet\Control\Lsa
Step 4 – On the opposite side of the page, if you look, you can see the “RunAsPPL” value.
Step 5 – Then, double-tap the value to edit it yourself.
Step 6 – Set the RunAsPPL ‘Value data:’ to “1“.
Step 7 – After this, click “OK“.
After modifying this value, exit Registry Editor. You can now restart your computer.
Fix 3 – Reset Windows Security
If none of the registry tricks or the group policy didn’t work out, resetting the Windows Security should do the trick.
Step 1 – Open Settings. Head on to the “Apps” area.
Step 2 – Now, on the other hand, click “Installed apps” to open it.
Step 3 – Now, find the “Windows Settings” going down through the list of apps.
Step 4 – Then tap the three-dot of Settings and click “Advanced options“.
Step 5 – Scroll down to find the Reset option. Just, tap “Reset” and click “Reset” another time to reset Windows Security.
Step 6 – Now, use the search box to type “security“.
Step 7 – Then, tap “Windows Security” to open that directly from the search results.
Step 8 – When Windows Security appears, go to the “Device Security” setting.
Step 9 – Inside that setting, open the “Core isolation details“.
Step 10 – Inside this setting, you can find the “Local Security Authority Protection” service.
Step 11 – Turn it ON.
You won’t face a problem. Your problem will be solved for sure.

