When Windows users are unable to browse or load the webpages on the browser on the system, they happen to think of all the factors that could be responsible for this issue.
Whereas many windows users when troubleshot this issue on their system, it threw an error message saying “The DNS server isn’t responding” to which the users do not know how to fix this in order to use the stable internet connection.
We have come up with a solution in this post, which will definitely be going to fix this problem.
However, try these workarounds beforehand –
- Try to restart the router and check if this was causing the problem.
- Change the browser application. That is if you are using the Microsoft Edge browser, then close it and open Google Chrome or Firefox to check if the browser application is causing the problem.
If the workaround did not help in resolving the issue, then please continue reading to see the solution.
Fix 1 – Modify the DNS Server Address
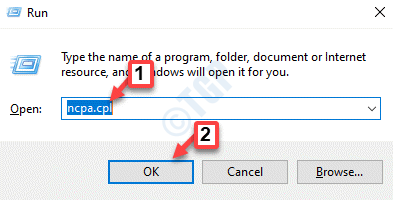
Step 1: Open the Run command box by pressing the Win + R keys together on the keyboard.
Step 2: Type ncpa.cpl in the run box and click OK to open the Network Connections page.

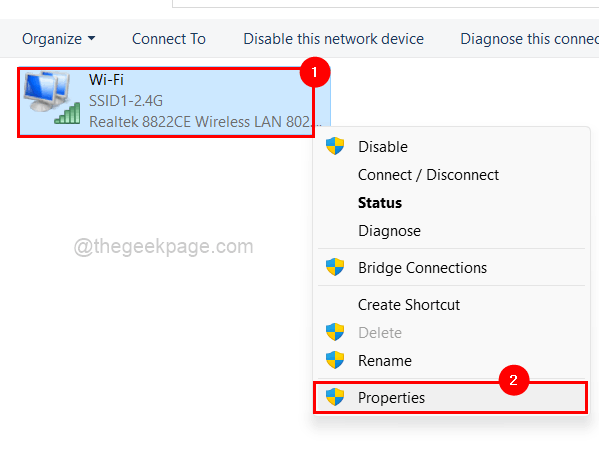
Step 3: On the Network Connections page, right-click on the Wi-Fi adapter if you are using Wi-Fi for the internet. Otherwise, right-click on Ethernet if you are using a cable connection.
Step 4: Select Properties from the context menu as shown below.

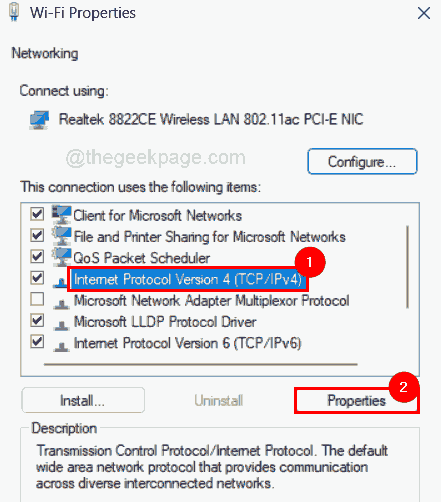
Step 5: Click on Internet Protocol Version 4 (TCP/IPv4) from the listed items and tap on Properties just below it as shown in the below image.

Step 6: In the Internet Protocol Version 4 Properties window, click the Use the following DNS server addresses radio button and enter the values 208 . 67 . 222 . 222 in the Preferred DNS server and 208 . 67 . 220 . 220 in the Alternate DNS server.
Step 7: At last, click OK to make changes and close the properties window.

Step 8: Close the Wi-Fi adapter properties window also by clicking OK.

Step 9: Close the Network Connections page.
Step 10: Press the Win + A keys together to open the Action Center on the taskbar.
Step 11: Click the right arrow in the Wi-Fi option to view all the available and connected connections as shown below.

Step 12: Click Disconnect for disconnecting the existing Wi-Fi connection on the system.

Step 13: After it gets disconnected, Reconnect it again by clicking Connect.

Now the problem on the system regarding ‘DNS server isn’t responding’ must be solved. If not, try our other fixes given below.
Fix 2 – Flush the DNS Cache & also Reset the IP address
Step 1: Press the Windows and R keys together which opens the Run command box on your system.
Step 2: Type cmd in the run textbox and press the CTRL + SHIFT + ENTER keys together to open the Command Prompt as admin.
NOTE: Accept the UAC window when prompted on the screen to continue.
Step 3: After the command prompt window opens up, execute the below-given commands one after the other for flushing the DNS cache as shown below.
ipconfig /flushdns

ipconfig /registerdns

Step 4: Now copy and paste the command and hit the Enter key to execute it for releasing and renewing the IP address.
ipconfig /release

ipconfig /renew

Step 5: Once it is done, close the command prompt window and reboot your system once and check if the problem still persists or not.
Fix 3 – Update the Network Adapter Driver
NOTE: Before proceeding, please download the latest version of the Network adapter driver from its manufacturer’s website.
Step 1: Press the Windows key on the keyboard and type device manager.
Step 2: Tap the Device Manager from the search results as shown below.

Step 3: Double-click on the Network adapters option to expand it.
Step 4: Later, right-click on the Network adapter and click Update driver from the list as shown below.

Step 5: Once the update window appears, click the Browse my computer for drivers option & then, browse and select the downloaded version of the network adapter on your system.

Step 6: Follow any on-screen instructions to complete the update process.
Step 7: Once over, restart the system and then, see if the problem got fixed.