What happens if you move some core files from their location to another and then try to access them from their previous shortcut file? It pops up an error message, “The item that this shortcut refers to has been changed or moved.“, with a prompt to remove the shortcut itself. This issue is nothing but a target mismatch and you can easily get around it following a very few steps.
Fix 1 – Check the Target location
As I have mentioned, if there is a mismatch between the target location of the shortcut file, it will spew up this error message.
1. Open the desktop or the location where the shortcut file is located.
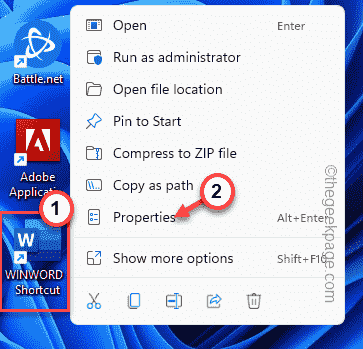
2. Once you are there, just right-click on that shortcut file and click on “Properties“.
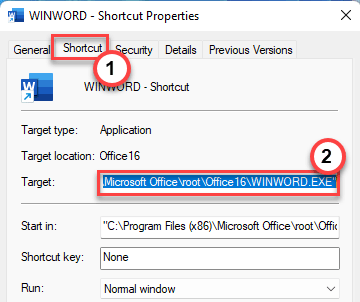
3. Once you have access to the Shorcut Properties, head on to the “Shortcut” page.
4. Now, here you may see various parameters of that shortcut file.
5. Just, take a look at the “Target:“. It shall direct you to the address of the core executable file. Now, select the address in that box (without the “”) and press the Ctlr+C keys together.
Example – The address that we have copied is –
C:\Program Files (x86)\Microsoft Office\root\Office16\WINWORD.exe
6. Press the Win key+E keys.
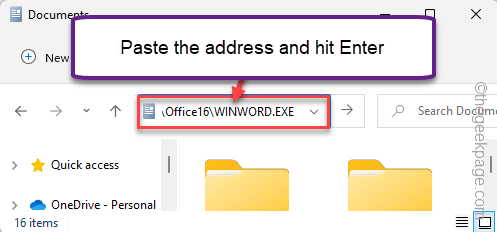
7. When the File Explorer opens up, paste that location that you have copied in the address bar and hit Enter.
If this directly launches the executable file, there is no issue with the path. You may consider moving the shortcut file to another location (any subdirectory of the drive where the app is installed) and trying to access it.
If you encounter any error message, or the app doesn’t launch at all, there is something wrong with the shortcut file. Jump on to the next solution to create a new shortcut.
Fix 2 – Make a new shortcut
If you want a quick resolution, delete the old shortcut file and create a new one.
1. At first, just select the corrupt shortcut file and delete it from the system.
2. Just open the File Explorer and head on to the location of the app that the shortcut was linked to.
[ If you are trying to find the location of an app, it’s easy.
a. Just search for the app from the search box.
b. Then, right-tap the app in the search results and click on “Open file location“.
This shall directly lead you to the app location.
]
3. Once you have reached there, just right-tap the executable file and tap on the “Show more option“.
4. Now, tap on the “Send to” option.
5. Then, from the side pane, select the “Desktop (shortcut)“. This will send the app shortcut file directly to the desktop screen.
Now, this will create a new shortcut to the app on your desktop. You can use this one to access the app.
Fix 3 – Repair the app
If you are facing this issue with any Microsoft 365 apps (like Word, Excel, etc.) you can just repair the app to fix the issue.
1. You have to press the Win key and the X keys at once.
2. Then, tap “Apps and Features” to access it.
3. Once you are there, scroll down and look for your Office app.
4. Now, tap the three-dot menu and tap “Modify“.
5. On the Office page, choose “Quick Repair” to find a quick resolution to this issue.
6. Then, tap “Repair” to start the repair quickly.
Additionally, you can use the Online Repair option as well if the quick repairing process fails to fix your issue.
This way, you can quickly repair the Office files. This will definitely help you out.
Fix 4 – Uninstall and reinstall it
If repairing the app itself doesn’t work, you can uninstall and reinstall the Office package on your system to fix this issue.
1. You have to press the Windows key+X keys together.
2. Just type “appwiz.cpl” and click “OK“.
3. Now, just look for the Office app on your system.
4. Once you have found it, select the app and tap “Uninstall” to uninstall the app from your system.
Just follow the on-screen instructions on the Office uninstaller to uninstall it from your system.
Once you have uninstalled it, restart the system. Then, reinstall the Office package on your system using the Microsoft Office installer. It will automatically create a shortcut or you can create one manually.


