When working on a Microsoft Windows Server system, you try to sync it’s time with another time source (external NTP server), you may often come across an error “The Computer did not Resync because no Time Data was Available“. So, to sync the time between the internal and the external time source, you need to execute the “w32tm /resync” command. The command needs to be either executed on the domain or on the client’s system. This error mainly arises due to an incorrect configuration in the Group Policy of the Windows Time Service. Fortunately, the “The Computer did not Resync because no Time Data was Available” error in your Windows 10 PC can be fixed. Let’s see how.
Method 1: Edit Group Policies
Below are two solutions considering, whether you are working on a domain controller or on a local computer.
When Working on a Local Computer
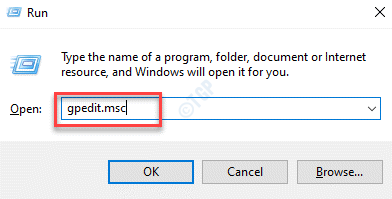
Step 1: Right-click on the Start menu and click on Run to open the Run command window.

Step 2: In the Run command box, type gpedit.msc and press OK to open the Local Group Policy Editor.

Step 3: On the extreme left side of the Local Group Policy Editor window, click to expand Computer Configuration.
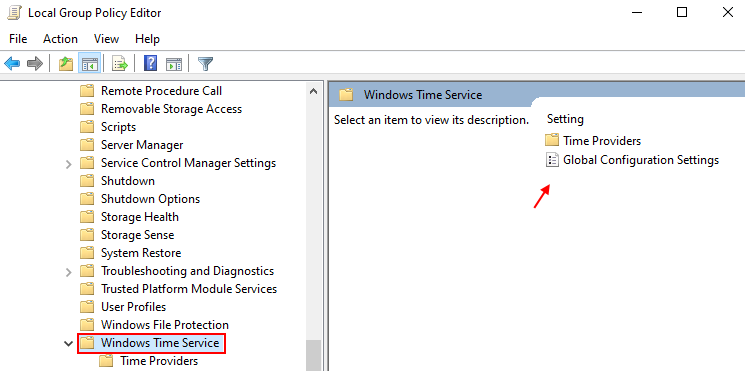
Step 4: Then navigate to Administrative Templates > System > Windows Time Service.
Now, left click on the Windows Time Service folder.
Step 5: Now, go to the right side of the Local Group Policy Editor window and double-click on Global Configuration Settings.

Step 6: In the Global Configuration Settings window, select the radio button next to Not Configured.

Press Apply and then OK to save the changes and exit.
Step 7: Now, again on the extreme left side of the window, click to expand the Windows Time Service folder and select the Time Providers folder.

Step 8: On the right side of the window, double-click on the Configure Windows NTP Client, Enable Windows NTP Client, and Enable Windows NTP Server one by one.
Step 9: Now, select the radio button next to Not Configured for each of them.
Press Apply and then OK to save changes and exit.
Now, restart your PC for the changes to be effective and check if the error is resolved.
When Working on a Domain Object
Step 1: Open the Run Command window by pressing the Win + R keys together on your keyboard.
Step 2: In the Run command search box, type dsa.msc and hit Enter to open the Active Directory Users and Computers Microsoft Management Console.
Step 3: Now, in the newly opened window, right-click on box that contains the Group Policy option that you want to edit.
Step 4: From the context-menu, select Properties.
Step 5: In the ContainerName Properties window, go to Group Policy and click on Edit.
You can now modify the Group Policy Editor.
Method 2: Make Changes to the Registry Editor
This method should be carried out on the homegroup, workgroup, or on the host computer using a centralized host system. So, edit the registry editor carefully:
Step 1: Press the Win + R hotkey on your computer to launch the Run command box.
Step 2: In the search field, write regedit and hit Enter to open the Registry Editor window.

Step 3: In the Registry Editor window, navigate to the below path:
HKEY_LOCAL_MACHINE\SYSTEM\CurrentControlSet\Services\W32Time\Parameters
Now, go to the right side of the window and double-click on Type.
*Note – If the Type key does not exists, right-click on an empty space, select New and then select String Value. Now, rename the new String Value as Type.

Step 4: In the Edit String dialogue box that opens, navigate to the Value data field and change the value to NT5DS.
Press OK to save changes and exit.

*Note – Before making any changes to the Registry settings, make sure you create a backup of the registry data. This will help you recover any lost data during the process.
Method 3: Restart Windows Time Service
This method will also restart the complete process, while it tries to fix the issue if it’s cause due to a bug.
Step 1: Press the Win + X shortcut key and select Run from the menu.

Step 2: This will open the Run command window.
Here, type services.msc in the search field and press OK to open the Services window.

Step 3: In the Services window, go to the right side and look for Windows Time.
Double-click on it.

Step 4: It opens the Windows Time Properties window.
Under the General tab, go to the Startup type field and make sure that it’s set to Automatic.

Step 5: Now, go to the Service status section. If the Service is running click on Stop.

Step 6: Then click on Start button to start the service again.
Press Apply and then OK to save changes and exit.

*Note – But, if you see an error message when you click on Start:
“Windows could not start the service on Local Computer. Error 1079: The account specified for this service differs from the account specified for other services running in the same process.”
In such a case, follow the below steps to fix the issue:
Step 1: Right-click on Start and select Run.

Step 2: In the Run command window, type services.msc to open the Service manager window.

Step 3: In the Services window, on the right side of the pane, scroll down and double-click on the Windows Time service.

Step 4: In the Properties window, go to the Log On tab and select the radio button next to This account and click on the Browse button.

Step 5: In the Select User dialogue box, click on the Advanced button below.

Step 6: In the Next window, click on Find Now.
It will generate a list of Names in the Search results section.
Select the desired account name from the list and press OK.

Step 8: Back in the Select User dialogue box, click on the Check Names button.
Press OK to return to the Windows Time Properties window, in the Log On tab.

Step 9: Now, add the Password and the Confirm password field as the prompt asks you to.
Press OK to save changes and exit.

Restart your PC and “The Computer did not Resync because no Time Data was Available” error should be gone.
Method 4: Run Windows Time Service Command
Step 1: Press the Win + R keys together on your keyboard to open the Run command window.
Step 2: In the Run command window, type cmd in the search field and press the Ctrl + Shift + Enter keys at once to open the Command Prompt window with admin rights.

Step 3: In the elevated Command Prompt window, run the below command and hit Enter:
net stop w32time
net start w32time
This will restart the Time service.
Step 4: Now, execute the below command:
w32tm /config /update
This command will ask the time sync service to utilize the changes.
Step 5: Now, run the below command in the Command Prompt window a and hit Enter:
w32tm /resync /rediscover
This will reset the time of the local computer as opposed to the time server.
*Note – Even if you see the below error message, the resync process is actually successful:
The computer did not resync because no time data was available.
Also, make sure that the Windows Firewall is not blocking the ports required by the Time service. If it is, disable the Firewall permissions.
Solution 2: For Those Using the Older Version of Windows
Step 1: Press the Win + X shortcut key on your keyboard to launch Run command.

Step 2: Type cmd in the Run command search field and press the Ctrl + Shift + Enter keys at once to launch the Command Prompt in elevated mode.

Step 3: In the Command Prompt (admin) window, type the below command and hit Enter:
w32tm /config /manualpeerlist:time.windows.com,0x1 /syncfromflags:manual /reliable:yes /update

Once completed, restart your PC and check if the time sync issue is gone.