During the manual installation of the new redistributable library or Windows Update from a standalone installer, you may see this error message – ‘Some security settings are missing or have been changed. In some cases, you may also note the Error Code associated with it – ‘0x80070424’. If you are facing this issue, don’t worry. This problem has a few quick and easy resolutions. Just follow these fixes.
Fix 1 – Re register WUAUENG.DLL
1. Search cmd in windows 10 search box.
2. Now, Right click and choose run as administrator
3. Now, copy and paste the command given below and hit enter key.
%SYSTEMROOT%\SYSTEM32\REGSVR32.EXE %SYSTEMROOT%\SYSTEM32\WUAUENG.DLL
4. Close the cmd window and try again.
Fix 2 – Reboot the TrustedInstaller service
This problem is associated with the Windows Modules Installer service. So, restarting it should solve the problem.
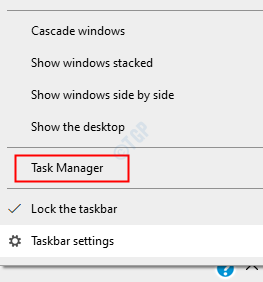
1. Right-click on the Windows icon and click on the “Task Manager“.

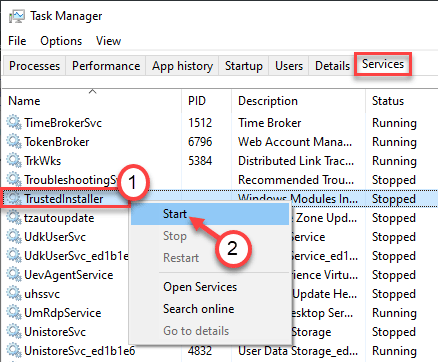
2. Once the Task Manager opens up, go to the “Services” tab.
3. In the Services tab, look out for the “TrustedInstaller” service.
4. Right-click on the service and click on “Start” to start the service.

Now, try to install the program or update the system. If it doesn’t help, try this approach-
1. Press the Ctrl+Shift+Esc keys together.
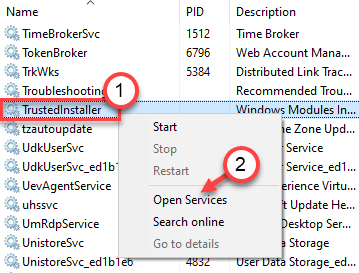
2. Go to the “Services” tab again.
3. Right-click on the “TrustedInstaller” service and click on “Open Service“.

1. You have to access the Run terminal. You have to press the Windows key+R keys.
2. What you need to do next is to type this command. Afterward, click on “OK“.
services. msc

3. After that, scroll down to find out the “Windows Modules Installer” service.
4. Then, right-click on it and then click on “Start” to start the service on your computer.
This should restart the service on your machine. Close the Services window and try to install the application again.
Fix 3 – Re-register Windows Installer
Re-register the Windows Installer from the Command Prompt.
1. Press the Windows key and start to type “cmd“.
2. Now, right-click on the “Command Prompt” and click on “Run as administrator”.

3. Copy and paste these 4 commands one-by-one and then hit Enter.
This will unregister and re-register the Windows Installer service.
%windir%\system32\msiexec.exe /unregister

%windir%\system32\msiexec.exe /regserver

%windir%\syswow64\msiexec.exe /unregister

%windir%\syswow64\msiexec.exe /regserver

Close the Command Prompt screen and restart the computer. Try to install the update or the conflicting app.
Fix 4 – Automate processes
This solution is specific to troubleshoot the Windows Update issue related to 0x80070424.
1. Press the Windows key+R keys together.
2. Then, write “services” and hit Enter.

3. In the Services window, look out for the “Background Intelligence Transfer Service“.
4. To modify it, double click on the service.

5. When you are in the Properties window, simply click on the drop-down.
6. After that, choose “Automatic“.
7. Don’t forget to initiate the service by clicking on “Start“.

8. Finally, click on “Apply” and “OK“.

9. Then, you have to double-click on the “DCOM Server Process Launcher” service.

10. Make sure, the startup type is set ‘Automatic‘.
11. Click on “Start” to start the service if it is not started yet.
12. Don’t forget to apply the settings by clicking on “Apply” and “OK“.

12. Following the same way, automate and start these services also.
a. Remote Procedure Call (RPC)
b. Windows Defender Firewall
c. Windows Update
d. Workstation
Close the Services utility. Now you have to run the Windows Update troubleshooter to troubleshoot the issue on your computer.
1. Just right-click on the Windows icon.
2. Then, click on the gear-shaped icon to access the Settings.

3. Then, select the “Update & Security” settings.

3. After that, click on the “Troubleshoot“.
4. Scroll down and click on “Additional troubleshooters“.

5. When the Additional Troubleshooters list appears, click on the “Windows Update“.
6. To start the troubleshooting process, “Run the Troubleshooter“.

Once the troubleshooting process is over, close the troubleshooter window.
Fix 5 – Re-register the system files
Windows Update first checks the integration and stability of the crucial system files. Re-register the system files.
1. Press the Windows key and start to type “cmd“.
2. Now, right-click on the “Command Prompt” and click on “Run as administrator”.

3. Copy and paste these two commands and hit Enter to re-register the dll files on your system.
regsvr32 Qmgr.dll /s
regsvr32 Qmgrprxy.dll /s

Once you have re-registered these files, close the terminal.
Restart your computer. Once you have restarted, run the update again.
Fix 6 – Modify the registry
Try enabling the Windows Update from the registry.
1. Click on the search box and write “regedit“.
2. After that, press the ‘Enter‘ key from your keyboard.

Warning – Registry Editor is a sensitive part of your system. Before heading on to modify the registry, we request to make a backup of the registry on your computer.
After opening the Registry Editor, click on “File“. Then click on “Export” to make a new backup on your computer.

3. After taking the backup, go to this location-
HKEY_LOCAL_MACHINE\SOFTWARE\Policies\Microsoft\Windows\WindowsUpdate
4. On the right-hand side, right-click on the space and click on “New>” and click on “DWORD (32-bit) Value“.

5. Then, name the files as “DisableWindowsUpdateAccess“.
6. After that, double click on the value to modify it.

7. Set the value to “0“.
8. Then, click on “OK” to save it.

Close the Registry Editor and restart the system. Check if this improves anything.
Fix 7 – Reset Windows Update elements
Resetting the Windows Update elements may fix the issue.
1. First of all, you have to write”cmd” in the search box.
2. After that, right-click on “Command Prompt” and choose “Run as administrator“.

3. There is a need to pause some services. To do that, simply Copy-paste and hit Enter to execute these commands.
net stop wuauserv
net stop cryptSvc
net stop bits
net stop msiserver

4. At the next step, you have to rename two files. Just run these two codes on the CMD screen.
ren C:\Windows\SoftwareDistribution SoftwareDistribution.bak
ren C:\Windows\System32\catroot2 catroot2.bak

5. Once you have renamed the folders, you have to resume those services again.
To do that, run these 4 codes sequentially.
net start wuauserv
net start cryptSvc
net start bits
net start msiserver

Close the CMD screen and restart your machine. This should fix the issue of ‘Pending Install’ on your computer.
Fix 8 – Run a simple SFC and DISM scan
1. Click on the search box and start to write “cmd“.
2. Further, right-click on the “Command Prompt” and click on “Run as administrators“.

3. Paste this code in the terminal. Thereafter, hit Enter to run the scan.
sfc /scannow

SFC scan will now start.
4. Once the SFC scan is complete, you have to launch a DISM scan.
5. Write this command in the CMD terminal and then hit Enter.
DISM.exe /Online /Cleanup-image /Restorehealth

This should solve the problem you are facing.