OneDrive is a cloud platform from Microsoft, allows users to store their important documents, files. OneDrive allows seamless access to the files from any available options like browser, android, Mac, or any other OS. But sometimes while saving the document on the OneDrive, you may see this error message – ‘Error 0x80070185: The cloud operation was unsuccessful.’. This restricts sharing or transfer of the files on the OneDrive. This issue is usually caused by the damaged setup file or the misconfigured setting.
Workarounds –
1. Click on “Try again” at least 5 times. In most cases, retrying 1-3 times works out the issue.
2. Disable the antivirus on your computer. Now, try to share/ transfer the file again.
Fix 1 – Reset the OneDrive
The best way to fix this issue is to reset the OneDrive on your computer.
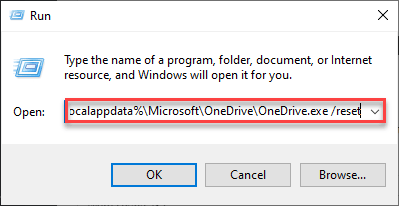
1. Right-click on the Windows icon and then click on the “Run“.
2. Now, copy-paste this run command and hit Enter.
%localappdata%\Microsoft\OneDrive\OneDrive.exe /reset

This will reset the OneDrive on your computer. OneDrive, after being reset, should automatically appear on the taskbar.
In case, if the resetting process doesn’t work, follow these steps.
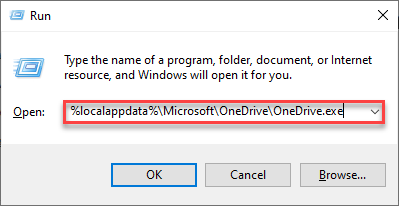
3. Press the Windows key+R keys together.
4. Once the Run appears, paste this code and hit Enter.
%localappdata%\Microsoft\OneDrive\OneDrive.exe

OneDrive should appear on your computer. Try accessing or share the conflicted files in the OneDrive.
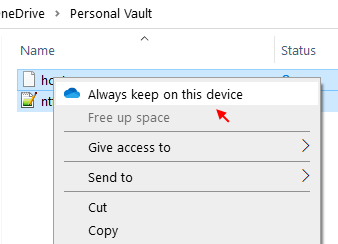
Fix 2 – Choose Always keep on this device and free up space
1. Select the files and Choose Always keep on this device

2. Now, Click on free up space.

Now, try again and see if it got fixed or not.
Fix 3 – Map the document as a new Network drive
You can map the document as a network drive and access it again.
Step 1 – Access the file from the browser
1. Go to the Microsoft OneDrive on your browser.
2. Now, login with the proper account credentials.

3. Open the conflicting file in the OneDrive.
4. Now, just copy the URL of the particular document from the browser window.

You may close or minimize the browser screen.
Step 2 – Map the drive
1. Open the File Explorer simply by pressing the Windows key+E keys together.
2. Once it opens up, on the left-hand pane, right-click on the “Network” and click on “Map network drives...”.

3. In the Map Network Drive window, click on the “Connect to a Web site that you can use to store your documents and pictures“.

4. After that, click on “Next” until you land on a page that says “Choose a custom network location“.
5. Here, select the “Choose a custom network location“. Click on “Next“.

6. Now, paste the copied URL of the conflicted document in that particular box.
7. Remove the “https://” from the front of the URL and replace it with the “\\“.

8. Once you have done that, click on “Next” to proceed with the setup.
9. Set up a name of the network location. (Default case – The name of the network is the name of the file on the OneDrive)
10. When you have completely set up the network, click on “Finish“.

You may close the File Explorer screen.
Step 3 – Run a PowerShell script
1. Press the Windows key+X keys together.
2. Then, click on “Windows PowerShell (Admin)“.

3. In the PowerShell terminal, paste this script and hit Enter.
{
$_.FullName
Get-Content -Path $_.FullName -first 1 | Out-Null
}

Close the PowerShell window.
Restart your computer once.
Now, try to access this network and you will be able to share/transfer the file from the OneDrive.
Fix 4 – Restart the OneDrive
You can close the OneDrive and open it again.
1.At first, right-click on the OneDrive icon (cloud symbol) on the right corner of the Taskbar.
2. In here, just click on “Close OneDrive” to close the OneDrive.

3. When you see a prompt, ‘Are you sure you want to close OneDrive?’, just click on “Close OneDrive” to close it.

4. In the next step, write “OneDrive” in the search box.
5. Then, click on “OneDrive” on the elevated search result.

Once the OneDrive opens up, try to access the particular file again.
Fix 5 – Sign out and sign in again to the OneDrive
You can try signing out from the OneDrive and then, signing to it again.
1. First of all, right-click on the OneDrive icon (cloud symbol) which is on the Taskbar.
2. Then, click on “Settings” to access the OneDrive settings on your computer.

3. In the Microsoft OneDrive window, go to the “Account” tab
4. Here, you have to click on “Unlink this PC“.

5. If a prompt appears stating, ‘Unlink account on this PC?’, simply click on “Unlink account“.

You will be signed out from OneDrive.
After signing out from the OneDrive account, OneDrive sign-in window should appear automatically on your computer.
6. Otherwise, click on the search box and type “OneDrive“.
7. After that, click on “OneDrive” on the elevated search result.

8. Put your email id associated with the OneDrive in the box.
9. Then, click on “Sign in” to initialize the sign-in process.

10. In the next window, type the OneDrive password once you are prompted for it.
11. Then, click on “Sign in ” to complete the sign-in process on your computer.

Then, try to access the problematic files on the OneDrive once again.
Fix 6 – Uninstall and reinstall OneDrive
If nothing is working out for you, try uninstalling the OneDrive from your computer.
1. First of all open the Settings screen by pressing the Windows key+I.
2. Then, you have to click on the “Apps“.

3. Then, click on the “Apps & Feature”.
4. Afterwards, just type “OneDrive” in the search box.

5. Next, click on “Microsoft OneDrive“.
6. After that, click on “Uninstall” to uninstall the OneDrive from your computer.

Now, wait for a while as Windows uninstalls the OneDrive from your computer.
7. Open the Microsoft Store on your computer.
8. After that, type “OneDrive” in the search box.
9. Then, click on the “OneDrive” from the search results.

10. Click on “Get” to get the OneDrive app.

11. Finally, click on “Install” to install the OneDrive app on the system.

Let Windows install the OneDrive on your system. Sign in to the OneDrive using proper credentials. Try to transfer/share the file again.
Your problem should be solved.