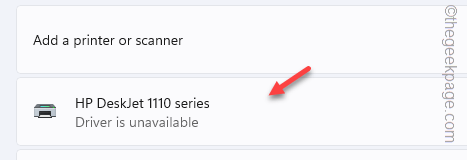
Suppose you are trying to print something very important and this prompt shows up in the Action Center “Driver is unavailable“. So, what can you do to resolve this problem? Don’t worry. There are some quick, preliminary workarounds that you can try to fix the problem, but if that doesn’t solve it, you have to take a deeper dive into the main solutions.
Fix 1 – Uninstall and reconnect the printer
Uninstall the printer driver from your computer and reinstall it. This process has many steps, so follow the process minutely to fix the problem.
Step 1 – Remove the Printer
First, you have to remove the printer driver from your computer.
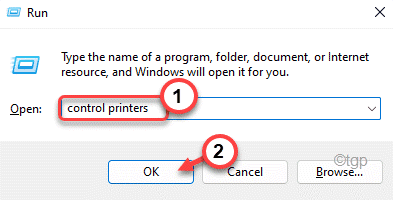
1. Open the list of devices connected to your system. So, press the Win key+R keys at once.
2. Type this in the box and click “OK“.
control printers
3. Now, in Windows 11, it will take you to the printers section in Settings.
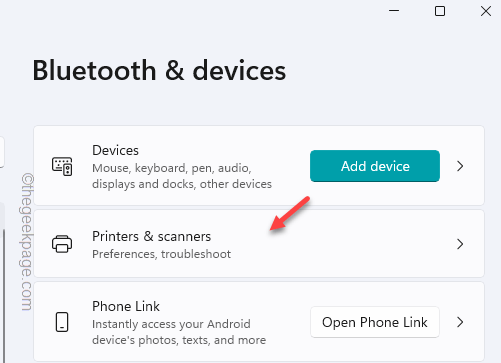
4. There, tap “Printers & scanners” to open it.
5. On the Printers & scanners page, locate the printer you are using.
6. Then, click it to open the printer settings.
7. Now, tap “Remove” to remove the printer driver from your system.
8. When the warning message appears, click “Yes” to remove the device.
After this, close the Control Panel page.
Step 2 – Uninstall the Printer
Now, you have to uninstall the printer driver from your computer from Device Manager.
1. At first, press the Win key+X keys together.
2. Then, tap “Device Manager” to open it.
3. Now, look for the “Printer queues” section and click it to expand it.
[You may not see the printer driver in the list as you have already removed it from Control Panel. If you don’t see it, go directly to Step 3. ]
4. After this, right-tap the printer driver and tap “Uninstall device“.
5. Then, tap “Uninstall” to confirm it.
After this, close the Device Manager.
Step 3 – Unplug the printer and plug it in
Now, as you have uninstalled the printer driver, it is time to unplug it and plug it in again.
1. Now, disconnect your printer from the system if you have plugged it in with a USB jack.
Otherwise, if you are using the printer in online mode, disconnect it from the router.
2. Now, shut down your computer. Then, shut down the printer and the router.
3. Disconnect everything from the power source.
4. Next just wait for a few minutes.
5. Then, plug all the things you have disconnected and connect them back in. Start the system, router, and printer.
Now, as soon as the device boots it will detect the printer driver and load up the default driver for it. So, wait for a few seconds after the system reboots.
You may see the official app for the printer has automatically started up.
Step 4 – Set the printer as the default
Now, all you have to do is to set the printer as the default printer device on your computer.
1. Click on the “Search” box and type “printers” in the search bar.
2. Then, tap “Printers & scanners” to open it on the Settings page.
3. Now, set the “Let Windows manage my default printer” to “Off” condition so that you can take care of it manually.
4. Now, tap the printer to open that printer setting.
5. Next, tap on the “Set as default” option to set the printer as the default printer on your system.
Now, as you have set the printer as the default printing device, you can now print the documents you want and you won’t face the “Printer driver unavailable” issue again.
Fix 2 – Update the printer driver
The computer shows the “Printer driver is unavailable” due to the absence of the missing driver.
There are multiple ways you can update the printer driver.
Way 1 – Using the Device Manager
You can use the Device Manager to update the printer driver.
1. Search “device” using the search bar.
2. When you see the “Device Manager” in the search result, tap it.
3. Then, just expand the “Printer queues” area to see the printer driver there.
4. Next, right-tap your printer device driver and tap “Update driver“.
5. Now, tap “Search automatically for drivers” to look for the printer driver for the printer.
The printer will now load up the default printer driver. So, wait for a few moments.
If you see this message has appeared –
The best drivers for your device are already installed
Then, tap “Search for updated drivers on Windows Update” to go to the Windows Update page to look for the printer driver updates.
Windows delivers these updates through the regular update channel. So, wait for Windows to update it.
Way 2 – Direct Update
There is another quick way to update the printer driver to the latest version.
1. Go to the printer manufacturer’s website or search using the printer driver model.
Here are the links to all the printer manufacturer’s drivers’ websites –
2. Then, input your printer model and tap “Search” to search for the latest printer driver.
3. After that, locate Software Utility and find the printer driver.
4. Then, tap “Download” to download the latest driver.
5. Once you are done downloading the driver, go to the location in File Explorer.
6. Now, double-tap the driver to start installing the driver.
Next, follow the on-screen steps to install the driver. After installing the driver, try to use the printer again. Test if this works.
Fix 3 – Run the printer troubleshooter
Windows has a dedicated printer troubleshooter that you can use to troubleshoot the printer.
1. Open the Settings page.
2. Then, click on the “Bluetooth & devices” section to open that.
3. Next, tap “Printer & scanners” to open that.
4. Here, open the problematic printer to access it.
5. Once you are inside the printer, tap “Run the troubleshooter” to run the printer troubleshooter.
Wait for Windows to identify and fix the printer issue. Apply the solution that the printer troubleshooter prescribes and fix the problem once and for all.
Fix 4 – Install the generic driver
You can install the generic driver for the printer driver at least.
1. Open the Device Manager.
2. Click on the “Print queues” option.
3. After that, right-tap the printer device and tap “Update driver”.
4. Now, this time, click on “Browse my computer for driver software” to open that.
5. After that, tap “Let me pick from a list of available drivers on my computer“.
6. Going on to the next page, select the printer driver and tap “Next” to install that driver.
This way, Windows will install this printer driver for the printer you are using.
You may use the printer as usual but remember this, you can’t use the printer to its full extent.
Additional Solutions –
1. All the printer manufacturers have separate printer softwares to handle the printers more efficiently. Like HP has the HP Smart.
You can run the diagnostics over the printer directly from the app or install the printer driver directly.
2. Install all the Windows Updates on your system. Windows Updates sometimes contain the printer driver updates within it. So, updating the device should help you resolve the problem.


