Some users are complaining about an issue with default resolution on their Windows 11 machine. According to these users, they can’t alter the default resolution of the screen from the Settings. If the resolution on the screen is set to anything less than the default (recommended) resolution, you can fix the issue following this easy problem on your computer.
Fix 1 – Update the display card adapter driver
You have to update the display card adapter on your computer.
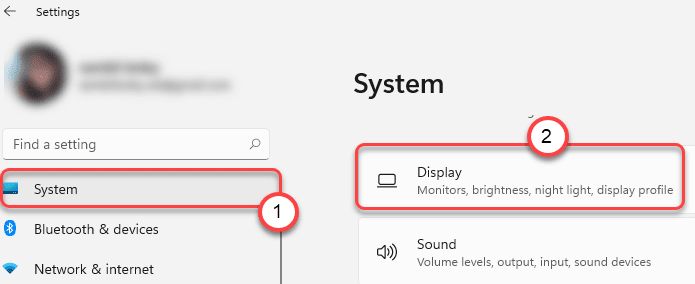
1. At first, press the Windows key + I keys together.
2. When the Settings opens up, tap on the “System” settings.
3. Then, on the right-hand side, click on “Display“.

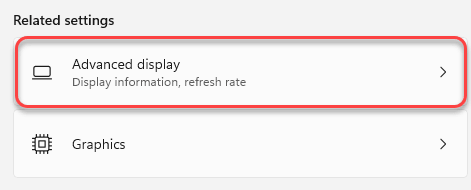
4. Now, on the same pane, click on the “Advanced display” settings.

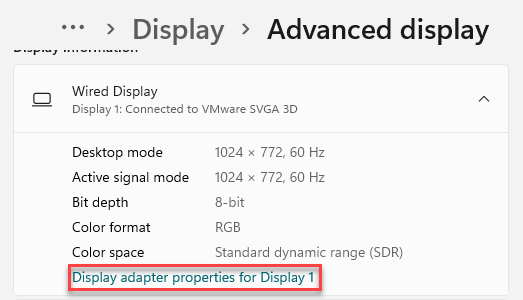
5. After that, click on the “Display adapter properties for Display 1“.

6. When the graphics driver properties open up, go to the “Adapter” tab.
7. Then, click on the “Properties” in the ‘Adapter Type’ tab.

8. After that, go to the “Driver” tab.
9. Next, click on “Update Driver” to update the graphics driver.

10. When you see the ‘How do you want to search for drivers?’ message on your screen, tap on the “Search automatically for drivers“.

Windows will search for the latest display driver on your computer and install it on your computer.
11. Coming back to the screen properties, click on “Apply” and “OK” to save it.

Now, close the Settings window and restart your computer.
Fix 2 – Try a different Display resolution
1 – Right click anywhere on any empty area of your desktop and select Display Settings

2 – Then, click on “Display resolution“. Now, try a different resolution and see which setting works best for your pc.

This should help you resolve the problem.
Fix 3 – Change scaling value
1 – Do a Right click anywhere on any empty area of your desktop and select Display Settings

2 – In the setting panel , Click on Scale

3 – Set a value anywhere between 100 and 500 and check after addingnthe value what works best for you.
Note: If it does not work, Just change it back to 100 which is by default the scaling setting

Fix 4 – Change mode of display adapter
1 – Right click anywhere on an empty area of your desktop and click Display Settings

2 – Now, scroll down and click on Advanced display

3 – Now, click on Display adapter properties of your display

4 – Now, click on List all modes

5- Now, by hit and trial, Just select each mode and click OK and then check if it fixes your display issue or not.

Fix 5 – Install the latest NVIDIA/AMD graphics driver
If updating the graphics driver from the default settings doesn’t work out, try to update it directly.
[We have shown the steps for the NVIDIA driver only. If you have an AMD gpu, the steps will be different. ]
1. At first, go to the NVIDIA driver website.
2. Put particular specifications of the driver in the appropriate section (like ‘Product type’, your ‘Operating System’, etc).
3. Finally, you need to click on the “Search“.

4. To download the driver on your system, click on the “Download“.

Once the downloading process completes, close the browser.
5. At first, go to the download location of the driver.
6. After that, just double-click on the offline installer to launch it.

7. When the NVIDIA Graphics Driver window appears, click on “NVIDIA Graphics Driver and GeForce Experience“.
8. You have to agree to the terms and conditions. Tap on “Agree and continue“.
9. Then, select the “Custom (Advanced)” option to try it out.
10. After that, click on “Next“.

7. Don’t forget to check the box beside the “Perform a clean installation“.
8. To start the installation process, click on “Next“.

Once the installation is done, click on ‘Close’ to close the NVIDIA Graphics Driver Installer window.
Fix 6 – reinstall the display driver
If updating the graphics driver doesn’t let you change the resolution, uninstall the graphics driver and replacing it with the default display driver should fix the problem.
1. At first, right-click on the Windows icon on the taskbar and click on “Device Manager“.

3. You have to expand the “Display adapters” in the list of devices.
4. Then, right-click on your network adapter and click on “Uninstall device“.

5. Then, click on “Uninstall” when the warning message appears on your screen.

This will uninstall the existing version of the display driver. Just reboot your device and it should set the default display driver. This should take care of the issue that you are currently facing.
[
NOTE –
Even if after restarting your computer, if the system doesn’t let you control the resolution, follow these steps –
1. Open the Device Manager window.
2. Then, click on “Action” and tap on the “Scan for hardware changes“.

This will fix the problem for sure.
]