With the introduction of Windows 11, Microsoft has claimed to enhance the gaming performance to a whole new level. But, some of the users who have upgraded to the preview build of Windows 11 are experiencing a completely different scenario. These users are facing issues of lags, jitters and occasional FPS drops, making the gameplay unbearable. If you are one of these users and facing any of these issues, this article is just for you.
Fix 1 – Use the Empty Standby List
This Empty Standby List is one of the most useful optimization tools out there for Windows users.
Step 1 – Download the ESL tool
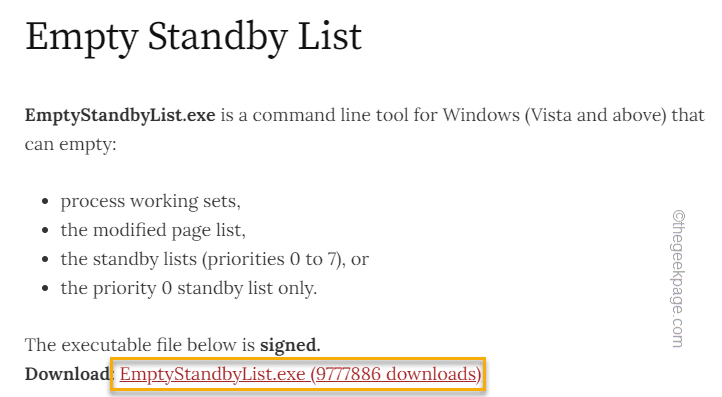
1. Go to the Empty Standby List.
2. Just, tap “EmptyStandbyList.exe” to download the tool directly on your system.
3. Now, press the Windows key+E keys together to open up the File Explorer.
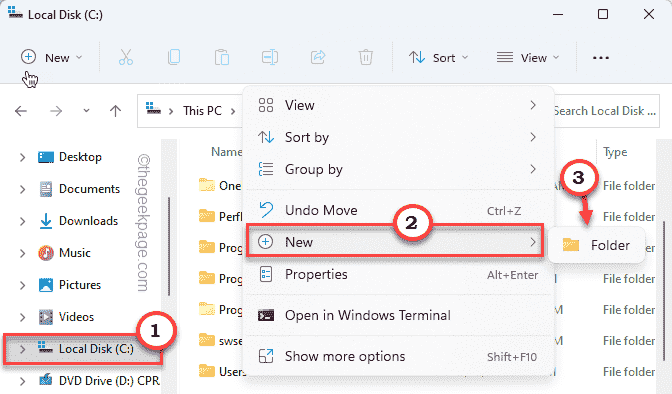
4. Just tap on the “Local Disk (C:)” to go there.
5. Once you are there, just right-click on the space and tap “New>” and click “Folder” to create a new folder.
6. Name the folder as “Empty Standby List“.
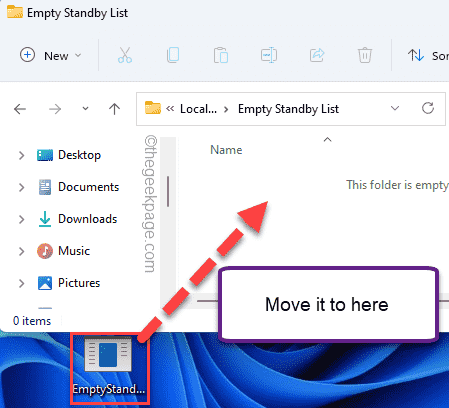
7. Finally, move the “EmptyStandbyList” tool to this folder.
After this close the File Explorer.
Step 2 – Check the amount of Standby Memory
If your system has a huge amount of reserved standby memory, you can use the ESL tool to clean it up.
1. Press the Windows key+R keys together.
2. Then, type “resmon” and hit Enter.
3. Once the Resource Monitor opens up, go to the “Memory” tab to check the memory usage.
4. Now, in the ‘Physical Memory’ section, you will notice several types of memory usage.
Just check the “Standby” memory usage. It can be around 4-8 GB according to your usage!
Close the Resource Monitor window.
Step 3 – Create a new task
Now, you can easily create a new task to run the ESL tool regularly.
1. You have to write “task scheduler” in the search box.
2. After that, click “Task Scheduler” to access it.
3. Once you have opened the Task Scheduler screen, tap on “Action” and then click the “Create Task” option to create a new task.
4. In the Create Task window, go to the “General” tab.
5. Type “Empty Standby List” in the appropriate box to name the task.
6. Once you have done that, choose the “Run whether user is logged on or not” option.
7. Now, you have to alter the user account running the task. So, tap “Change User or Group…“.
8. Now, click on “Advanced“.
8. Just, tap “Find now” option.
9. In this list of groups, look for the “SYSTEM” account and select it.
10. Then, tap “OK” to proceed.
11. Again, click “OK” to proceed further.
12. Coming back to the Task Scheduler page, check the “Run with highest privileges” box.
13. Later set the ‘Configure for:’ settings to “Windows 10“.
14. Next, go to the “Triggers” area.
15. Here, tap “New” to set a new trigger.
16. Next, set the ‘Begin the task:’ settings “On a schedule“.
17. Later, check the “Repeat task every:” and choose “10 minutes“.
18. Just set the ‘for a duration of;’ settings to “Indefinitely“.
19. Tap “OK” to save these changes.
20. After that, you have to navigate to the “Actions” area.
21. Finally, click on the “New…” option.
22. On the New Action page, set the “Action:” settings to “Start a program“.
23. After that, tap “Browse…“.
24. Now, you have to just navigate to the location of the ESL tool. That is –
C:\Empty Standby List
25. Next, just choose the “EmptyStandbyList” tool inside the folder.
26. Then, click “Open” to select the tool.
28. Just, tap “OK” to complete the process.
This way, you have successfully created a task that will automatically clear the standby RAM of your system in the interval of 10 minutes, making more memory available for your system.
Just close the Task Scheduler. Reboot your Windows machine. After restarting, try to play a game and test if this is working or not.
NOTE –
If you want you can easily disable and remove the task from your computer.
1. Just open the Task Scheduler.
2. Once it opens up, in the middle pane, you will find the “Empty Standby List” task.
3. Just right-tap the task and tap “Disable” to disable it.
This way, you can easily disable the task. You may also opt for removing the task from your system.
4. To do that, right-tap the task and click “Delete” to remove the task.
Once you have removed the task, restart the computer.
Fix 2 – Disable the High precision event timer device
There is another tweak that you can use to boost the FPS for your favorite game.
1. You have to access the Run terminal. To do that, press Windows key+R keys together.
2. Just, type “devmgmt.msc” and hit Enter key on your keyboard to open the Device Manager.
3. After opening the Device Manager, look for the “System devices“. Once you have found it, tap it to expand the section.
4. Next, just look for the “High precision event viewer” device in the list of devices.
5. Just, right-click on the device and click “Disable device” to disable the device.
[If you notice that the device is already disabled, enable the device in the same way.]
6. Tap “Yes” to disable the device completely.
Just close the Device Manager. Play a game and check if this works.
Fix 3 – Clean install the graphics driver
You have to clean install the graphics driver.
[
NOTE – We have shown how to download and install the display driver for the NVIDIA cards in the following steps. If you are using an AMD Radeon card, the steps will differ, but it is all the same. Download the latest build of your graphics driver and install it, and restart the system.
]
1. At first, you have to go the NVIDIA Driver downloads website.
2. Just place your particular specifications of the existing graphics driver in the appropriate section (like ‘Product type’, your ‘Operating System’, etc).
3. Finally, you need to click on the “Search“.

4. Then, click on the “Download” button to download the graphics driver.

Once the downloading process completes, close the browser.
5. At first, open the location where you have downloaded the driver.
6. After that, just double-click on the offline installer to launch it.

7. Once the NVIDIA Graphics Driver window appears, click on “NVIDIA Graphics Driver and GeForce Experience” to install it.
8. You have to agree to the terms and conditions. Tap on “Agree and continue“.
9. Then, select the “Custom (Advanced)” option to try it out.
10. After that, click on “Next“.

7. Don’t forget to check the box beside the “Perform a clean installation“.
8. To start the installation process, click on “Next“.

Once the installation is done, click on ‘Close’ to close the NVIDIA Graphics Driver Installer window.
Restart your computer to let the installation process complete.
Fix 4 – Update audio drivers
If there is no issue with the graphics driver, try updating the audio drivers.
1. At first, press the Windows key+R keys together.
2. Then, type “devmgmt.msc” and hit Enter.

3. When the Device Manager opens up, expand the “Sound, video, and game controllers” section.
4. Then, right-click on the audio driver and click on “Update driver”.

5. Next, click on “Search automatically for drivers“.

Let Windows install the necessary driver for your system.
Fix 5 – Update Windows to the latest version
Check if there are new Windows Updates are available on your system.
1. At first, press the Windows key+I keys together.
2. Then, tap on the “Windows Update” from the left-hand side.
3. After that, on the left-hand pane, click on “Check for Updates“.

Let Windows find out the latest update for your device and install it on your computer.
Restart the system and it should fix the lags and jitters that you have witnessed before.


