Screen flickering issues can be very annoying for users. Usually, this screen flickering issue, prevalent in both Windows 11 and 10 devices, occurs due to either a faulty graphics driver or an incompatible application. Before you do anything else, we recommend you run a small test on your computer to identify the actual reason behind the screen flickering problem.
The Task Manager Test
You can run this small test to identify whether it is a hardware fault or just a third-party app that is causing this problem. You can follow these steps to run the test –
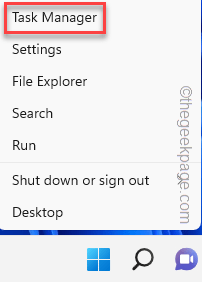
1. Open the Task Manager. Either you can just press the Ctrl+Shift+Esc these 3 keys together or press Win key+X keys, followed by a tap on “Task Manager“.
2. However you open the Task Manager, once it opens up a notice which type of screen flickering issue you are noticing on your computer.
Check whether only the Task Manager part of the screen is flickering or the entire screen except the Task Manager is flickering.
Results of the test –
If the Task Manager is flickering, that means the problem is caused by a hardware fault (a corrupted display driver or defects in the cables).
Otherwise, if your entire screen except the Task Manager is showing signs of the screen flickering issue, a third-party app is responsible.
Fix 1 – Check the cable, and screen for defects
Check the cables and the monitor visually for any defects. Follow these steps –
1. Don’t unplug anything. Now, take a look at the physical health of the cable that connects your monitor to your computer. Check whether you can see any dents, heavy scratches, or torn portions on that cable.
If that’s the case, we suggest you order a replacement cable which costs only $8 to $10 depending upon which type of cable you are using.
2. At first, turn off your computer screen. Switch off the monitor as well.
3. Then, unplug the monitor cable and plug the cable back in.
Test if this works.
Fix 2 – Disable the hardware acceleration
Hardware acceleration can cause this problem. There is no definite way to switch off the hardware acceleration. So, you have to use the Registry Editor.
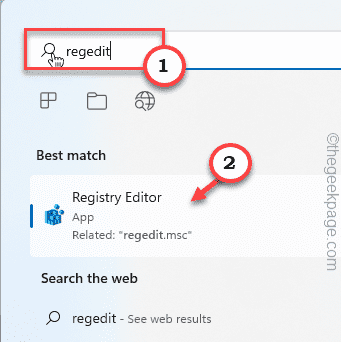
1. Open the Registry Editor. To do that, search for “regedit“.
2. Then, tap “Registry Editor“.
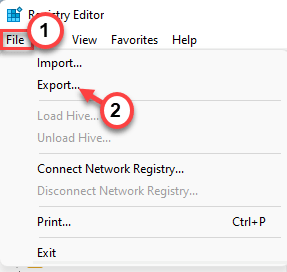
NOTE – You should create a registry backup before you proceed further. We request you make a backup of the registry on your computer.
Once you have opened the Registry Editor, click on “File” on the menu bar. Then, tap “Export” to create a new backup on your computer.
3. On the Registry Editor page, reach this location –
HKEY_CURRENT_USER\SOFTWARE\Microsoft\Avalon.Graphics
4. Look for the “DisableHWAcceleration” value.
5. If you can’t find it, right-click on the right-hand pane and click “New” and tap “DWORD (32-bit Value)“.
6. Name the value as “DisableHWAcceleration“.
7. Then, you can double-click on the key to change it.
8. Now, fix the value to “1“.
9. Finally, tap “OK” to save these settings.
After this close the Registry Editor page. Restart your computer. Once the system restarts, the hardware acceleration feature will be disabled on your system.
Fix 3 – Check the GPU connection
If you can’t see any defects in the connecting cable of the monitor, you should check the GPU connection as well.
1. Turn off the computer first and then disconnect it from the power source.
2. After that, open the cabinet. You will see the display cable is connected to the dedicated GPU.
3. Check the position of the GPU on the motherboard. Sometimes, the card gets ejected from its’ seat. In that case, place it properly.
4. If your motherboard has an integrated graphics card (every motherboard has one), attach the display cable to that integrated display port.
5. Now, start up the system. Check whether you can notice any screen flickering issue or not.
If the screen flickering stops, this problem is a graphics-card-oriented issue. Try updating the card or roll back any recent updates.
Fix 4 – Set the optimum refresh rate
Refresh Rate plays a huge role on a monitor. Setting the optimum refresh rate can fix this screen flickering issue.
1. Holding the Windows key and the I keys together opens up the Settings window.
2. Once it opens up, click on the “System” settings on the left-hand pane.
3. Here, you can find the “Display” settings on your right-hand pane. Tap it.
4. Then, tap “Advanced display” to explore it.
5. After that, on the right-hand side, click on “Choose a refresh rate” and set it to any different refresh rate.
[Example – Suppose your system supports 75 Hz. Try setting the refresh rate to 60 Hz.]
Once you have set it to a different refresh rate, the screen flickering issue should stop.
This should fix your problem once and for all.
Fix 5 – Uninstall the display driver
Uninstall the existing display driver and perform a clean installation.
Step 1 – Uninstall the graphics card
1. First of all, press Windows key+X from your keyboard.
2. On the context menu, tap on the “Device Manager“.
3. Next, click on the drop-down beside the “Display adapters“.
You may see two types of graphics cards here. One is the dedicated one and another one is the dedicated one.
4. Then, right-tap the dedicated graphics driver and click the “Uninstall device“.
5. An additional message may appear on your screen. Next, check the box beside the “Delete the driver software for this device” option.
6. Then, click on “Uninstall“.
This uninstalls the driver from your computer and deletes the driver software from your computer. This way, Windows can’t load the faulty driver again.
Now, restart your computer after you have closed the Device Manager.
Step 2 – Perform a clean installation
Now, just download the graphics driver manually and perform a clean installation.
1. Open your browser and go to the NVIDIA Graphics Card driver page.
2. Next, arrange the drop-boxes to select the model of your GPU.
3. Now, tap “SEARCH” to perform a search for the latest GPU driver.
4. Coming to the next page, you can find the latest graphics driver. Tap “DOWNLOAD“.
Wait for a few moments,
When you have downloaded the driver package, close the browser window.
After downloading the driver, close the browser.
5. Once you are there, double-tap the installer.
6. In the License Agreement step, choose the first option “NVIDIA Graphics Driver and GeForce Experience“.
7. After that, tap “AGREE AND CONTINUE” to agree with the terms and go to the next step.
8. At the next step, select the “Custom (Advanced)” option.
9. After that, tap “NEXT” to go to the next and final step.
10. Coming to the next and final step of the installer, make sure that you have checked these options-
Graphics Driver
HD Audio Driver
NVIDIA GeForce Experience
PhysX System Software
11. Now, it is very important and check the “Perform a clean installation” checkbox.
12. After that, tap “Next” to start the process.
Wait for the installer to restore the NVIDIA settings to the default settings and install the latest driver.
13. Finally, once it is done, click “Close“.
This should fix the screen flickering issue. Check if this helps.
Fix 6 – Rollback the driver
If this screen flickering issue has just started after a recent graphics update, roll back the update.
1. First of all, right-click not the Windows key.
2. Then, tap the “Device Manager” option to access it.
3. Once you see that Device Manager has opened up, click on the “Display adapters“.
4. After this, just right-tap the NVIDIA graphics driver and tap “Properties“.
5. Now, go to the Properties window, and locate the “Driver” tab.
6. Next, tap the “Rollback driver“.
7. Just click “Yes” on the next page.
Allow the installer a while to roll back the driver. Once you have rolled it back, you have to restart your computer.
This should fix the screen flickering issue you are facing.
Fix 7 – Change wallpaper, colors
Windows option to automatically select an accent color sometimes cause the screen flickering problem.
1. Open Settings and head on to the “Personalization” pane.
2. Then, on the right-hand pane, click “Colors“.
4. Just scroll down a bit and set the “Accent color” to “Manual” mode.
5. Next, choose any color of your choice from the color palette.
Now, as you have chosen the accent color, the screen won’t flicker anymore.
Fix 8 – Disable the animation effects
Disable the animation effects and test.
1. Right-tap the Windows icon and click “Settings“.
2. Once you have opened the Settings page, go to the “Accessibility” tab.
3. Then on the right-hand pane, click on “Visual effects“.
4. Set the “Animations effects” to the “Off” condition.
After this, close the Settings page.
The screen flickering issue should be gone now.
Fix 9 – Uninstall third-party apps
Some third-party apps can cause the problem. Uninstalling such an app should fix the problem.
[ Example – Users have pointed their fingers to the NORTON antivirus as the main culprit of the issue. ]
1. At first, press the Win key+R keys together. This way, the Run box opens up.
2. Then, write “appwiz.cpl” and click “OK“.
3. Going to the Programs & Features page, look for any incompatible apps.
4. Right-tap such an app and click “Uninstall” to uninstall it from your computer.
Once you have uninstalled the app, restart and the screen would stop flickering.
Your problem should be solved.


