Does the shortcuts or app icons on the Desktop not working in your Windows 11? The simplest reason behind why a shortcut may break is the sudden change of the target applicaiton path. When you try to use the shortcut, it won’t work as the shortcut file is corrupt. There are a number of solutions that you may apply to fix the broken icons and shortcut in Desktop.
Fix 1 – Recreate the IconCache file
The best solution for this issue is to delete the current IconCache file from the system files and let the system rebuild it.
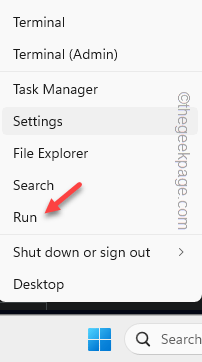
Step 1 – To do this, right-click the Windows key and choose the “Run” item.
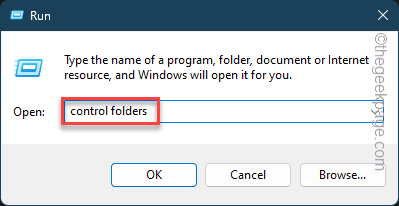
Step 2 – After this, type this and hit Enter.
control folders
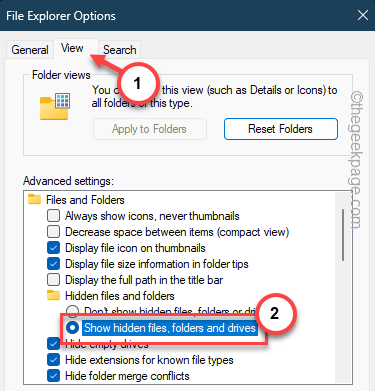
Step 3 – This shall open the Folder Options tab. Quickly visit the “View” tab.
Step 4 – In the Hidden files and folders section, choose the “Show hidden files, folders and drives” tab.
Step 5 – Now, all you have to do is to save the changes. So, tap “Apply” and “OK“.
Step 6 – Now, open a new Run panel.
Step 7 – Next, paste this in there and click “OK“.
%localappdata%
This shall take you to the Local folder.
Step 8 – In there, you will find the “IconCache” file.
Step 9 – This file keeps the cache file of the icons on your Desktop. So, select the file and tap the bin icon to delete the file from the device.
Quit the Local folder. Rebooting the computer should let the device rebuild the IconCache file.
Check the icons on your Desktop once more.
Fix 2 – Check the Target of the shortcut
Every shortcut is linked to a target file to be launched on the device.
Step 1 – You have to know the main installation directory of the shortcut file.
Step 2 – If you don’t know that, search for the application directly from Search.
Step 3 – Next, right-click the app in there and tap the “Open file location” prompt.
Step 4 – In some cases, this will take you just to the Shortcuts folder.
Step 5 – So, find out the main excutable once again. Right-click that file there and tap “Open file location” one more time.
This should lead you to the main source of excutable file.
The location you see there, it is the ‘Target:’ of the shortcut file.
Step 6 – So, come back to the Shortcut file on the Desktop (or in another location).
Step 7 – Later, right-click the file and tap “Properties“.
Step 8 – Go to the “Shortcut” tab there.
Step 9 – Compare the “Target:” and the actual location you have traced earlier.
Step 10 – In case of any disparity, you have to manually fix that and save the changes.
This way, you can fix the broken shortcuts issue.
Fix 3 – Create a new shortcut
If the shortcut file is leading up to an error message, you should deelte that and create a new shortcut in its place.
Step 1 – Just go to the location of the application installed on your system.
Step 2 – Otherwise, run a search using the search box and trace it to there.
Step 3 – When you are there, right-click the app executable file there and tap “Show more options“.
Step 4 – Next, select the “Send to>” and use the “Desktop (shortcut)” item.
This way, you can create a fresh Desktop shorcut in the place of the older one.
Use the new shortcut and check it out.
Fix 4 – Reboot the File Explorer process
If nothing so far has worked out, restart the File Explorer process and test.
Step 1 – Check whether a File Explorer instance in running (you will notice the tab directly in the File Explorer).
Step 2 – Otherwise, pressing the Win+E keys should do the trick.
Step 3 – Now, hit the Win+X keys from your keyboard.
Step 4 – A context tab will elevate. So, tap “Task Manager“.
Step 5 – Find the “File Explorer” process on that page.
Step 6 – Right-tap the “File Explorer” process and tap “Restart“.
Your whole screen will turn off briefly. But, within a few moments, everything should go back to normal.
Try to access the shortcut files and check their integrity once again.
Fix 5 – Run a system wide scan
A malware infection can cause the non-effectiveness of the shortcuts present on the Desktop.
Step 1 – So, begin by searching for “Windows Security“.
Step 2 – Open that up.
Step 3 – Go this way –
Virus & threat protection > Scan options
Step 4 – Now, can choose the “Quick Scan” option as it does take a few minutes to analyze the main system files for any threats.
Step 5 – Or, you can opt for a “Full scan“, which does scan all the files on the system and blocks the malware automatically.
Step 6 – Run the scan using the ‘Scan now‘ option.
Once all the threats are blocked/ removed/ quarantined, all the icons on your desktop should get back their


