Remote access to a computer is a Windows 10 Pro exclusive feature that lets you access any of your Windows 10 devices from anywhere in the world. Accessing the remote desktop from your computer isn’t an easy process. Sometimes it may throw up some unknown error messages like “We couldn’t connect to the remote PC because the PC can’t be found. Error code 0x104“. There are some easy resolutions to fix this issue on your computer.
Fix 1 – Turn on Network Discovery
The remote desktop feature will stop working if you disable the network discovery feature.
1. Right-click on the Windows icon. Then you have to click on the “Run“.
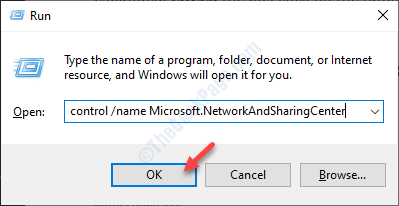
2. Then, type the below-mentioned code and then click on “OK“.
control /name Microsoft.NetworkAndSharingCenter

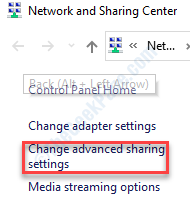
3. When the Network & Sharing center opens up, click on the “Change advanced sharing settings“.

4. Here you will see various network profiles on your screen.
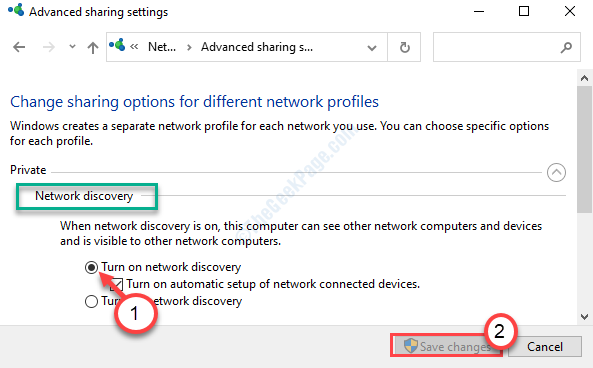
5. You have to expand the network profile you are currently using. Once expanded, check the box click on the radio button beside “Turn on network discovery“.
6. Don’t forget to click on the “Save changes” to save it.

Close the Control Panel window.
Restart your computer and further try to access the remote computer.
Fix 2 – Enable Remote Desktop settings
You have to check whether the Remote desktop is enabled on your computer.
1. You need to press Windows key+I.
2. After that, you have to go to the “System“.

3. When the System window appears, on the left-hand side, scroll down to choose the “Remote Desktop“.
4. On the right side, check if the “Enable Remote Desktop” is switched to “ON” or not.

After doing this if you can access the remote desktop again or not.
Fix 3 – Allow Remote assistance through the firewall
Sometimes firewalls may disallow some particular rules which in turn may cause this type of error.
1. Press the Windows key from the keyboard. Here type “Windows Defender Firewall“.
2. Then hit Enter.

3. On the left-hand side, click on the “Advanced settings“.

4. When the Windows Defender with Advanced Security opens up, click on the “Inbound Rules“.
5. After that you have to scroll down to find the “Remote Assistance (RA Server TCP-In)“. Right-click on the rule and then click on “Enable rule“.

6. Just below you will notice two more rules named “Remote Desktop – User Mode (TCP-In)” and “Remote Desktop – User Mode (UDP-In)“.
7. Just like before right-click on these two rules one-by-one and then click on “Enable rule” to enable both the rules.
8. Now, check that the ‘Local Port’ for these two rules is set to “3389“.

After doing all these, close the window.
Try connecting to this desktop using remote access.
Fix 4 – Clean modified DNS server settings
Setting the DNS server to obtain the settings automatically should fix this problem.
Step 1: Press Windows key + R from the keyboard to open the Run command.
Step 2: In the Run command search box, type ncpa.cpl and press OK to open the Network connections window.

3. Within seconds the Network Connections will appear. Now, right-click on the network you are using and then click on “Properties“.

4. After that, double click on “Internet Protocol Version 4 (TCP/IPv4)“.

7. Once the Internet Protocol Version 4 (TCP/IPv4) Properties window has opened up, click on “Obtain DNS server address automatically”
8. Don’t forget to click on “OK“.

Give the remote access another try.
The problem should be gone by now.