While installing the printer driver using the printer driver package, you may face an annoying error message stating – ‘Printer driver package can’t be installed’. If you are seeing this error message, the installation will be stopped midway, and you have to solve the problem manually. This error mainly occurs if there isn’t enough free space available on the Windows 11 drive. Follow these fixes to find a quick resolution for this issue.
Workarounds –
1. Restart your computer once and try to install the printer driver once again.
2. Disable any third-party antivirus software you are using. It sometimes blocks some threads of the installation process.
Fix 1 – Use the disk cleanup
You can use the Disk Cleanup tool to clear out any unnecessary trash files eating up the space in the C: drive.
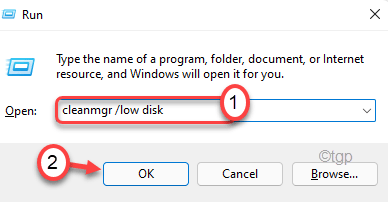
1. Press Windows+R keys together.
2. After that, write this command and hit Enter.
cleanmgr /low disk

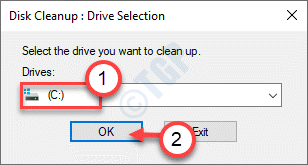
The Disk Cleanup window will be opened.
3. When the Disk Cleanup: Drive Selection window appears, click on the drop-down beside ‘Drives:’ and choose the “(C:)” drive.
4. After that, click on “OK“.

Wait a while for your computer to analyze the number of trash files.
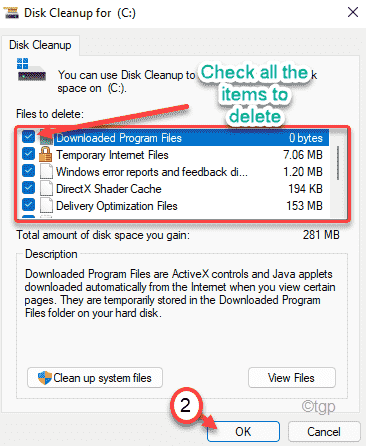
5. Now, check all the boxes one-by-one in the “Files to delete:” section.
6. After that, click on “OK” to start the cleanup process.

7. You will notice a prompt asking for your permission to delete the items.
8. Just click on the “Delete files” to remove those.

9. Now, again open the disk cleanup tool.
10. After that, click on “Clean up system files” to clean up the system files.

11. Select C Drive again.
12. Then, select all the old Windows installation files.
13. Then, tap on “OK” to delete the files.
Disk Cleanup will clear out all the junk files from the C: drive.
Fix 2 – Empty the Temp folders
Temp folders stores temporary appdata. Clearing it out should work out for you.
1. At first, press the Windows key along with the ‘R‘ key.
2. When the Run terminal pops up, type “%temp%“. Just, hit Enter.

3. Then, tap on “Continue” if a warning message appears.

4. Now, select all the contents of the folder using your mouse.
5. After that, hit the ‘Delete‘ key to remove everything from Temp.

6. Now, again press the Windows key+R keys together.
7. Further, type “temp” and click on “OK“.

8. Remove everything inside the folder.

9. Once you are done, press the Windows key+R keys again.
10. Then, write “prefetch” and hit Enter.

11. Select all the contents inside the folder and press the ‘Delete‘ key to delete all the contents.

After that, close the File Explorer.
Fix 3 – Remove printer files
You have to remove the existing printer files from your computer.
1. At first, click on the Windows key and write “cmd“.
2. Then, right-click on the “Command Prompt” and click on “Run as administrator“.

3. Simply, type this command on the terminal and hit Enter to stall the spooler service.
net stop spooler

4. After stopping the spooler service press the Windows key+E keys together.
5. In the File Explorer, head to this location ~
C:\Windows\system32\spool\PRINTERS
6. You will be warned with a message.
Just tap on “Continue” to proceed further.

7. Here, press Ctrl+A keys together to select all the files/folders.
8. Then, hit the “Delete” key to remove the files.

8. Once you are done, you have to resume the spooler service again. To do that, type this code and hit Enter.
net start spooler

Finally, close the Command Prompt window. Restart your computer and try to install the printer driver package.
Fix 4 – Update the printer driver
Try to update the printer driver using the Device Manager.
1. Press the Windows key+R keys together.
2. Then, type “devmgmt.msc” and click on “OK“.

3. Now, expand the “Print queue” section.
4. After that, right-click on your Canon printer driver and click on “Update driver“.

5. Now, choose “Browse my computer for drivers“.

6. Then, tap on “Browse“.

7. Now, expand the drives and select the exact folder where you have the printer driver package.
8. Finally, click on “OK“.

Windows will install the printer driver from the driver package. After installing the driver, restart your computer.
This should fix your problem.