All most all the printers do come with the plug-and-play feature of Windows, where you can just plug in the printer and Windows should install the default driver for the printer automatically. But, while manually installing a printer driver from a driver package, you may see this ‘Printer Driver Package Cannot be Installed’ error message. Don’t worry. Just enact these easy fixes to fix the printer problem on your computer.
Fix 1 – Clear the Temp files
If the Windows Temp folder lacks free space considerably, this error message may appear while installing the printer driver.
Step 1
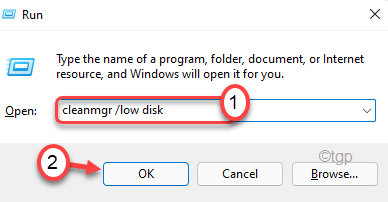
1. At first, press Windows+R keys together.
2. Just paste this command in the Run terminal and click on “OK“.
cleanmgr /low disk

This will open up the Disk Cleanup screen.
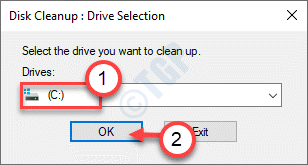
3. Next, tap on the “Drives:“.
4. Then, click on the drop-down and choose the “(C:)” drive from the list.
4. After that, click on “OK“.

Wait a while for your computer to analyze the number of trash files.
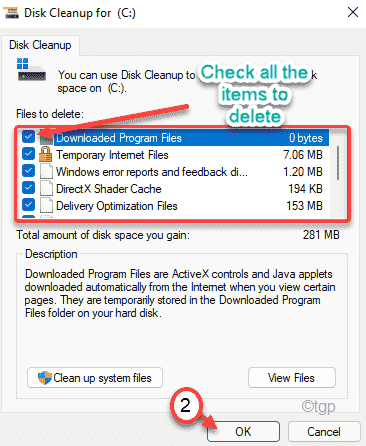
5. Here, in the “Files to delete:” section, check all the options one by one.
6. Finally, click on “OK” to clean up the drive.

7. You will notice a prompt asking for your permission to delete the items.
8. Just click on the “Delete files” to remove those files.

This is the way you can delete almost all the temporary files on the Local Disk (C:) drive.
Step 2
There are some leftover files that you have to take care of manually.
1. At first, press the Windows key along with the ‘R‘ key.
2. Now, type “%temp%“. Just click on “OK” to open the Temp folder.

3. If you see a warning message, click on “Continue“.

4. When the Temp folders open up, select all the files with your mouse.
5. After that, press the ‘Delete‘ key to empty the Temp folder.

6. Now, right-click on the Windows icon and tap on “Run“.
7. Further, write “temp” and click “OK“.

8. Just as before, simply remove all the files inside the folder.

Once you are done, close the File Explorer.
9. You have to press the Windows key+R keys together.
10. Then, write “prefetch” in the box and hit Enter.

11 Now, select all the contents inside the folder.
12. Then, press the ‘Delete‘ key to remove all the contents within the folders.

You can now close the File Explorer. Once you are done, reboot your computer once.
After restarting the system, try to install the printer driver from the same driver package. This time, it will be installed without any further issues.
Fix 2 – Use compatibility mode
If you are trying to install an older driver on the system, it may face a compatibility issue.
1. Open the File Explorer and go to the location of the driver package.
2. Then, right-click on the driver package and click on “Properties“.

4. Now, go to the “Compatibility” tab in the Properties window.
5. Here, check the “Run this program in compatibility mode for:” option.
6. Then, choose the “Windows 8” from the list.

7. Finally, check the “Run this program as an administrator” box.
8. Then, click on “Apply” and “OK” to save this changes.

Now, try to install the printer driver. The printer driver will be installed without any further errors.
Fix 3 – Run the in-built Printer troubleshooter
If nothing is working out for you, try troubleshooting the printer.
1. At first, press the Windows key+R keys together.
2. Then, type this URI command and hit Enter.
ms-settings:troubleshoot

3. Now, click on “Other troubleshooters“.

4. Then, on the right-hand side, you will see the “Printer” troubleshooter.
5. Here, click on “Run” to run the troubleshooter.

Now, follow the on-screen instructions to troubleshoot the printer issue.
After enacting the recommended fix to the printer, try to install the printer driver from the driver package.
Fix 4 – Clear spooler files
You have to clear the spooler files manually.
1. At first, click on the Windows icon and type “cmd“.
2. Then, right-click on the “Command Prompt” and tap on “Run as administrator“.

3. Once the Command Prompt opens up, type this command and hit Enter.
net stop spooler

Minimize the terminal.
4. After that, press the Windows key+E keys together.
5. Then go to this location ~
C:\Windows\system32\spool\PRINTERS
6. You will see a prompt while opening the PRINTERS folder. Just tap on “Continue” to proceed further.

7. Select all the contents here and press the “Delete” key to clear the folder.

8. Finally, execute this command to start the spooler service again on your system.
net start spooler

Finally, close the Command Prompt window.
Then, again try to install the printer on your system. This way, the error won’t occur.