PCs crashing down while you are in a long, intense gaming session is nothing new. Usually, when the system temperature goes off above the allowable safe limit, the system automatically restarts, trying to save the components. But, what if your PC starts to shut down continuously while playing only games, not while running any resource-hungry operation? Usually, this problem is related to the GPU and with some GPU-bound solutions, you can be back in the game within a few moments.
Fix 1 – Tally the minimum requirement for the game
Every game demands some minimum system requirement to run sustainably.
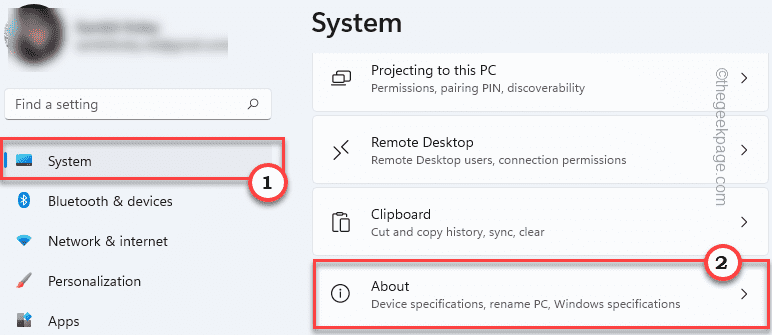
1. You have to know your system specifications.
2. So, just, press the Windows key+I keys together. This will open the Settings screen.
3. On the Settings page, tap on “System” on the left pane.
4. Now, on the right-hand pane, scroll all the down and tap “About“.
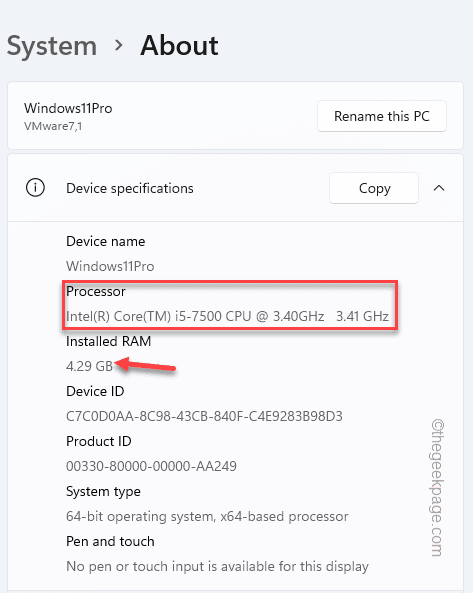
4. Here, you will get all the information about your system.
Just notice the “Installed RAM“, “Processor” and Graphics card details.
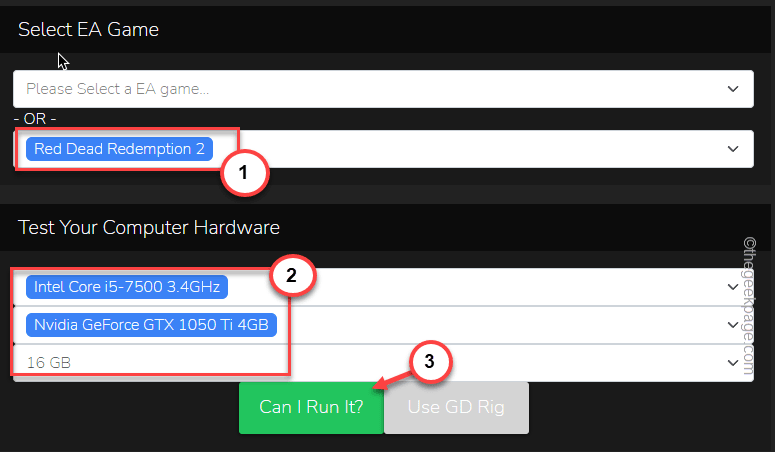
5. Once you have noted these pieces of information, go to the Can I Run it.
6. Just select the game you are trying to play in the box.
7. Next, put the specifications of your system (like CPU, GPU, and RAM).
8. Finally, click on “Can I Run it?” to run the check.
This will release a detailed report about which game settings you should use or whether the system specifications aren’t enough to run the game. In that case, you have to upgrade your system specifications to run the game smoothly.
Fix 2 – Update the graphics driver
NVIDIA, AMD releases monthly driver updates for their game drivers to make those compatible with new games.
1. Search for “GeForce Experience“.
2. Then, click on “GeForce Experience“.
3. When the GeForce Experience opens up, head on to the “DRIVERS” tab.
4. Here, just wait a little while as it does search for the driver update. Tap “DOWNLOAD” to download the latest version.
Depending upon the network speed, it may take 3-7 minutes.
4. Once the driver is downloaded, tap “Express installation“.
Now all you have to do is to wait for the downloading process to be complete.
For AMD Users
This will be useful for AMD card users.
1. If you don’t go to the AMD Radeon Software driver download page.
2. After you have chosen the required driver, tap on “DOWNLOAD NOW” to download the tool.
3. Now, double-tap the “Radeon-software-adrenalin” setup file to run it.
It will be installed on your system.
Just launch Adrenalin utility and it should automatically detect and download the latest software driver.
Install the latest driver on your system, restart it, and later, test whether you can play the game or not.
Fix 4 – Kill background processes
Check whether any unwanted process is consuming PC resources in the background.
1. Just right-tap the Windows icon and tap “Task Manager” to access it.
2. Alternatively, you can press the Ctrl+Shift+Esc keys together to open the Task Manager.
3. Once the Task Manager opens up, you will find several unnecessary apps running.
4. Now, check which apps are the unnecessary ones. Just, right-click the app and tap “End task” to kill that app.
5. This way, end all the unnecessary apps (like game launchers, Installer files) that are consuming resources.
Close the Task Manager. After closing all the unwanted processes, launch the game and check.
Fix 5 – Check the File Integrity of the game
[For Steam games]
If the game is missing some crucial game files, it may cause this problem.
1. Open Steam.
2. Now, tap on the “LIBRARY” menu to load up all the games that you have got.
3. Just right-click on the problematic game and tap “Properties“.
4. In the game properties, tap on the “LOCAL FILES“.
5. Now, tap on “Verify integrity of the game files…” to check whether the game is missing any crucial files.
This process will take a while as it verifies each individual file and fixes the issue.
[FOR EPIC STORE games]
If you are facing this issue with a Epic Store game, just do this –
1. Open the Epic Games Launcher.
2. Once you have opened it up, go to the “Library” on the left pane.
3. After that, just tap on the three-dot menu and tap on “Verify” to verify the game files.
If this doesn’t work out, go for the next fix.
Fix 6 – Switch to the High-Performance Mode
If your system is using a power-saving profile, switching to the High performance once may help.
1. You have to open the Power settings in Control Panel. So, press the Windows key+R keys together.
2. Then, type this line and hit Enter.
powercfg.cpl
3. Now, try to check if you can find the “High Performance” plan in the list of plans.
4. If you don’t just tap on “Show additional plans” to view additional plans.
5. Now, just select the “High Performance” plan from the list.
Once you have done that, close the Control Panel screen and test whether this works.
Fix 7 – Disable the default sound device
Some users have solved this issue just by disabling the onboard default audio device.
1. Just type “device manager” in the search box.
2. Then, tap “Device Manager” to access the utility.
3. On the Device Manager page, right-click on the default audio device and tap on “Disable device“.
4. To confirm the action, tap “Yes“.
Once you have disabled the audio device, close the Device Manager and restart the system.
Alternative Tips–
1. Turbo mode – There are some devices that have a dedicated Turbo Mode. Like in Asus laptops, you have to plug in your system and press the Fn+F5 keys together to turn ON the Turbo mode.
2. SSD – Using an SSD instead of an HDD has its advantages like game loading speed, game performance, and data transfer speed increases by folds.
3. Lower In-game settings – If the computer is crashing only if you are trying to switch to a higher setting for the game, launch the game in lower settings.


