BSOD or Blue Screen of Death is infamous among Windows users as to when the computer crashes, it shows up an error message, a QR code along with an error message over a blue screen. But, in some rarest of rare cases, users have reported experiencing Pink Screen of Death where all things are similar to the BSOD issues, except, the background color is pale pink. This very rare issue may have appeared due to any hardware/software problem on your system.
Fix 1 – Update your graphics card
Try updating the graphics card on your system.
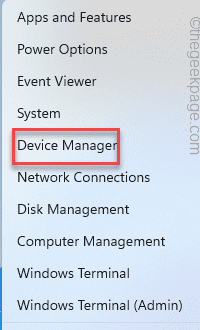
1. At first, press the Windows key+X keys together.
2. Then, tap on the “Device Manager” to access it.

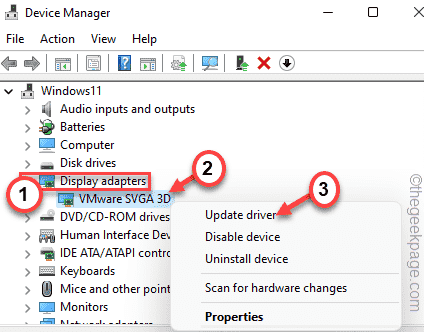
3. When the Device Manager opens up, tap on the “Display adapters” to expand it.
4. Then, right-click on your display driver and click on “Update driver“.

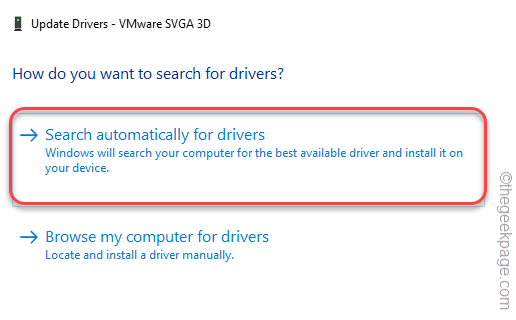
5. Next, click on the “Search automatically for drivers” on the window.

Windows will now download and install the latest version of the graphics driver on your system.
Restart the system and check whether this works.
NOTE – Additionally, you can also download the latest version of Nvidia, AMD, Intel graphics drivers directly on your system and install manually.
Fix 2 – Disconnect all unnecessary items
You have plugged in some unnecessary items to your system, try detaching those and check.
1. At first, make sure your computer is shut down completely.
2. Now, carefully remove detach the system from the power source.
3. Then, remove every external device from your system (including various USB adapters, dongles, external HDDs, USB drives).
5. Once you have done that, just attach the power cable to your system and switch ON your machine.
While your computer starts up, check whether you are seeing the pink screen of death issue.
Fix 3 – Check the display manually
There is a chance that the monitor/display unit you are using is malfunctioning.
1. Check the connection of the monitor.
2. The best way to identify if there is an issue with the monitor is to detach it from your system and test with another PC/laptop.
Check whether you are noticing a pink tint issue on the screen on another PC. If you aren’t then the problem is with your current system.
Fix 4 – Use the Clean Mode
You can clean boot your system to identify the root cause of the issue and take action accordingly.
1. At first, press the Windows key+R keys together.
2. Then, type this command and hit the Enter key.
msconfig

3. In the System Configuration window, go to the “General” tab.
4. Here, select the “Selective startup” option and then check the “Load startup items” option.

5. After that, click on the “Services” section.
6. Here, you have to check the “Hide all Microsoft services” box.
7. Then, tap on the “Disable all” option to disable all the third-party apps.

This way, all the services affecting the pointer flickering issue will be stopped.
8. Then, tap on the “Startup” tab.
9. Now, tap on the “Open Task Manager“.

Task Manager will open up.
10. All the services that are set to autostart with the system are listed here.
11. Then, right-click on the service and tap on “Disable“.

Now, close the Task Manager and return to the System Configuration window.
12. Don’t forget to tap on “Apply” and then on “OK“.

You will notice a prompt has appeared to restart your machine.
13. Just, click on “Restart” to reboot your system immediately.

Once your system restarts, check whether you are facing the same Pink Screen of Death or not.
If you are not experiencing the issue, you can deduct a third-party software is causing this problem.
1. Press the Windows key+R keys together.
2. Then, type “appwiz.cpl” and click on “OK“.

3. In the Programs & Features window, you will see the list of apps.
Check which apps are installed recently.
4. Just, right-click on the most recent installed app and tap on “Uninstall” to uninstall the app.

After doing this, your problem should be fixed.
Additional Tips –
1. If you are facing this issue with a game, try reinstalling it.
2. Try using another display unit if it is possible.