Many of the Windows users have reported that the arrow keys of photos app on their windows system have suddenly stopped working and they are not able to use the photos app properly like navigating through pictures/photos in their folder. Even after they have tried restarting their system for several times, still the problem exists.
Therefore, we have analyzed this problem and these below given factors could be the reason behind it.
- Problem while installation of Photos app
- File Indexing problem on system
- Changes in settings in Photos app
- Photos app not set as default
- Windows not updated
After considering all the factors that could be the potential cause for this problem, in this post we have compiled a few fixes that could help the users in resolving this issue they are facing.
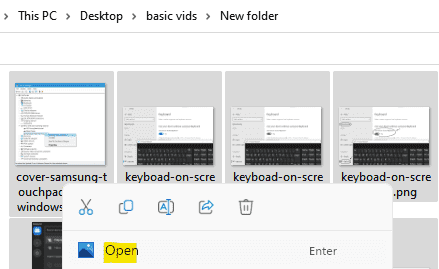
Fix 1: Select all Photos in Folder and open
Just select all the photos in the folder by pressing CTRL + A together and then hit Enter key.
Now, Just use arrow keys to go to the next picture easily.

Fix 2: Turn Off Indexing Option for Searching file or folders
When you open a folder which contains loads and loads of heavy files or when you search for a file using search method, then it will surely take time if the indexing option is enabled. When the file loading takes time, then the Photos app can’t access the file which will cause the arrow keys to stop working.
So we are going to show you how you can turn off the indexing option for searching file or folders in a few simple steps given below.
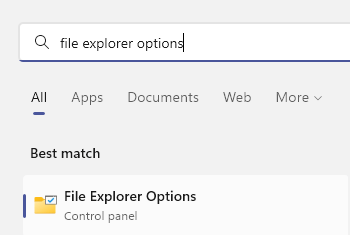
Step 1: Search File explorer options in windows search box and then click on File explorer options showing up in the search.

Step 2: This will open up the folder options window.
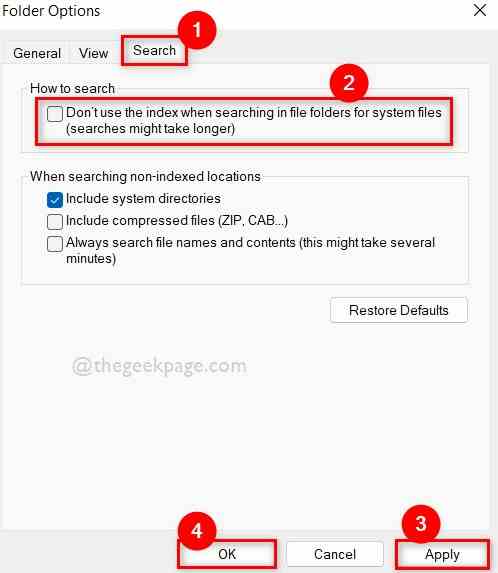
Step 3: Go to Search tab in the folder options window as shown below.
Step 4: Under the Search tab, Uncheck the Don’t use the index when searching in file folders for system files (searches might take longer) checkbox.
Step 5: Finally, Click Apply and OK to close the Folder Options window.

Step 6: Now check if the issue is resolved.
Hope this solved the issue.
Fix 3: Uninstall and again Reinstall Microsoft Photos app
Sometimes, there might be an issue with the Microsoft Photos app itself. So try uninstalling the photos app and then again re-install the app using PowerShell commands given below.
Step 1: Press Windows + R keys together to open Run box.
Step 2: Then, type powershell in the run box and press CTRL + SHIFT + ENTER keys together to open PowerShell application as an admin.
Step 3: Click Yes on the UAC prompt to continue.

Step 4: Execute the below given command to uninstall / remove the Photos app from your system.
get-appxpackage Microsoft.Windows.Photos | remove-appxpackage

Step 5: Then, execute this command given below to re-install the Photos app as shown below.
Get-AppxPackage -allusers Microsoft.Windows.Photos | Foreach {Add-AppxPackage -DisableDevelopmentMode -Register "$($_.InstallLocation)\AppXManifest.xml"}

Step 6: Once done, Close the PowerShell application.
Step 7: Check if the issue is solved.
Fix 4: Set Microsoft Photos app as default
This can be one of the reasons basically that when you open a picture with photos app and try to navigate to other pictures, it might not work because of Photos app not being set as default. If it is set as default, then there would not be a problem for scrolling other photos using photos app. Let use see how to set the photos app as default in windows 11 using the simple steps given below.
Step 1: Press Windows + R keys together to open Run command box on your system.
Step 2: Then, Type ms-settings:defaultapps in the run dialog box and press the Enter key to open Default apps page on your system as shown in the below screenshot.

Step 3: Locate Photos app by scrolling the list of applications and click on it to open it.

Step 4: Then, Select the file type such as jpg, jpeg or png, etc. as shown in the below image.

Step 5: Select Photos from the list and Click OK as shown below.

Step 6: This will set the Photos app as default for those file types you chose to open.
Step 7: Close the Settings window once you are done.
Open any picture using photos app and check if the arrow keys are working fine.
Hope this must have solved your problem. If not, try our other fixes given below.
Fix 5: Run the Windows Store Apps Troubleshooter
If there is any problem with the Windows store app on your system, then it might be the reason for photos app not navigating issue. So, troubleshooting the windows store app can detect any problem and it will try to fix the issue.
Let us see how to do it below.
Step 1: Open Run command box by pressing Windows + R keys together on your keyboard.
Step 2: Type control.exe /name Microsoft.Troubleshooting in the run box and press the Enter key to open Troubleshoot page as shown below.

Step 3: Select Other troubleshooters option as shown below.

Step 4: In the other troubleshooters page, scroll down and locate Windows Store Apps option at the bottom.
Step 5: Click Run of the Windows Store Apps to start performing the troubleshoot as shown below.

Step 6: Perform the onscreen instructions if any, to complete the process of troubleshooting.
Step 7: Then, wait for sometime it will troubleshoot and come up with the fix. Perform the fix.
Step 8: After it is fixed, close the other troubleshooters page.
Now check if the photos app arrow keys are working fine or not.
That’s it.
Fix 6: Try Resetting or Repairing the Photos app
Whenever any application on the system is not working properly, either not opening the app or any part of the application is not working, then there is an option in windows where the user can reset or repair the app. Reset will delete the data from the application whereas Repair option will try to repair the app without losing the data.
The user can choose any option they want as per their need and here are a few steps given below on how to reset / repair the app on your windows 11 system.
Step 1: Open Run command box by pressing Windows + R keys together on your keyboard.
Step 2: Type appwiz.cpl in the run box and press the Enter key to open Installed Apps page on your system as shown below.

Step 3: In the Installed page, scroll down and check for Microsoft Photos application.
Step 4: Click on three vertical dots (Show more options) icon in front of Microsoft Photos app as shown below.
Step 5: Select Advanced options from the list as shown.

Step 6: Scroll down the Photos Options page and go to Reset section.
Step 7: Then, either Click Repair for repairing the application without losing data OR Click Reset button to repair the app with data being lost as shown in the below image.

Step 8: Once the repairing / resetting is done, check if the photos app arrow keys are working fine.
Hope this solved the issue.
That’s it.
Hope this post was informative. Thank you!