Many users have reported seeing an error while sending or receiving emails in Outlook. This error is seen in all the Outlook versions. The complete error message is as follows –
Task ‘Microsoft Exchange Server – Sending’ reported error (0x8004060C): ‘The message store has reached its maximum size. To reduce the amount of data in this message store, select some items that you no longer need, and permanently delete them.
Or
Task ‘EMAIL ADDRESS’ – Sending and Receiving’ reported error (0x8004060C): ‘Unknown Error 0x8004060C
Or
Task ‘Microsoft Exchange Server – Receiving’ reported error (0x8004060C): ‘Unknown Error 0x8004060C
This error is because the Outlook PST file exceeds the size limit. In case you are facing this error and wondering how to fix it, don’t panic. In this article, we have compiled a list of fixes that might help you overcome this error.
Fix 1: Delete unwanted items from Outlook
Step 1: Open the MS Outlook Application.
Step 2 – Click on File and the click on Info
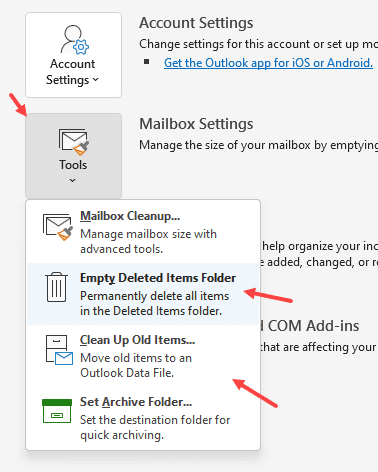
Step 3 – Now, Click on Tools and Then Use Empty deleted Items folder and clean up Old items Option to clear clutter from outlook.

Step 4: Ensure that the messages are even deleted from the Deleted Items folders. Alternatively, Shift+Delete to delete the email.
Fix 2: Compacting the PST File
Step 1: Open the MS Outlook Application.
Step 2: Click on the File menu option.

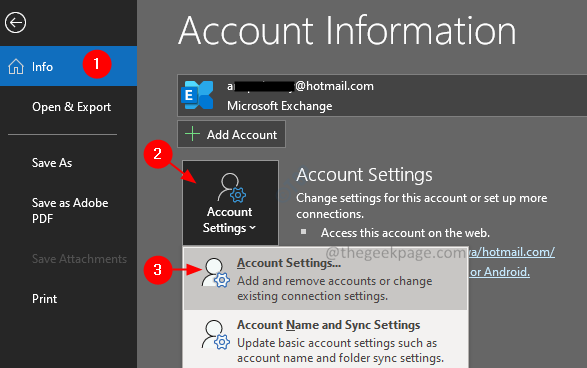
Step 3: On the right-hand side, click on the Account Settings.
Step 4: From the drop-down, choose Account settings.
Step 5: In the appearing window, click on the Data Files tab.
Step 6: Click on the required account.
Step 7: Then, click on Settings.
Step 7: In the window that shows up, click on the Advanced tab.
Step 8: Click on the Outlook Data File Settings button.
Step 9: In the Outlook Data File Settings window that opens, click on the Compact Now button.
Step 10: Click on the Ok button.
Fix 3: Reducing the size of PST files.
Step 1: Open the MS Outlook Application.
Step 2: Click on the File menu option.

Step 3: Click on the Tools.
Step 4: From the drop-down choose Mailbox Cleanup.
Step 5: In the opening window, find the older items and the find larger items, and delete them.
Step 6: You can choose to delete all the items in Deleted Items folder by clicking on the Empty button.
Step 7: You can choose to delete all alternate versions of items in your mailbox. Click on the Delete button.
These steps will help you clean your mailbox and reduce the size of the PST file.
Fix 4: Archiving data and creating a new PST File.
Step 1: Open the MS Outlook Application.
Step 2: Click on the File tab from the top menu option.
Step 3: Click on the Tools.
Step 4: From the drop-down choose Clean Up Old Items.
Step 5: In the archive window that opens, click on either Archive this folder and all subfolders.
Step 6: Select the required folders.
Note: Click on Archive all folders according to their Auto Archive settings in the previous step to archive all the folders.
Step 7: Choose an appropriate date in the Archive items older than section.
Step 8: Check the box next to Include items with “Do not AutoArchive” checked.
Step 9: Browse and Choose the location of the Archive File.
Step 10: Click on the OK button.
Fix 5: Repair the Corrupt PST File
If there is a .pst or .ost file present in the location specified in the error message, it means that the file is corrupted due to some issue and Outlook is not able to open it. In this case, one can opt to run the built-in repair tool for Outlook by Microsoft called, Scan PST.
Step 1: Find out the location of the .pst file. To do so,
1. Go to Control Panel and Open the Mail Setup.Refer the Steps 1,2,3, from Fix 3
2. In the Mail Setup window, click on the Data Files button as shown below

3. In the Account Settings window that opens, double-click on the .pst file that you want to repair

4. In the Outlook Data File window that opens, Under the Filename section the location of the file will be present.

Step 2: Run the SCANPST application. To do so, we have to know its location.
Following is the location of different versions of Outlook.
Outlook 365
C:\Program Files\Microsoft Office\root\Office16
Outlook 2016/2019
32-bit Windows > C:\Program Files\Microsoft Office\Office16
64-bit Windows > C:\Program Files (x86)\Microsoft Office\Office16
64-bit Outlook > C:\Program Files\Microsoft Office\Office16
Click-to-Run > C:\Program Files\Microsoft Office\root\Office16
Outlook 2013
32-bit Windows > C:\Program Files\Microsoft Office\Office15
64-bit Windows > C:\Program Files (x86)\Microsoft Office\Office15
64-bit Outlook > C:\Program Files\Microsoft Office\Office15
Click-to-Run > C:\Program Files\Microsoft Office\root\Office15
Outlook 2010
32-bit Windows > C:\Program Files\Microsoft Office\Office14
64-bit Windows > C:\Program Files (x86)\Microsoft Office\Office14
64-bit Outlook > C:\Program Files\Microsoft Office\Office14
Outlook 2007
32-bit Windows > C:\Program Files\Microsoft Office\Office12
64-bit Windows > C:\Program Files (x86)\Microsoft Office\Office12
Outlook 2003
32-bit Windows > C:\Program Files\Common Files\System\MSMAPI\<locale ID>
64-bit Windows > C:\Program Files (x86)\Common Files\System\MSMAPI\<locale ID>
Outlook 2002/XP
C:\Program Files\Common Files\System\MAPI\<locale ID>\scanpst.exe
Outlook 2000
C:\Program Files\Common Files\System\MAPI\<locale ID>\NT\scanpst.exe
Based on the Outlook version on your system, go to the appropriate location and double click on SCANPST.EXE

Step 3: Now open the Outlook Data File window( the window opened in Step 1, point 5) Select the entire Filename and Copy it. (Click anywhere within the Text area, Hold Ctrl+a followed by Ctrl+c)

Step 4: When the SCANNPST application opens,
- Paste the filename in the Enter the name of the file you want to scan section
- Click on the Start button

Once, the scan completes. Restart your system and try opening the Outlook Application. Check if this fixed the issue.
That’s All. We hope this article has been informative. Thank you for Reading.
