As we all know, when we delete any file from our system it is stored in the recycle bin temporarily. In case one wants the file back, one can go to the recycle bin and restore the deleted file. Recycle bin is usually present on the desktop. However, one might have deleted the recycle bin either intentionally or accidentally. At times, windows update might perform certain changes in the system and this might result in Recycle Bin in icon disappearing from the desktop. If you notice that recycle bin is not present on your desktop, then it doesn’t mean that the recycle bin is being deleted from the system, it might have been moved elsewhere.
In this article, let us discover the different ways of opening Recycle Bin in Windows 10 when it is not present on the Desktop.
Method 1: From Show desktop icons option in the Context Menu
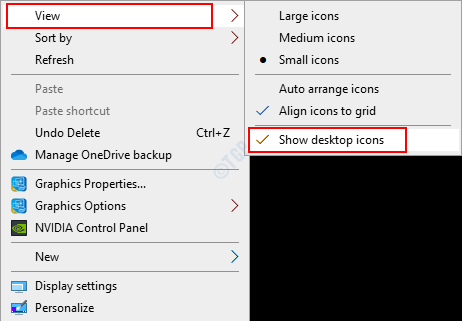
Step 1: Right-click anywhere in the blank area on the desktop
Step 2: Choose View from the context menu
Step 3: Tick on Show desktop icons

Check if you can see the Recycle Bin icon on the Desktop now. If not, check the below methods.
Method 2: Opening Recycle Bin from Run Dialog
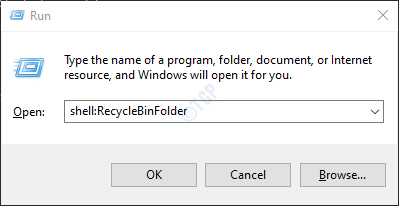
Step 1: From your keyboard hold the keys Windows+r at the same time to open the Run Dialog in your system
Step 2: When the dialog opens, type shell:RecycleBinFolder , and Press the OK button

That’s it and the RecycleBbin folder opens.
NOTE:
Alternatively, the command explorer.exe shell:RecycleBinFolder can be used.
Method 3: Opening Recycle bin from the address bar in the File Explorer
Step 1: Holding the keys Windows+e simultaneously from your keyboard open the Fie Explorer Window
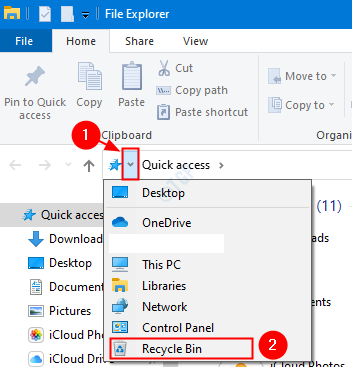
Step 2: In the explorer window that opens,
- Click on the downward arrow present in the address bar shown in the below screenshot
- Choose Recycle bin from the drop-down menu.

Step 3: Click on the Recycle Bin to open it.
With this, the recycle bin folder will be opened in the window.
Method 4: Adding Recycle bin icon back to the Desktop from Settings
Step 1: From your keyboard hold the buttons Windows+r at the same time to open the Run Dialog in your system
Step 2: When the dialog opens, type ms-settings:themes, and Press on OK.

Step 3: In the Settings –> Personalization –> Themes window that opens, scroll down and click on Desktop icon settings under the section named Related Settings

Step 4: In the Desktop Icon Settings window,
- Under the Desktop icons section, click on Recycle Bin to tick the option.
- Press on Apply
- Press on OK

With these simple settings, one can see the Recycle icon back on the Desktop again.
Method 5: From Command Prompt
Step 1: Pressing the keys Windows+r together to open the Run window.
Step 2: Type cmd and press Enter

Step 3: In the command prompt window that opens, just type the below command and hit Enter
start shell:RecycleBinFolder

Method 6: From PowerShell
Step 1: Holding the keys Windows+r at the same time to open the Run window.
Step 2: Type powershell and hit Enter

Step 3: In the PowerShell window that opens, run the below command and hit Enter to open recycle bin
start shell:RecycleBinFolder

Method 7: Opening Recycle bin from the File Explorer
Step 1: Holding the buttons Windows+e simultaneously from your keyboard open the Fie Explorer Window
Step 2: On the left-hand side of the explorer window,
- Right-click anywhere on the blank area
- Click on Show all folders option from the context menu

Step 3: Once, ticked you can see a tick mark next to Show all folders, and simultaneously you can view Recycle Bin in the Explorer as shown in the below screenshot.

Step 4: Click on the Recycle Bin to open it.
That’s All. Hope this article has been informative. Thank you for Reading. Kindly comment and let us know if you found this article useful.