Some Microsoft Visual Studio users have reported an error message “Object reference not set to an instance of an object.” while opening several projects. Though at first sight, it may feel like other installations (like ASP.NET or Web Tools) may have affected it, the corrupted local cache of VS is actually the main culprit here. So, just follow our instructions and get Visual Studio back in no time at all.
Fix 1 – Delete the local VS cache
Delete the Local VS cache from your system. You can do it directly from the terminal or using the GUI (File Explorer).
Step 1 –
NOTE – As you are removing the local cache and resetting the user setting to default, expect all the personal changes you have made under VS Layout, and linked MS account to be gone.
1. Before you do anything, close the Visual Studio app.
2. Then, open File Explorer on your computer.
3. Next, go to this location –
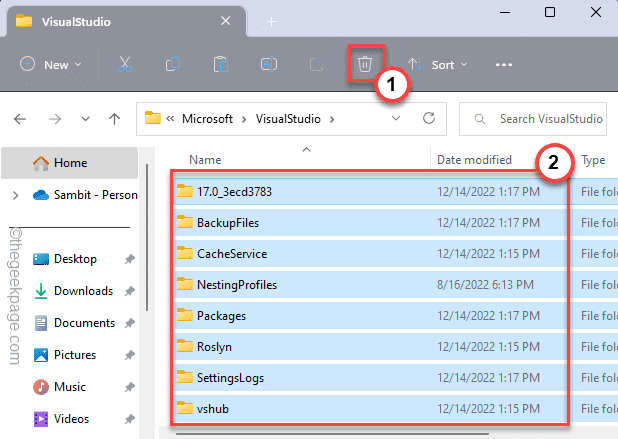
C:\Users\%username%\AppData\Local\Microsoft\VisualStudio
4. Here, select all the components inside and tap the bin icon to empty the folder.
5. Now, head on to this point –
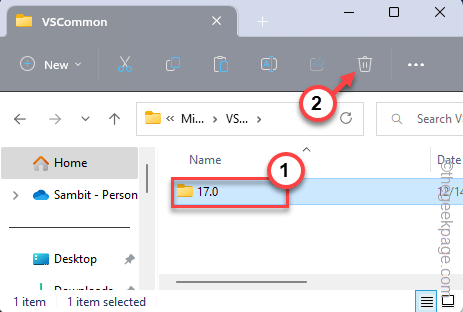
C:\Users\%userprofile%\AppData\Local\Microsoft\VSCommon
6. After that, press the Ctrl+A keys together to select everything at once.
7. Finally, tap the “Delete” key from your keyboard to remove all the components.
Close the File Explorer.
Step 2 – Reset the userdata
This step is optional and only if Step 1 alone doesn’t fix the issue, do this.
You can easily reset the user data using a terminal.
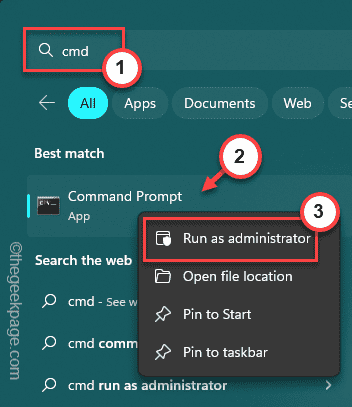
1. Type “cmd” in the search box.
2. Then, right-tap the “Command Prompt” that appears in the search box and tap “Run as administrator“.
3. After that, you have to go inside the Visual Studio installation folder using the cd command.
x64 system - C:\Program Files (x86)\Microsoft Visual Studio 22.0\Common7\IDE
x86 system - C:\Program Files\Microsoft Visual Studio 22.0\Common7\IDE
So, the command is –
cd installation folder of VS
You have to replace the “location of VS” with the installation folder on your computer.
cd C:\Program Files (x86)\Microsoft Visual Studio 22.0\Common7\IDE
4. Finally, execute this to reset the userdata.
devenv /resetuserdata
After this, close the terminal and relaunch the Visual Studio. Check if this works.
Fix 2 – Restart VS
This Object reference issue you are having may just be a one-time glitch. Just close Visual Studio processes and test.
1. If you right-click the Windows icon, you will notice the context menu.
2. There, tap “Task Manager” to open that.
3. On the Task Manager panel, look for the “vshub.exe” process.
4. Once you have found that, right-tap that and tap “End task” to kill the process.
After that, restart Visual Studio. Check if this works.
Fix 3 – Delete ComponentModel
You can delete the manually Component Model cache and test whether it works.
1. Open a Run box using the Win key and the R keys together.
2. Then, type “%localappdata%” and hit Enter to visit the Appdata folder.
3. Now, go this way –
Microsoft\VisualStudio.0
4. Here, you can find the “ComponentModelCache” folder.
5. Then, select the folder and tap the “Delete” icon to delete it from your system.
After this, restart Visual Studio.
Check if this helps. You won’t see the “Object reference not set to an instance of an object ” error message again.
There is another way of doing this. You can install the Clear MEF Component Cache extension and use it to do the same.
Fix 4 – Run Visual Studio as an administrator
Run the Visual Studio as an administrator and test. Some users have fixed the problem through this.
1. Just type “visual” in the search box.
2. Then, right-click on “Visual Studio 2022” as it appears on the search result, and then, click “Run as administrator” to run VS as an admin.
Wait for Visual Studio to launch. Now, open your project and test it yourself.
Fix 5 – Manually reset the VS User data
If running <code>devenv /resetuserdata<code> doesn’t solve the issue, try resetting the Visual Studio user cache data manually.
1. Open the Visual Studio, if it isn’t already opened.
2. There, click on “Tools>” and click on “Import and Export Settings” to open that setting.
3. Next, just tap the “Reset all settings” option and tap “Next” on the following window that precedes.
4. On the following page, select the “No, just reset settings, overwriting my current settings” option and tap “Next” to start the reset process.
This process takes just a few seconds.
Finally, tap “Finish” to complete the process.
Once all these are done, open the project once more and test it.
Check if this works.
Fix 6 – Update the extensions
Update all the Visual Studio extensions you have. Old, faulty extensions may cause this problem.
1. Launch Visual Studio.
2. On the Visual Studio page, click on “Extensions” on the menu bar.
3. Then, tap “Manage extensions“.
4. Now, the complete list of extensions will open up as a list.
5. So, select “Extensions” on the left-hand pane.
6. Then, tap “Update all” to update all the extensions one by one.
When all the extensions are updated, open the project again and test.
Fix 7 – Install ASP.Net packages and web tools
Download & install the latest ASP.Net in Visual Studio. If you want you can download additional workloads as well.
1. Open Visual Studio.
2. Then, click on “Tools” and tap “Get tools and features” from the drop-down list.
3. Visual Studio installer window will appear on your screen.
4. There, go to the “Workloads” section.
5. Check the “ASP.NET and web development” tool.
On the opposite side of the page, under Installation details, you may check all the optional tools (like .NET profiling tools, Entity Framework 6 tools, etc.)
6. Finally, when you are satisfied with your selection, tap “Modify“.
Wait for Visual Studio Installer to install the packages. Then, close and relaunch VS once and test further.
The error won’t appear again.
Fix 8 – Install the latest Visual Studio
A simple bug can cause the Object Reference error. So, update the Visual Studio to the latest version.
1. At first, press the Win+S key to call the search box. Type “visual” there.
2. Then, tap the “Visual Studio Installer” in the search box to open it.
3. Wait until Visual Studio Installer opens up and if there are any new versions available, you will notice Update available message.
Here, you can see the latest Visual Studio package.
4. Just, tap “Update” to update it.
The problem won’t resurface again.
Fix 9 – Disable the Touch service
If you are working on a Surface device or any touchscreen device, the Touch Keyboard and Handwriting Panel Service can cause the problem. Disable it on your system.
1. At first, open a Run box using the Win key and the R key.
2. Then, write this down and hit Enter.
services.msc
3. When the Services utility opens up, go down until you see “Touch Keyboard and Handwriting Panel Service“.
4. You can directly double-tap it or right-click it and tap “Properties“.
5. Next, set the ‘Startup type:’ to “Disabled” from the drop-down list.
6. After that, tap “Apply” and “OK” to save this change.
Close Services after this. Open the Visual Studio and test.
Fix 10 – Check your code once more
If all these solutions have failed to fix the problem, you should review the code for any issues such as having a reference object with a null value. This can create such instances and you should omit those mistakes and try again.
Additional Points –
Though this problem usually appears in Microsoft Visual Studio, in some cases, the same error message may appear while using AutoDesk Vault. In that case, you can just uninstall the Autodesk Vault from your system and reinstall it.


