Google Voice has not yet rolled out in all the countries yet. But wherever it is rolled out, it is a star. It provides excellent calling facilities and is widely used by many users. Moreover, it comes with the brand name Google and it, thus, by default inherits a lot of credibility. However, just like any other Android application, Google Voice is also not devoid of bugs. There are many issues faced by Google Voice users, though none is unsolvable. One such issue faced by the Voice users is the Google Voice couldn’t place your call issue.
The issue occurs because of several reasons like unstable network connection, faulty application updates, corrupted application data/cache, incorrect application configurations, interference of VPN, etc. Though the causes are many, the solutions are actually quite easy and straightforward. Dive into the article to find out how you can quickly figure out and fix the Google Voice couldn’t place your call error in a matter of seconds. Hope you enjoy reading!
Solution 1: Change Google Voice Settings
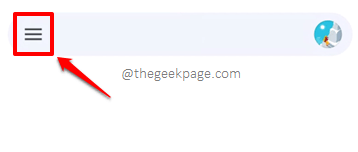
Step 1: Open the Google Voice application and click on the More Options icon located at the top left corner of the screen.
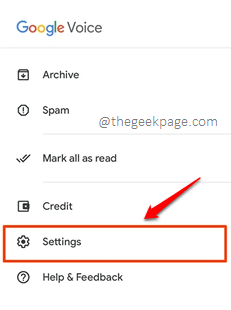
Step 2: As next, from the list of options available, click on the one that says Settings.
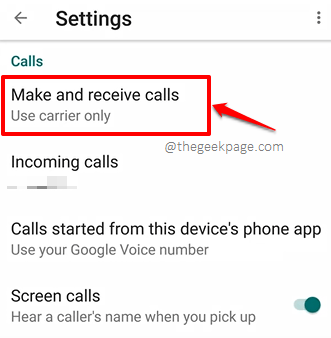
Step 3: Now on the Settings screen, under the Calls section, click on the option Make and receive calls.
Step 4: Finally, choose the radio button corresponding to the option Prefer Wi-Fi and mobile data. That’s it.
Once you are all done, force close the Google Voice application and check if the issue is resolved or not.
Solution 2: Clear Google Voice Application Data and Cache
In this solution, let’s try clearing off Google Voice application data and cache.
Step 1: Once again, launch the Settings application.
Step 2: On the Settings screen, click on the Apps option.
Step 3: Scroll through, locate and click on the Voice application.
Step 4: Click on the Storage option next.
Step 5: Now on the Storage screen, click on the Clear data button and on the Clear cache button to clear off app data and app cache respectively. That’s it. Check if that resolves your issue.
If none of the above-listed solutions fixed the issue for you, try launching Google Play Store and updating the Google Voice application. You can also try uninstalling the application altogether and installing it all over again. Please let us know if you’re still stuck, we are happy to help.
Solution 3: Check Whether you have a Stable Network Connection
Most of the time, the issue occurs because there is no stable network connection. So the very first thing you should check is whether you are connected to the Internet fine or not. If you’re on cellular data, try switching to a Wi-Fi network and vice-versa.
Solution 4: Disable VPN if Enabled
Some users have reported that when they disabled their VPN tunneling, Google Voice readily started placing calls successfully without throwing the error message. So you can try disabling Virtual Private Network(VPN) connections if you have enabled any on your Android device.
Solution 5: Grant Required Permissions to Google Voice
Step 1: Launch the Settings application by clicking on its icon from the applications drawer.
Step 2: On the Settings screen, click on the Apps option.
Step 3: Scroll through the list of applications installed on your device and click on the Voice application to view its application-related information.
Step 4: As next, click on the Permissions option.
Step 5: Now, on the Permissions screen, you got to make sure all the permissions are under the ALLOWED section and none under the DENIED section. If any of the permissions are under the DENIED section, click on it.
Step 6: Choose the radio button corresponding to the Allow option and hit the Back arrow icon at the top left corner of the screen to get back to the Permissions screen.
Repeat the same and move all the DENIED permissions to the ALLOWED section.
Step 7: Finally, your Permissions screen should look like the one in the following screenshot. All the permissions should be under the ALLOWED section.
Note: For security-related concerns, if you don’t feel like granting all the permissions, you can try granting permissions one by one and check if that fixes the issue of Google Voice not being able to place calls.
Stay tuned for more and more amazing technical tricks, tips, solutions, how-tos, and hacks.


