NVIDIA Control Panel has all the things and settings that you can tweak to extract the full capabilities of your graphics card. So, when the NVIDIA Control Panel stops working, you can’t alter many settings that you want to unless you find a fix to make the NVIDIA Control Panel once more.
Fix 1 – Kill all the NVIDIA processes
You have to kill all the NVIDIA processes and restart the File Explorer process.
1. Try to open the NVIDIA Control Panel.
Windows will try to launch the NVIDIA Control Panel. It won’t open up. Don’t worry.
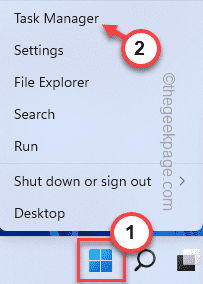
2. Now, just right-click the Windows icon and tap “Task Manager“.
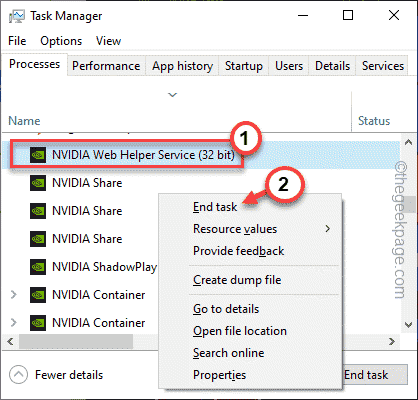
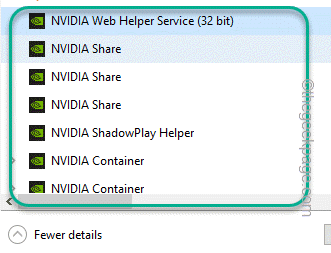
4. When the Task Manager opens up, you will find several NVIDIA processes running.
5. Just right-tap one of those processes and tap “End task” to kill that.
6. Repeat the same steps for all the NVIDIA processes as well.
7. Now, press the Windows key+E once to open the File Explorer. Once it does open up, minimize it and go back to the Task Manager.
8. Coming back to the Task Manager page, you will find the “File Explorer” process.
9. Just, select it and tap “Restart” to reboot the File Explorer.
This may turn your screen unresponsive for a brief period. Soon, you can check whether the NVIDIA Control Panel is working or not.
Fix 2 – Automate the NVIDIA service
If the first method doesn’t solve your issue, you can automate the NVIDIA service.
1. Open the Run terminal. To do that, right-tap the Windows icon in the middle of the taskbar and tap “Run“.
2. Then, type this word there and click “OK“.
services.msc
3. When the Services page opens up, scroll down and find the “NVIDIA Display Container LS” service.
4. Once you have found it, double-tap that to open it.
5. Now, look at the status of the service. If it is ‘Stopped‘, you have to tap “Start“.
If it is already running, tap “Stop” to stop the service and then, click “Start” to resume the service.
6. Once it is done, set the ‘Startup type:’ to the “Automatic” setting from the drop-down option.
7. Later, just click “OK” to save all these changes that you have made.
8. Coming back to the Services page, try to find the “NVIDIA LocalSystem Container” service.
9. Once you have found that service, repeat the same steps that we have mentioned in Steps 5 to Step 7 to automate this service as well.
[Additionally, if you can find the “NVIDIA Network Service Container“, automate it. ]
Finally, close the Services screen. Then, try to open the NVIDIA Control Panel one more time. It should solve your problem.
Fix 3 – Kill the NVIDIA Container process
If automating the NVIDIA-related services doesn’t work, try ending NVIDIA processes.
1. Try to open the NVIDIA Control Panel.
2. Then, press the Ctrl+Shift+Esc key combinations together to open the Task Manager without even moving your mouse.
3. Now, head on to the “Details” tab and look for the “NVDisplay.Container.exe” process.
4. Just right-tap that and click “End task” to kill it.
After this, retry to launch the NVIDIA Control Panel again. Test if this is working or not.
Fix 4 – Update the graphics driver
NVIDIA updates its control panel with its regular driver updates as well.
There are two ways you can proceed.
Using the Device Manager
1. Open the Run terminal by pressing the Windows key+R.
2. Then, type this and click on “OK“.
devmgmt.msc
3. On the Device Manager page, just expand the “Display adapters” section.
4. Just, right-tap the NVIDIA driver and click on the “Update driver” option to update the driver.
5. Now, you will be offered two choices. Choose “Search automatically for drivers” to let it search and install the graphics card on the system.
Windows will now download and install the latest graphics card on your system.
Once it is done, do restart your computer.
Using the NVIDIA GeForce Experience
It is the easiest way to update your NVIDIA driver.
1. At first, launch the GeForce Experience app.
2. Now, you may go to the “DRIVERS” section.
3. After that, tap on “Download” to download the latest version of the driver.
Wait for a while as your system downloads the latest version of the driver.
4. Once it is done, tap on “CUSTOM INSTALLATION“.
This will let you take full control over the installation process.
5. In the next step, just check the “Perform a clean installation” tab and click “Next“.
This will remove all the misconfigured driver profiles and set the default settings.
Once this process is done, feel free to check the status of the NVIDIA Control Panel.
Additional Tip –
If nothing has worked for you, you can try to uninstall the NVIDIA Control Panel app.
a. Open the Apps and Features page.
b. Here, locate and uninstall the “NVIDIA Control Panel” app.
c. Once you have uninstalled the NVIDIA Control Panel app, open this Store link.
d. Now, tap “Install” to
After this, use this new NVIDIA Control Panel app.


