Windows Backup is a very useful tool to take a system image backup and protect the system so that if anything bad happens to the system itself, you will have an option to restore it back using this image. But, while taking backup, some users have complained of seeing this error message – “Windows Backup Image Error 0x80780113” on their systems. This error occurs simply because of the low System Reserved space on your computer. Extending the storage should fix the problem.
Fix 1 – Create a new System Volume
You can’t increase the system volume using the Computer Management tool. You can create a system volume only on a primary partition of an MBR disk.
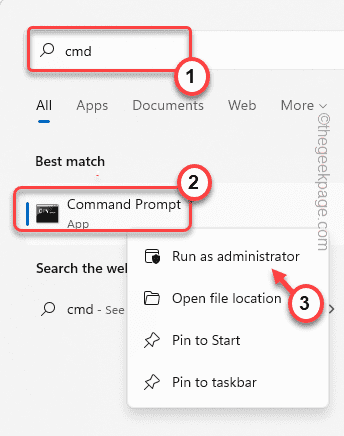
1. At first, press the Windows key and type “cmd“.
2. Then, right-click on the “Command Prompt” and tap on “Run as administrator“.

3. When the terminal appears, paste this command and hit Enter.
bcdboot.exe /s C:\Windows /s F:
NOTE –
Here, C: drive is the current system drive. F: is the new partition of an MBR disk. You can use any other drive letter if you want.

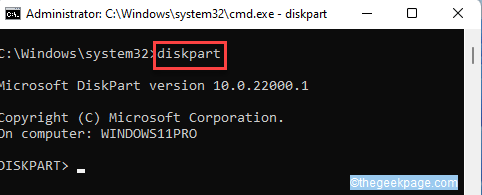
4. Now, you have to access the DISKPART tool in the terminal. Type this command and hit Enter to access it.
diskpart

5. Now, all you have to do is select the volume F and activate it as the main system reserved partition.
select volume F
active

Once you are done, close the Command Prompt terminal and restart your computer.
After restarting, F: drive will be the System Reserved Partition. Now, try to take a system image backup.
Fix 2 – Use a third-party tool
Actually, Windows doesn’t allow users to increase the partition of the System Reserved partition. So, you have to use a third-party free tool to do the job.
1. Go to the official MiniTool Download Center.
2. In the MiniTool Partition Wizard Free Edition section, tap on “Download“.

3. After downloading the setup, double click on it to run it on your system.

Now, follow the on-screen instructions to install the MiniTool Partition tool on your computer.
4. At the final step, make sure the “Launch Minitool Partition wizard” is checked.
5. Then, tap on “Finish“.

This will automatically open up the Minitool again.
6. Once it does, you will notice the list of drives.
7. After that, right-click on the “System Reserved” and tap on “Extend” to extend the partition.

8. Drag the slider to a size you prefer (preferably 1 to 2 GB).
9. Finally, click on “OK“.

This process can take a while. Once you are done, close the MiniTool Partition Wizard.
Then, go back to the Control Panel and start creating a system image backup. It will work just fine.
Fix 2 – Perform a disk cleanup operation
Unnecessary junk files can cause storage issues in your system drive.
1. At first, press the Windows key and type “disk cleanup“.
2. Then, tap on “Disk Cleanup“.

3. Now, click on the “Drives:“.
4. After that, tap on the drop-down and choose the “(C:)” drive and click on “OK“.

Wait a while for your computer to analyze the number of trash files.
5. Now, check all the boxes one by one to select all the files.
6. Finally, tap on “OK” to remove all the junk files.

7. A warning message will appear for your confirmation to permanently delete all the files.
8. Just tap on the “Delete files” to asset your action.

9. Open the Disk Cleanup, if it isn’t opened yet.
10. This time tap on the “Clean up system files” option.

11. Re-select the C drive.
12. Then, select files like old windows installations and non-useful safe to remove all the system files this time.

This should have emptied all the system junk files. But you can perform these optional steps to empty up the Temp folder.
OPTIONAL STEPS –
1. At first, right-click on the Windows key and tap on “Run“.
2. Just write “%temp%” and then hit Enter to open the Temp folder.

3. When you see the warning message, tap on “Continue” to proceed further.

4. Select all the files and folders together in the Temp folder.
5. Then, press the ‘Delete‘ key to empty the Temp folder.

6. Now, press the Windows key+R keys together.
7. Further, write “temp” and hit Enter.

8. Remove everything inside the folder.

After clearing these files, close the File Explorer. After cleaning up your PC, there should be no issues creating a system image backup.
Fix 4 – Run chkdsk
If there are any bad spots in the C drive, running a disk checking operation should fix it.
1. At first, press the Windows key and write “cmd“.
2. After that, right-click on the “Command Prompt” and click on “Run as administrator” to access the terminal.

3. Then, copy-paste this disk-checking command and press the Enter key to run the disk checking operation.
chkdsk C: /f /r /x
Press “Y” and then hit Enter to set the check to be performed when your device restarts.

After closing the Command Prompt window, restart the system to run the check.
Once you have done that, create the system image backup.
Fix 5 – Remove the current USN Journal
The USN journal keeps the record of the changes you have made in the drive and with time the journal size can grow quite big.
1. At first, press the Windows key+X keys together.
2. Then, tap on the “Disk Management” to access it.

3. When the Disk Management opens up, right-click on the “System Reserved” and click on “Change Drive Letter and Paths…“.

4. Now, tap on “Change…“.

5. Set the “Assign the following drive letter:” option.
6. Then, set a new drive letter for the reserved partition from the drop-down list. (Suppose, the new drive letter is “F:“)
6. After that, tap on “OK“.

Once you have done that, close the Disk Management window.
7. Then, press the Windows key+R keys together.
8. After that, type “cmd” and press Ctrl+Shift+Enter to access the Command Prompt with administrative rights.

9. Now, copy-paste these codes one by one and hit Enter to run these commands.
fsutil usn queryjournal F:
fsutil usn deletejournal /N /D F:

Then, close the Command Prompt window.
Then, restart your computer. After rebooting the device, try creating a system image backup.
Fix 6 – Setup some parameters
There are some parameters like Prefetch, ReadyBoost, and Superfetch, that have effects on the SSD storage.
1. At first, write “cmd“.
2. After that, right-click on the “Command Prompt” and click on “Run as administrator” to access the terminal.

3. Then, type this command in the terminal and hit Enter.
winsat formal -v

After running the command on your terminal, close it. Then, restart your computer 3 times consecutively to let this change take effect on the system.
Fix 7 – Make sure the System Protection is enabled
According to some users, System Protection must be enabled to create a system image backup without any error.
1. At first, press the Windows key+R keys together.
2. Then, type this code and click on “OK” to access the System Properties window.
sysdm.cpl

3. When it does open up, navigate to the “System Protection” tab.
4. Then, select the C: drive from the list.
5. Next, tap on “Configure…” to configure the system protection settings.

6. Now, toggle the “Turn on system protection“.
7. Just, slide the “Max Usage” settings according to your choice and the available space you have.
8. Then, click on “OK” to save the changes.

After that, try to create the system image backup. This time it will be created without the error message.
Fix 8 – Remove the additional languages
You can remove the additional language packs to fix this issue.
1. At first, press the Windows key+I keys together.
2. Then, tap on “Time & Language“.
3. After that, on the right-hand side, tap on “Language & Region“.

4. Now, you will notice several language packs here.
5. Just, click on the additional language pack and tap on “Remove” to remove the language pack from your computer.

After doing this, restart your computer. Then, try to create the system image backup again.
This time, you won’t face this issue.
Fix 9 – Update the drivers
You can try to update the disk drive on your computer.
1. At first, right-click on the Windows icon and tap on the “Device Manager“.

2. Now, expand the “Disk drives“.
3. Then, right-click on your hard disk drive and tap on the “Update driver“.

4. Now, tap on the “Search automatically for drivers“.

This will now update the disk drivers and solve the drive-related issues on your system.
Restart your system and try to make a new system image backup. This you won’t see the Error Code 0x80780119.
Your problem should be solved.