Whenever you play content on your Windows 10 or Windows 11 system, you must have noticed that the sound volume differs for videos and music. In fact, even when you are watching an online show, you may notice that the volume of the advertisement is much higher than the actual show. The disparity in the sound volume is not just for videos, but also for the music collections. Based on how and from where you downloaded the music, the sound volume may differ for some songs.
In such situations, you usually change the sound volume every time you play a video content or music and that can be truly annoying. But fortunately, if you turn on the loudness equalization feature, it normalizes the sound volume on your Windows 10 PC with immediate effect. This offers a uniform sound level for all content including videos, music and online shows across all browsers and applications on your PC.
Let’s see how to normalize the sound volume through loudness equalization in your Windows 10 PC.
How To Normalize the Sound Volume Using the Built-In Loudness Equalization Feature
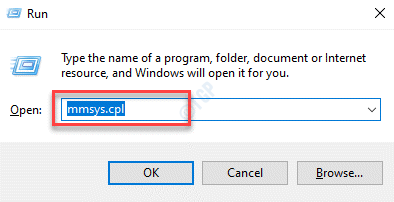
Step 1: Press the Win + R keys together on your keyboard to launch the Run command window,.
Step 2: In the Run command search box, type mmsys.cpl and press OK to open the Sound dialogue box.

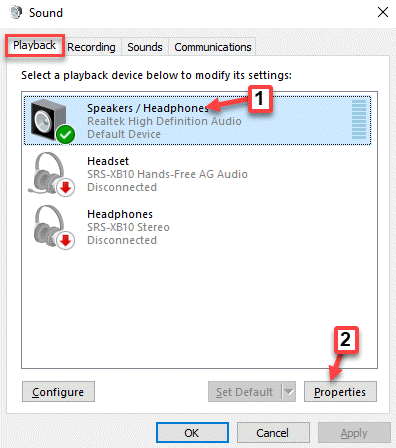
Step 3: In the Sound dialogue box, under the Playback tab, select Speakers/Headphones and click on the Properties button at the bottom.

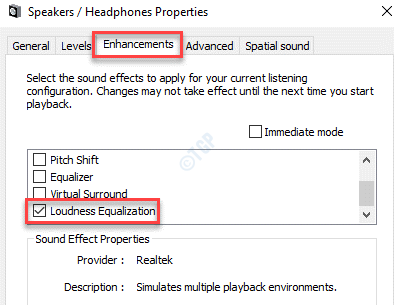
Step 4: In the Speakers/Headphones Properties window, select the Enhancements tab.
Now, go to the list and check the box next to Loudness Equalization.
Press Apply and then OK to save the changes and exit.

Now, play the online content or the music collection and the sound volume should be uniform for all. In fact, there will be a significant change in the sound volume and the quality, with the softer sounds getting more louder and the louder sounds getting more tuned.
How To Normalize the Sound Volume Using Volume mixer
1 – Press Windows and R key at Once to open run.
2 -Now, type Sndvol.exe in the run box and click OK.

3 – Now, use the slider to drag and adjust volume.

How To Normalize the Sound Volume Using Volume mixer
1 – Search Sound Mixer Options in windows search box and then click on search result

2 – Now, drag the slider of volume of each app to adjust

How to Normalize Sound Volume Using Realtek Loudness Equalization
If the Enhancements option in the Sound Properties or the Loudness Equalization feature is missing in your Windows 10 device, you can try this method. The Enhancements option or the Loudness Equalization feature is not supported by some audio settings and in such cases, you would need the Realtek sound card to help normalize the audio level.
Those who have the Realtek sound card, should also update its drivers at regular intervals to keep it working smoothly. Outdated or corrupt drivers can lead to fluctuations in the sound volume and the quality.
Here’s how to normalize the sound volume through loudness equalization in your Realtek sound card:
Step 1: Right-click on Start and select Run to open the Run command box.

Step 2: In the Run command window, type control panel in the search field and press OK to launch the Control Panel window.

Step 3: In the Control Panel window, set the View by field at top right side of the to Large icons.
Now, click on Realtek Audio Manager option in the list.
Select the Speakers tab and then, in the sub menu, click on Sound Effects tab.
Now, look for the Loudness Equalization option and then check the box next to it to enable it.
Reboot your PC for the changes to be effective.
Now, try playing some content and you should notice that the sound volume is consistent for all.
How to Normalize the Sound Volume Using the Loudness Equalization Feature in VLC Media Player
However, if the sound properties of your device does not feature the Enhancements option or the Loudness Equalization feature, or it does not even support the Realtek sound card, you may try using a different media player app that supports Loudness Equalization feature, like the VLC Media Player. This will also be useful for you, especially if you want to normalize sound levels for different video files or music files in a specific app.
Here’s how to use the built-in loudness equalization feature in the VLC Media Player:
Step 1: Open the VLC Media Player app and click on Tools at the top.
Select Preferences from the menu.

Step 2: It will take you to the Simple Preferences window.
Here, go towards the bottom and select All.

Step 3: It will open the Advanced Preferences window.
Now, on the left side of the pane, under the Audio section, select Filters.

Step 4: Now, navigate to the right side and under the Audio filters section, check the box next to the Volume normaliser option.

Step 5: Now, go back to the left side of the pane and under the Audio section, expand the Filters option.
Now, scroll down and select Volume normaliser.

Step 6: Now, here you can adjust the volume level on the right side of the pane.
Click on the Save button below to save the changes and exit.

Now, play your content on the VLC Media Player with a uniform sound level for all content.