The NET.TCP Port Sharing service allows multiple users to share the TCP ports over the net.tcp protocol in a more secure way. This service may fail to start in some cases, even though you have set it up to Automatically start in Windows 11 or windows 10 Services. Restarting the service in your Local computer multiple times may not solve the issue in most of the cases.
You may be experiencing the error “The Net.Tcp Port Sharing Service service on Local Computer started and then stopped. Some services stop automatically if they are not in use by other services or programs.” There can be many possibilities to such discrepancies.
- System File Corruptions – System files may be corrupted as a result of system crash or power outages. Solving this can help solve the NET.TCP Port Sharing service error.
- NET Framework 3.5 dependencies – An important dependency with the NET TCP Port sharing is the .NET Framework and its associated dlls . Glitches or corruptions in the .NET framework can be solved by reinstalling its package or enabling it again in the Windows Features.
- Recent updates or Installations – If you have done any new installations on your system or allowed critical updates to some Windows features, they could have probably led to this error. Disabling those programs or their reinstallations can help solve this error.
- Inconsistent TCP/IP connection – If the data connections to your Internet over TCP/IP is corrupted, then it is highly likely that you will be experiencing this issue.
To solve these errors, you can try out any one of the below given fixes and check which one works out for you.
Fix 1 : Disable IPV6
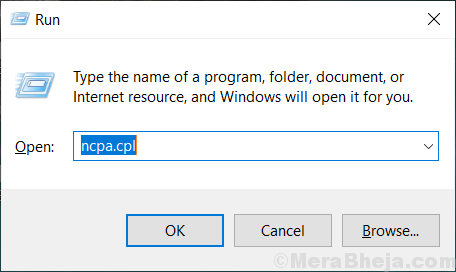
1. Press Windows key + R key together to open run.
2. Now, write ncpa.cpl in it and click OK.

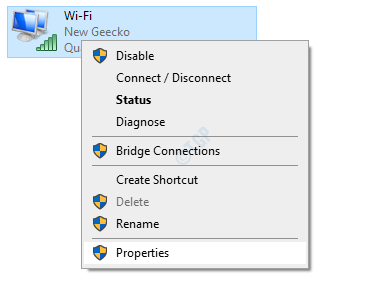
3. Now, Right click on the adapter with which you are connected with internet.
4. Click on properties.

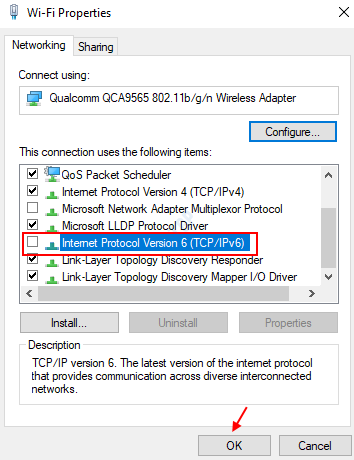
5. Uncheck IPV6 to disable it and click OK.

Fix 2 : Re-Enabling the .NET Framework 3.5 Dependency.
Enabling the .NET Framework 3.5 dependency from the Windows Features screen has been successful for a number of affected users. Follow the below given steps to check how to accomplish this.
Step 1 : Open the Run dialog box in Windows 11 by pressing Windows Key and R together. Once done, type in the command appwiz.cpl and Hit Enter.

This will open up the Programs and Features window.
Step 2 : On the Programs and Features screen, navigate to the option Turn Windows Features On or Off on the left. Click on it.

Step 3 : In the Windows Features window that pops up, move to the feature .NET Framework 3.5 and enable the check box associated with it.

Step 4 : You will now find two options Windows Communication Foundation HTTP Activation and Windows Communication Foundation Non-HTTP Activation below it. Enable the checkboxes associated with both of them. Hit the OK button in the bottom of the window.

Note: – In case you find both the checkboxes are already enabled, then disable them temporarily, restart your PC. Then once your PC start again , check both of them to enable them again.
Step 5 : Restart your system and check if you are still facing the error.
If the above method doesn’t work for you, do move on to the next fix.
Fix 3 : Perform a Winsock Reset
If this is due to some issues with the Network Adapter, performing a Winsock reset will help you solve the errors pertaining to the Transmission Control Protocol and Internet Protocols. To do a Winsock reset, follow the below given steps.
Step 1 : You are required to open the Command Prompt in elevated mode.
To do so, search for Command Prompt from the Windows Start Menu, Right click and choose the option, Run as administrator.

Step 2 : Type in the following commands one by one and Hit Enter after each command.
netsh int ip reset c:\resetlog.txt
netsh winsock reset c:\winsock.txt
netsh int ipv4 reset reset.log
ipconfig /flushdns
Try all the commands one by one. Once done, the WinSock component in your system will be completely reset and the TCP/IP protocols will be effectively restored.

Step 3 : Once all the commands have been executed successfully, you are required to close the command prompt. Now, Restart your system and check if the issue still persists.
In case you still discover the NET.TCP Port Sharing service error, move on to execute the next fix.
Fix 4 : Restart NET.TCP Port Sharing Service
It is an already reported Windows 11 & 10 glitch, that it will force the NET.TCP Port Sharing Service to be stuck in a state where it can neither be opened nor be closed. To restart the service automatically, follow the below given steps
Step 1 : Open the Run dialog box in your Windows OS by pressing the Windows Key and R together. In the text box provided, type in the command services.msc and Hit Enter. This will open up the services screen.

Step 2 : Scroll down the available services in the right pane. Once you reach the NET.TCP Port Sharing Service, Right click on it and choose Properties.

Step 3 : In the Properties Window that opens up, click on the General tab from the menu on top. Change the Startup Type to Automatic by choosing it from the drop down menu.

Click on Apply followed by Ok. Close the Properties Window and wait for the changes to take place.
Now Restart your system and check if the service is automatically started.
Step 4 : In case the service is already set to Automatic, then you may need to click the Stop button and then enable it again by clicking the Start button.

Click on Apply followed by Ok. Now Close the Properties Window and wait to check if the changes have taken place.This will immediately start the service, instead of automatically starting at the system startup.
If in case the NET.TCP Port sharing service was already set to Automatic start up in the Windows Services, you may need to Restart it. Follow the below given steps to do so.
Step 1 : Open the Run dialog in your Windows PC by pressing the Windows Key + R together. Type in the command services.msc in the text box provided and Hit Enter.

Step 2 : Scroll down the services on the right and click on NET.TCP Port Sharing Service.
Step 3 : Stop the service the clicking the option Stop the Service, which you can find on the left pane of the window.

Step 4 : Now restart the service the clicking on Restart the Service on the left pane of the window.

That’s it. The NET.TCP Port sharing service will now be restarted properly. Check if this solution has helped you with your issue. If not, get on to the next one.
Fix 5 : Perform A System Restore
A System Restore is basically a snapshot of the Windows System files and other installed application files on your system at a specific point in time. Performing a system restore helps the files to be restored to a previous state where in a check point would have been created. This can be of help in solving your issue. Follow the below given steps to observe how it is done.
Step 1 : Search for Create a restore point by typing it from your Windows Search bar and click on it.

Step 2 : Click on the System Protection Tab from the top menu. Choose the Option Configure to turn on the System Protection.

Step 3 : In the window that opens up, check in the option Turn on System Protection under the System Restore section.

Step 4 : Move the slider next to Max usage and set it to your desired percentage. This implies the maximum disk space that will be used for system protection. Click on Apply, followed by OK.

Step 5 : Now in the System Restore tab mentioned in Step 2, Click on the Create button under the section Protection Settings. This is to create the restore point.

Step 6 : Provide a name for the Restore Point in the text box that pops up. Click on Create button once done and close the popup dialog. This is the point up to which the System Restore will be done.

You are now all set to do a system restore.
Step 7 : Click on the System Restore option under the System Restore Tab. Click on the Next button when it prompts you and after all the processing is done, finally hit the Finish button. This should get the job done.

That’s it. Any of these above given methods should possibly work out for you. Please feel free to comment in case of any queries.