Many Windows 10 users have reported that MPSigStub is consuming very high CPU resources than usual. This at times may cause the system to choke up and hang. If you too are facing the MPSigStub high CPU usage issue in Windows 10, we are going to help you out of this situation.
Before we proceed, it is important for you to know what is MPSigStub exactly.
What is MPSigStub.exe?
An executable file, MPSigStub or MPSigStub.exe is also known as Microsoft Protection Signature Stub. This file extracts the downloaded Windows Update on your PC. The file is also linked to Windows Defender. In most cases, the MPSigStub high CPU usage issue last only for a while and becomes a problem when it continues for long.
It might be possible that a malware could be disguised in your PC as MPSigStub.exe file. If that is the case, you will need to give it a check and get rid of the malware as soon as possible.
Whatever be the case, its quite unusual for the MPSigStub.exe file to cause issues and hampering your PC’s performance. So, if you are troubled by the same, check out the solutions mentioned below to get rid of this issue, once and for all.
Solution 1: Check if a Windows Update is in Progress
As mentioned earlier, the MPSigStub.exe file is associated with Windows Update. If an update process is going on in your Windows PC, then the MPSigStub file is undoubtedly going to consume more resources than usual.
The best you can do in this case is wait out the Windows update process. It might not take much long. If it is taking a longer time than expected to finish the update, then go to the next methods.
Solution 2: Update Windows 10 on Your PC Manually
It might be possible that the Windows 10 Update process in your PC is stuck for some reason. In that case, you can manually trigger the update process. For this, follow the steps below:
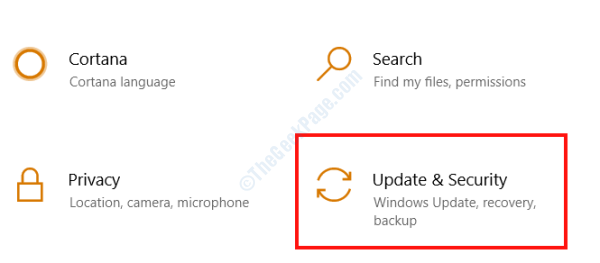
Step 1: Open the Settings app in Windows. For this, press the Win + I keys simultaneously. After the Settings menu opens, click on the Update & Security option.

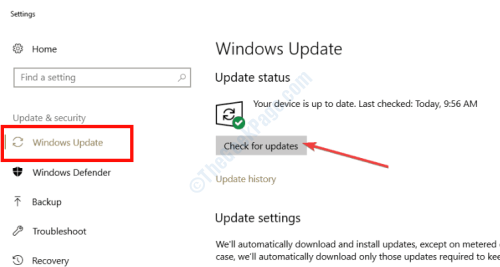
Step 2: When the new window opens, go to its left pane and select the Windows Update option. Now, go to the right pane and make a click on the Check for Updates button.

If the update file has already been downloaded, you will be notified about the same. Whatever be the case, proceed with the on-screen instructions to make sure that Windows 10 gets updated.
Once the update is successful, you will be able to get rid of the MPSigStub.exe high CPU usage. If you are still facing the same issue, then follow the next method.
Solution 3: Scan PC for Malware
Malwares are threats to your PC and the data stored on it. If the MPSigStub process in your PC is still utilizing high resources, then its highly likely that it is a Malware that has made its way into your PC somehow. In order to get rid of this malware, you will be requiring a Malware Scanner or an Antivirus.
Downloading an Anti-malware that does its job perfectly is of extreme importance. You must look at the reviews and ratings of the anti-malware before downloading one and scanning your PC. Here are some of the Best Free Antivirus Software For Windows 10 PC. Once you download the antimalware or antivirus, go ahead and perform a scan.
If a malware if found on your PC, the antimalware will delete it for you. Also, make sure to keep the antimalware installed on your PC and keep it updated as well. Doing so will ensure safety of your PC from further malware and virus threats.
Solution 4 : Delete the MPSigStub File
Another thing that you can try to get rid of the MPSigStub file so that it does not consume system resources is deleting the file. Let us checkout how to go about this method.
Step 1: Open File Explorer on your PC.
Step 2: if you know the location where the MPSigStub.exe file is located, navigate to it. Else, you can just use the search bar of File Explorer to find the file. The file is usually located at the following location on your PC: C:\Windows\System32
Step 3: Once the file is located, go ahead and delete it. Just select the MPSigStub.exe file and press the Del button on your keyboard.
On the off chances if you are unable to delete the file, here’s what to do.
Change File Permissions
When your user account does not have the proper permissions to delete the file, you will need to change the file permissions. Follow the steps given below:
Step 1: Open the MPSigStub file properties window. For this, make a right click on the MPSigStub.exe file, and from the context menu, select the Properties option.
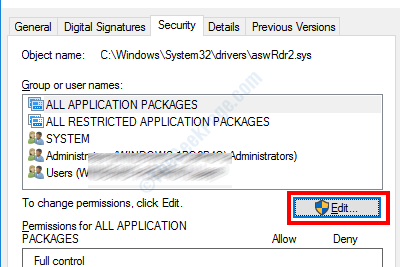
Step 2: When the Properties window opens, go to the Security tab. Here, click on the Edit option.

Step 3: In the new window that opens, select your user account from the Group or user names section. Now, go to the Permissions section and select the Allow checkmark of the Full control option. Once done, click on the Ok button to apply the settings.

Now that you have changed the permissions of the file, you will be able to delete it on your PC.
After deleting the file, restart your PC once and check for the issue. You will not be facing the MPSigStub high CPU usage problem anymore.
In the end,
we would like to say that the MPSigStub.exe high CPU usage issue mostly occurs because of ongoing Windows update going on your PC. If you just noticed the issue on your PC, its recommended to wait it out till the Windows Update is complete. It would be a very unusual scenario if a malware is disguised as the MPSigStub.exe file. Whatever be the case, we have provided solutions for all possible scenarios.
We hope that you were able to get rid of the MPSigStub related issue on your Windows 10 PC. If so, make sure to let us know in the comments section below what was the solution that helped you. We would also like to hear from you if you aren’t able to get rid of this issue. We will try our best to help you out of this situation.