Many users are reporting that they could not set some services in the windows service manager to automatic mode and it gives the error. The message of the error says The delayed auto start flag could not be set, error 87.
The error occurs when users try to delay some services on Windows to make the computer boot faster. We have found different solutions for this error, you can use any one to solve the error.
Prelimary Fix:
Try rebooting your PC and then again try to set delayed start for the particular service
Solution 1 – Delay auto-start by Windows Registry Editor
STEP 1: Press the Windows and R keys together to open the Run dialogue box. Type regedit into the textbox and then click on the OK button. It will open up the Windows Registry editor.

STEP 2: Press Yes button on the user account control prompt
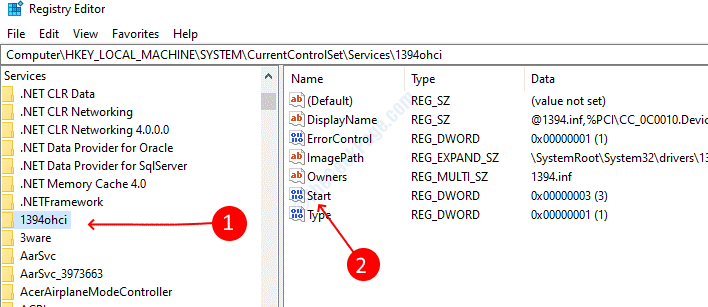
STEP 3: Navigate to the following location in the registry, you can also paste the path into the address bar.
HKEY_LOCAL_MACHINE\SYSTEM\CurrentControlSet\Services

STEP 4: Here you will find list of services, choose the one from the left pane which you wanted to delay.
STEP 5: Once you selected the service, double click on the Start name from the right pane.

STEP 6: Change the Value to 2 and then save it. Close the registry window.

Solution 2 – Delay by Windows Powershell command
STEP 1: Press Windows and X keys together and then select Windows Powershell(admin).

STEP 2: Press Yes button on the user account control prompt
STEP 3: Type the following command into the Powershell window and then hit the enter to execute it.
Get-Service -Name ServiceName | Set-Service -StartupType AutomaticDelayedStart
Note: Replace ServiceName with service you want to make delayed.
Solution 3 – Clean Boot your PC
1 – Press CTRL + SHIFT + Esc keys to open Task manager
2 -Now, Go to startup tab and right click and disable all items

3 – Now, Press Windows and R key and then write msconfig in it and click OK

4 – Now, Click Services Tab.
5 – Now, select Hide all Microsoft services
6 – Now, click on disable all

7 -Now, restart computer
Solution 4 – Delete service from the service groups
Many services are grouped together in the services menu so you won’t be able to directly change their settings without degrouping them. If you try to change any settings you will get the access denied error, follow the steps below to remove the group
STEP 1: Open Windows Registry by entering regedit in the run dialogue box.

STEP 2: Open the following location in the registry editor
HKEY_LOCAL_MACHINE\SYSTEM\CurrentControlSet\Services\
Now, click on the folder related to the ServiceName with your desired service
STEP 3: In the right side , Just Right Click on the Group name and select delete. Confirm the deletion if it asks you to.
