The purpose of the Windows Search Indexing option is to make the search faster on a computer. It creates an index of all your files, documents, etc so that it becomes faster to find things. Windows search creates an index of files, photos, videos, folders, and more for which users can search based on location, size, name, author name, etc. Search becomes very easy and quick. But it is not mandatory to keep the windows search indexing on, now you may wonder what if it’s off. If you do so, it will stop indexing your documents and the search still works, but it may consume more time. The most interesting option in indexing is to select only those locations where you need to add an indexing feature. In this article let us discuss how to add, remove or modify the search indexing location on windows 11.
Modify The Search Index Location On Windows 11
We can add a location or remove a location from being indexed. Including the indexing option, makes the search faster, removing the indexing option might reduce the size but the speed of the application might slow down, and search results may get delayed. So modification can be done in two ways, let us see what are those.
Method 1: Modify The Search Index Location Using Settings
Step 1: Open the windows settings using keys (Windows + I) simultaneously or you can click on the Start button and then click on Settings.
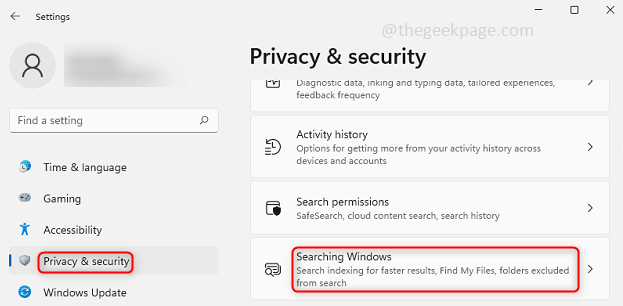
Step 2: In the left pane click on Privacy and Security and on the right pane click on Searching Windows.
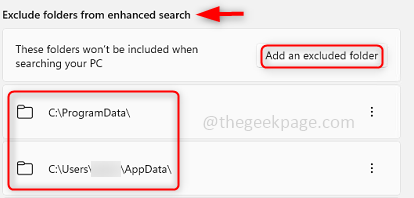
Step 3: To exclude a folder from indexing, that means if you do not need indexing, click on Add an excluded folder which is present on the right, then browse and select the folder or drive to be excluded. The excluded files and folders will be listed below in the same window.
Step 4: To remove a folder from the excluded list, click on the 3 dots present on the right of the folder which you want to remove from the list. Click on Remove. This also means that a particular folder will have an indexing option from now on.
Method 2: Modify The Search Index Location Using Advanced Indexing Options
Step 1: Open the windows settings using keys (Windows + I) simultaneously or you can click on the Start button and then click on Settings.
Step 2: In the left pane click on Privacy and Security and on the right pane click on Searching Windows.
Step 3: Click on Advanced Indexing Options.
Step 4: Click on Modify option at the bottom.
Step 5: Click on Show all locations in order to apply for all users and note that you must be logged in as an Administrator. If you do not click on show all locations the changes will be applied only to the current user.
Step 6: There appears a window where you have all drives and folders and also there is a checkbox beside it. To include the folders for search indexing click on the checkbox of the particular folder you want to include. To exclude the folders for search indexing uncheck the checkbox for that particular folder.
Step 7: You can also see the included and excluded folders in the summary section. Click on OK.
Step 8: Now the changes are applied so you can go ahead and close the window by clicking on the Close button.
That’s it! Hope this article helped you and now you are able to easily include or exclude the search indexing option for a particular folder or a drive. Thank you and Happy Reading!!!


