Since the introduction of Minecraft Launcher in the Store, some Minecraft players are complaining about the login process not working on their systems. This seems to be the problem with the new launcher only. So, we have listed all these fixes for you to solve the login issue with Minecraft.
Fix 1- Repair Minecraft Launcher
The first thing you should try is to repair the Minecraft Launcher.
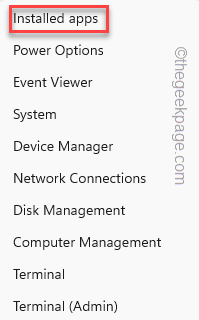
Step 1 – Hold the Windows key+X keys together. Power-user menu will elevate.
Step 2 – There, click “Installed apps” to open that up.
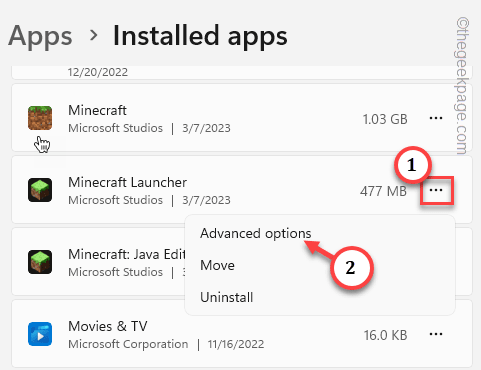
Step 3 – If you go down through the Installed apps page, you will find “Minecraft Launcher“.
Step 4 – Once you have seen that, click the button beside and click “Advanced options“.
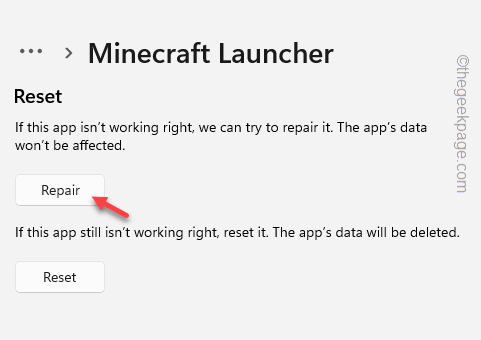
Step 5 – Inside here, get down and click “Repair” to repair the launcher.
Wait till the Minecraft launcher is repaired.
Now, you may close the Installed apps page.
Fix 2 – Log in with the same account on Store, Xbox
Make sure that you have logged in to the Store and Xbox app with the same Microsoft account.
Log-in process for the Xbox app
Step 1 – Launch the Xbox app.
Step 2 – Click on the “Sign in” button and click “Sign in” using your account.
Then, just input your account credentials to log in with your Microsoft account.
Log-in process for Store
Step 1 – Open Microsoft Store.
Step 2 – If you haven’t logged in yet, click the user icon.
Step 3 – Then, click “Sign in” to sign in to the Store using your Microsoft account.
The account chooser console will appear in the next step.
Step 4 – Carefully select the same Microsoft account you have used to log in to Xbox before (this will be the account for Minecraft as well).
Step 5 – Then, tap “Continue” to proceed.
Wait until you are logged in.
Now, launch the Minecraft Launcher and check whether you can log in or not.
Fix 3 – Log out of Xbox and Store, Log in to Minecraft
If you are still unable to log in to Minecraft Launcher, log out of Xbox and then try to log in to Minecraft again.
Steps to log out of Xbox and Store –
Step 1 – Launch the Xbox app.
Step 2 – On the right-top corner you shall find the account image. Then, click that and tap “Sign out” to sign out from Xbox.
It will automatically boot you out of your account.
Step 3 – Open Microsoft Store.
Step 4 – Tap the account image you have just beside the search bar and click “Sign out” to sign out from Store.
Step 5 – Now, finally, launch the Minecraft Launcher.
Wait for it opens up.
Step 6 – Then, tap “MICROSOFT LOGIN” to log in with the Microsoft account.
But, as you have logged out from both Store and the Xbox app, you have to input Microsoft account credentials once again.
Step 7 – You will see your account on the Xbox login page.
Step 8 – Either you can tap “LET’S GO” to proceed with that account or, you can use the “Sign in with a different account” to go with another account.
This time, you won’t face any difficulties logging in to your account.
Fix 4 – Delete the cache folder
If logging out of both Store and Xboxb doesn’t fix the issue, there may be some corrupted Cache folder.
Step 1 – Holding the Win+E keys together.
Step 2 – Then, get to this point –
C:\Users\%username%\AppData\Local\Packages\Microsoft.XboxIdentityProvider_cw5n1h2txyewy\AC\TokenBroker
[“%username%” is the username of your system. You will find a folder named.
If you can’t find the Appdata folder, it is hidden. Now, do this to show the hidden files and folders.
a. Open a Run box.
b. Then, type this there and hit Enter.
control folders
c. Go to “View“.
d. Then, tick the “Show hidden files, folders, and drives” box.
e. Save the settings by clicking “Apply” and tapping “OK“.
]
Step 3 – Once you are there, you will find the “Accounts” and “Cache” folders.
Step 4 – Select both folders at once and tap “Delete” to delete them from your system.
After you delete those folders, restart your computer.
Once the system boots up, launch Minecraft Launcher and test it yourself.
Fix 5 – Delete Xbl login credentials
Like any other app, Xbox Live authentication credentials are also saved locally on your system. So, deleting those should help you resolve the issue.
Step 1 – You have to open the Credentials Manager. So, type “credential manager” after pressing the Windows key.
Step 2 – Then, tap “Credentials manager” to access it.
Step 3 – In the Credentials Manager page, head on to the “Windows Credentials“.
You shall see the complete list of saved passwords along with their entries in a list format.
Step 4 – Look for the “XblGrtsDeviceKey” or “XblDeviceKey” whichever you may find on the page. Expand it.
Step 5 – Then, click “Remove” to remove that credentials from your system.
Step 6 – When the warning message opens up, tap “Yes” to remove the key.
Close the Credentials Manager. Then, restart the system. Once the system restarts, launch Minecraft Launcher and test it out.
Fix 6 – Enable and start all the Xbox services
If Minecraft Launcher still doesn’t allow you to log in, start these Xbox services and then retest.
Step 1 – Start to type this in the search box.
services
Step 2 – Then, tap “Services” in the search results to open that.
Step 3 – When you get there, scroll down and find the “IP Helper” service.
Step 4 – There, double-tap the service to open that up.
Step 5 – Make sure to set the Startup type to “Automatic” mode.
Step 6 – Now, tap “Apply“.
Step 7 – Check whether the service is running or not. Then, tap “Start” to start the service, if it is stopped.
Step 8 – Then, click “OK“.
Step 9 – After this, get to the “Xbox Live Auth Manager” service.
Step 10 – Then, double-tap this service.
Step 11 – Just like the previous service, set the ‘Startup type’ to “Automatic“.
Step 11 – Make sure to tap “Apply” to apply the changes.
Step 12 – Just like before, if the service isn’t running, click “Start” to start the service. Then, tap “OK” to complete the process.
Step 13 – Now, following the same steps, automate and start these services –
Xbox Live Game Save
Xbox Live Networking SErvice
Gaming Services
Windows Update
Microsoft Install Service
After this, you may exit Services and restart your computer once.
Give the Minecraft Launcher log-in another try. Check if this works.
Fix 7 – Allow Microsoft apps to sign you in
There is a feature in your accounts that allows Minecraft to automatically sign you in.
Step 1 – Open Settings.
Step 2 – Then, head on to the “Accounts” point on the left-hand pane.
Step 3 – After this, you can visit the “Email & accounts” to open that up.
As you open it, you can find all the Microsoft accounts in one place.
Step 4 – Expand the email account that you have associated with Minecraft.
Step 5 – Now, set the Sign in option to “Microsoft apps can sign me in” from the drop-down list.
Exit Settings and run the Minecraft Launcher on your computer. Now, try to log in again and test.
Fix 8 – Uninstall all the Minecraft Launchers and reinstall the real one
If you have ever installed any other non-official Minecraft that isn’t related to Mojang, that may be the root cause of the problem. Uninstall everything else and use only the official launcher.
Step 1 – Uninstall all the other launchers
Step 1 – Open Settings.
Step 2 – Next you have to do is to head on to the “Apps” section.
Step 3 – On the other hand of the page, click “Installed apps“. Open that.
Step 4 – You will see a search box there. Just write “Minecraft” in that box.
You will notice all the Minecraft apps and launchers you have installed on your system.
Now, the official one will have “Microsoft Studios” listed as the app developer.
Step 5 – So, click the button beside the old launcher and tap “Uninstall“.
Step 6 – Another prompt will appear. Tap “Uninstall” to uninstall it from your system.
Step 7 – This way, uninstall all the launchers and apps related to Minecraft.
Once you have made sure that all the old Minecraft Launchers are uninstalled apps, exit Settings.
Do not forget to restart your system.
Step 2 – Install the latest launcher
Step 1 – After rebooting the system, open a browser and go to this Minecraft official website.
Step 2 – There, click “DOWNLOAD MINECRAFT LAUNCHER” to download the installer file.
Step 3 – After downloading the setup file, double-tap the “MinecraftInstaller” to run it on your system.
Just follow the on-screen steps and you will have the Minecraft Launcher on your system in no time.
Open the new launcher and you can easily log in to it using your Minecraft credentials.
Fix 9 – Use alternative Minecraft executables
If nothing works with the new Minecraft Launcher, you can download and use the older executable files.
Step 1 – There is a dedicated page for all the Minecraft executable files. You can get there from an alternative source.
Step 2 – You can directly download the file from the list. Even the .msi executable (which is for Windows 7,8 machines) will work well on Windows 10 and 11. So, you can download and use them to log in.
This way, you can enjoy the same game with even the older version of the game. Check if this solves the issue.


