Microsoft Store, with the recent updates, is only becoming better every day. The new aesthetics update with in-built support for android apps has given the Store a new life. But with every newer iteration, comes new error messages and error codes. The Microsoft Store error 0xD000000D is an error that you have to manually solve. But there is nothing to worry about, as you can easily solve this problem.
Fix 1 – Run the Windows Store Apps troubleshooter
Windows Store Apps troubleshooter is designed to identify and fix problems associated with the Microsoft Store.
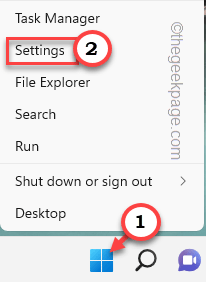
1. So, right-tap the Windows icon on your taskbar and tap “Settings“.
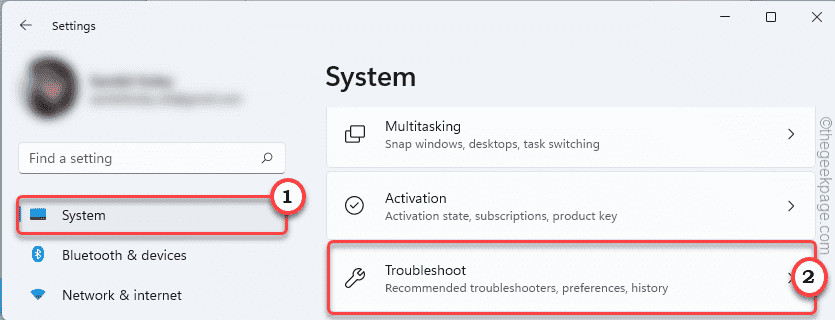
2. On the Settings page, go to the “System” settings.
3. Now, tap “Troubleshoot” from the right-hand menu.
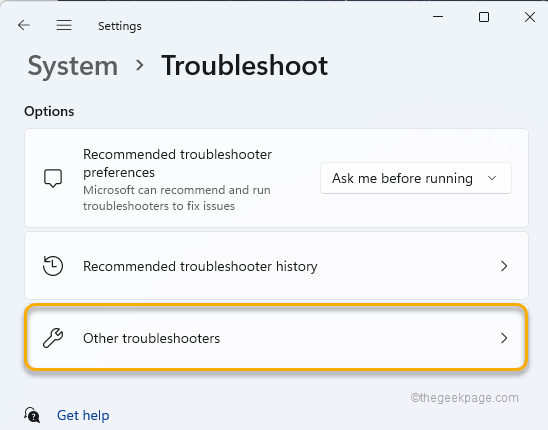
4. For the next step, tap “Other troubleshooters” to explore more troubleshooting options.
5. Now, here you will find several troubleshooters.
6. Just, tap “Windows Store Apps” to select it. Tap “Run” to run the troubleshooter.
Just let this troubleshooter run, identify, and fix the issue.
Fix 2 – Reset the Store
Try resetting the Store cache on your system.
1 – Search cmd in Windows search box. Right click and choose run as administrator

2 – Type wsreset in command prompt window and hit Enter key

It just takes a few seconds and the Store cache will be reset to the default.
Once you have done that, open Store and check if you are still facing the same issue or not.
Fix 3 – Check the date and Time
The store won’t perform normally if the system date or time is misconfigured.
1. Pressing the Windows key and the R key from your keyboard should open Run.
2. Just write down this in the Run and click “OK“.
timedate.cpl
3. On the Date and Time page, navigate to the “Date and Time” tab.
4. Now, check the time that you find here. If you notice the time or date is showing misconfigured, just tap “Change date and time…“.
5. In the following tab, reset the time and date settings according to your local time.
6. After that, tap “OK” to save the changes.
7. Next, you have to come to the “Internet Time” section.
8. Tap on “Change settings” to modify the settings.
9. Next, check the “Synchronize with an Internet server” option.
10. You have to update the time server. Tap “Update now“.
11. After that, tap “OK” to save the changes.
12. After that, tap “Apply” and “OK“.
After doing this, restart the system once.
Then, launch Store and test if this works out or not.
Fix 4 – Check for Windows Updates
Install the latest Windows Update on your system.
1. Pressing the Win key+I keys together should open the Settings.
2. Now, tap “Windows Update” from the left pane.
3. You will find an option that says “Check for updates“. Click on it to check for new updates.
Windows will now download the latest version of Windows and install it on the system.
4. Once the update is downloaded and installed on the system, you will be asked to restart the system.
5. Tap “Restart now” to restart the system.
This will complete the update process and then check
Fix 5 – Re-sign into the Store
Sign out from the system and then re-sign into the Store. Check if that solves your problem.
1. Open Store.
2. Then, tap on your account icon in the menu bar and tap on “Sign out“.
You will be signed out from the Store.
3. Now, tap on the same account icon and click on “Sign in“.
4. The sign-in page will pop up. Here, choose the Microsoft account that you were using before.
5. Then, tap on “Continue” to proceed further.
Then, input your account password and complete the signing process. Later, check if this works out.
Fix 6 – Repair or Reset the Store
Try to repair the Store first and, if that doesn’t work, resetting it may work.
1. Open Settings.
2. Next, select “Apps” on the left-hand side.
3. After that, tap “Apps & Features“.
4. Next, scroll down through the list of alphabetically sorted apps to find “Microsoft Store“.
5. After that, tap on the “⋮“. Next, tap on “Advanced options“.
6. You can repair the app. To do that, tap “Repair“.
Wait for the repairing process to be complete.
Launch Store and check if you are still seeing the error message or not.
If the error message re-appears, come back to the Settings page.
8. Now, tap “Reset” to reset the app.
9. There will be a prompt to confirm the resetting process. Tap the “Reset” option again.
After that, close the Settings window.
Launch Store and sign in again. Check whether you are still facing the issue or not.


