Microsoft Defender is a built-in security app that offers your system real-time protection against malware, viruses or and spyware that may affect your web browsing, emails, apps, and more. However, sometimes you may see the Microsoft Defender error: 0x80073b01 in your Windows 10 PC while you are trying to start the app. The error prevents you from starting the app.
You may also not be able to find the Windows Defender in the Control Panel, or may receive notifications that it’s up and running or may receive update messages. But, when you try to start it, it doesn’t . The error code: 0x80073b01 means that there’s a conflict between the Microsoft Defender app and another security software on your system. The error can also show up if there are any corrupted files blocking that might be blocking it.
While you may try to fix it by using another security software or a recovery application, chances are, that they won’t help. However, we have a couple of fixes for this issue. Let’s see how to resolve it.
Method 1: Check if Windows Defender Service is Running
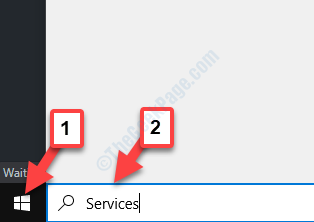
Step 1: Go to the Windows icon (Start)on the bottom left of your desktop and type Services.

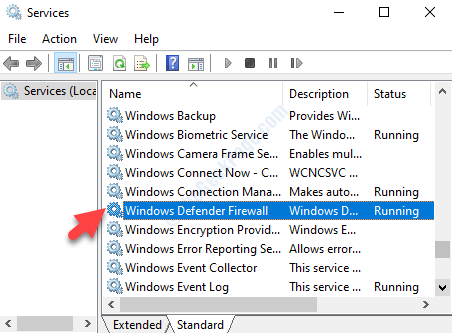
Step 2: Left-click on the result to open the Service Manager window.
Now, navigate to the right side of the window and under Names, locate Windows Defender Firewall.

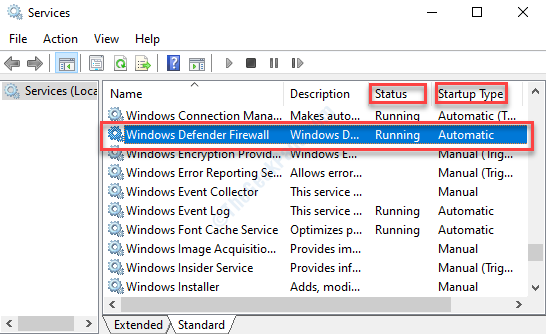
Step 3: Check if the Status is Running and the Startup Type is Automatic.

Step 4: If the Status is showing Stopped and the Startup Type as Manual, or either of them, right-click on the Windows Defender service and select Properties from the context menu.

Step 5: Now, in the Properties dialogue box, under the General tab, go to the Startup type section and set the field to Automatic, and under the Service Status section, click on Start (if applicable) to make sure that the Service Status is Running.

Press Apply and then OK to save the changes and exit.
Step 6: Once that is done, go back to the Services window and look for:
- Windows Defender Advanced Threat Protection,
- Microsoft Defender Antivirus Network Inspection Service,
- Microsoft Defender Antivirus Service.
Now, select them one by one, right-click on them to select Properties from the right-click menu and set them Startup type in each of them to Manual.
Also, make sure that the Service Status is Running for all of them. If not, press the Start button to start the services.
Now, go back and try starting the Windows Defender app and it should open now. If you are still facing the error, follow the 2nd method.
Method 2: By Re-Registering the Windows Defender DLL File
Step 1: Navigate to the Start button on your desktop and type Command Prompt in the search field.

Step 2: Right-click on the result and select Run as administrator from the right-click menu to open the Command Prompt in admin mode.

Step 3: In the Command Prompt window, run the below command one by one and hit Enter after each command.
regsvr32 wuaueng.dll
regsvr32 wucltui.dll
regsvr32 softpub.dll
regsvr32 wintrust.dll
regsvr32 initpki.dll
regsvr32 wups.dll
regsvr32 wuweb.dll
regsvr32 atl.dll
regsvr32 mssip32.dll
These commands will re-register each of the Windows Defender DLL files.
Now, reboot your PC and try opening the Windows Defender app. It should work fine now. But, if the problem persists, try the 3rd method.
Method 3: By Running SFC /Scannow Command
Step 1: Press the Windows key + X together on your keyboard to open the context menu.
Step 2: From the context menu, select Command Prompt (Admin) to open Command Prompt in admin mode.

Step 3: Now, in the Command Prompt (admin mode) window, run the below command and hit Enter:
sfc /scannow

This is the System File Checker command and the process takes a while to get complete, So, wait patiently and once it’s over, it will display if any corruptions found. It fixes and restores any broken files on the spot.
Restart the computer and the dll files are replaced with fresh ones. You can now run your Windows defender and there should be no problems.
Alternatively, you can also try the 4th method.
Method 4: By Removing a 3rd Party Antivirus Program
As discussed in the beginning, a 3rd party antivirus software is often one of the major causes of the conflict with the Windows Defender app and hence you see the Microsoft Defender error: 0x80073b01 in your Windows 10 PC . In such cases, you would need to uninstall the 3rd party antivirus program.
Step 1: Navigate to the Start button on the bottom left of your desktop and type Control Panel.

Step 2: Now, left-click on the result top open the Control Panel Home window.

Step 3: In the Control Panel Home window, navigate to the View by field on the upper right of the screen. Then set the field to Category by selecting from the drop-down next to it.
Then, scroll down and under Programs section, click to open Uninstall a program.

Step 4: Now, under the Uninstall or change a program window, locate the 3rd party antivirus software from the list (that you installed recently) and click on Uninstall on the top.
That’s all. Follow the above steps and you should no more see the Windows Defender error. You can now open the Windows Defender app.