Microsoft Defender Antivirus is the built-in security solution for Windows that keeps your system protected from any malware or virus attacks. It protects your PC in real-time from all kinds of suspicious activities and you can check the protection history in your Microsoft Defender Antivirus on your Windows 11 PC. The Windows Security app keeps running in the background and notifies you of any security breaches, and displays all the reports in the protection history section. This helps you to keep a track of the different types of unwanted activities and the action taken against them.
Protection history is a feature offered by the built-in antivirus that displays the list of malware files detected during the scan. The list also includes the details related to the malware, indicating if it has been completely removed till the next Windows update release with the bug fix. The protection history is also visible for the Ransomware protection feature. It shows which items have been blocked, so that you can check them and allow if it was a false-positive.
So, how do you view the malware history in the Microsoft Defender antivirus on your Windows 10/11 PC? We can explain how..
Method 1: Check Protection History Through Windows Security Settings
This method needs you to access the Windows Security settings through the Settings app. Follow the below instructions to view the protection history using Windows Security:
Step 1: Press the Win + I keys together on your keyboard to open the Settings app.
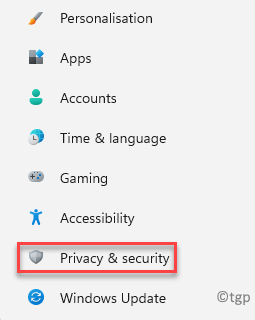
Step 2: In the Settings window, click on Privacy & Security on the left side of the pane.
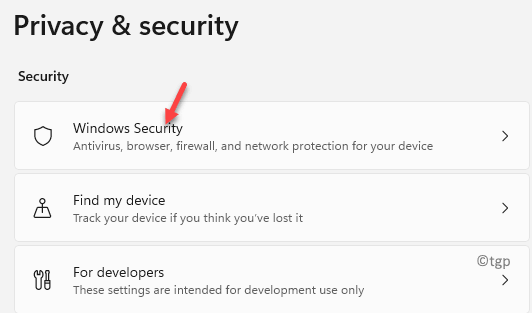
Step 3: Now, navigate to the right side and under the Security section, click on Windows Security.
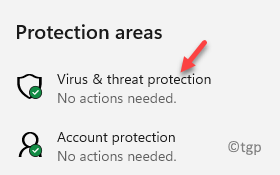
Step 4: Next, in the Windows Security page on the right, under the Protection areas section, click on Virus & threat protection.
Step 5: Now, in the Virus & threat protection screen, under the Current threats section, click on the Protection history link in blue.
Step 6: In the next window, you will see the list of all the threats found and blocked, removed or quarantined by the Windows Security.
*Note – If you do not see anything here, it means that there has been no potential threats found on your PC yet, to be detected by the Microsoft Defender antivirus.
Step 7: You can now click on on the items from the list one by one and you can view the detailed info for each of the potential threats. The information includes – the name of the app or the process, which app blocked it, which app or folder was protected, date, etc.
You can also click on the Actions drop-down below each of the item details and select Allow on device if you recognize the app or file, and if you are sure it’s not a threat.
Step 8: Moreover, if it’s a long list of items, you can click on the Filter option at the top right and select from the list what you want to view:
Recommendations

Quarantined Items

Cleaned items

Removed items

Allowed items

Restored items

Blocked actions > Blocked folder access, Blocked items, Rule-based block

Severity > Severe, High, Moderate, Low
Now that you have a clear view of the protection history, you know that your system has total protection by the Windows Security.
Method 2: Check Protection History Using Windows PowerShell
But, if you want to pull up the protection history for any malware detected and blocked, you can do so using the elevated Windows PowerShell. Let’s see how:
Step 1: Press the Win + R keys simultaneously on your PC and the Run command window opens.
Step 2: In the Run command search field, type Powershell and press the Ctrl +Shift + Enter shortcut keys on your keyboard to open the elevated Windows PowerShell.
Step 3: In the PowerShell (admin) window, run the below command and hit Enter:
Get-MpThreat
This will pull up the list of threats that has been detected by the antivirus with details like the status of the threat execution, active status, and location of the infected file.
Step 4: You can also execute the below command to check the list of any active or false malware findings:
Get-MpThreatDetection
This will pull up details like the Initial Detection Time and date, action success: True/False, infected file location, and more.
*Note – The difference between the above two commands is, while Get-MpThreat pulls up the threat history, the Get-MpThreatDetection command pulls up the protection history.
Once you have run the commands successfully, you would have a clear view of what type of malware tried to invade your PC.


