After installing a new driver or updating an existing one, your computer may go into Blue Screen of Death just showing this error message ‘MAXIMUM_WAIT_OBJECT_EXCEEDED’ containing the value 0x0000000C. This problem actually occurs if you have installed a misconfigured driver or an incompatible version of the driver. You have to roll back the update or you may even have uninstalled the driver update from your computer.
Fix 1 – Remove any external hardware
Any of the external hardware attached to the system can cause this issue.
1. At first, shut down your system.
2. Then, remove any external hardware (any external storage devices like pen drive, HDDs) that you have connected to your system.
3. After doing that, start up your system.
After the system boots up, check whether this works out for you.
Fix 2 – Rollback/ Uninstall or Disable recently updated driver
The main reason behind this issue being the misconfigured driver, rolling back the updates or uninstalling the driver should fix the issue.
Steps to boot your computer to Windows Recovery Environment –
a. At first, you have to shut down your computer.
b. Simply press the power button to boot up your system.
c. Then, when your system boots up, press-hold the power button again to force shutdown your system as soon as you have seen the manufacturer’s logo.
d. Continue this for 2-3 more times and it will automatically reach the startup repair screen.
When your computer boots up, you will be in Recovery Environment mode.
1. Then, click on the “Advanced options“.

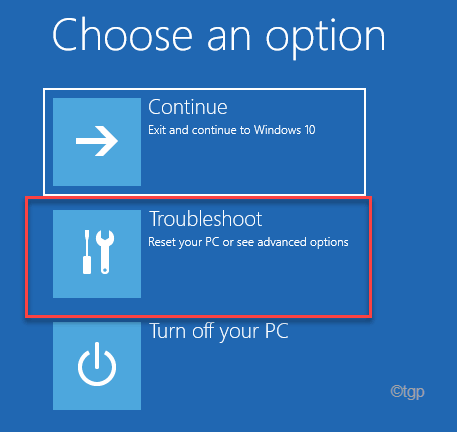
2. Next, click on the “Troubleshoot” to troubleshoot this issue.

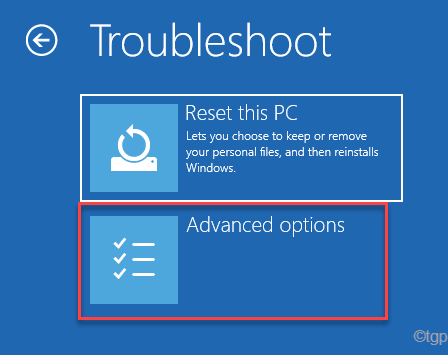
3. Then, tap on the “Advanced options” to proceed further.

4. Next, tap on the “Startup Settings” to view all the available startup settings.

8. Now, click on “Restart” to restart the system.

9. Here you will see all 9 possibilities of startup types.
10. Then, hit the F4 from your keyboard to select the “Enable Safe Mode” option.

Once your system boots up in the Safe Mode, your desktop screen will be set to pitch black with a ‘Safe Mode‘ watermark at the four corners of the screen.
Rollback the driver update
If a specific device driver has received a driver update recently, roll back the driver update.
1. Press the Windows key+X keys together.
2. Then, tap on the “Device Manager” to access it.

3. Then, double-click on the driver to expand it.

4. Then, go to the “Drivers” tab.
5. Next, tap on the “Rollback driver” to roll back the faulty driver update.

After rolling back the driver, you will be prompted to restart your computer. Restart the system at once and check.
Uninstalling the device
If rolling back the driver doesn’t work, you have to uninstall the driver update from your computer.
1. Simply, right-click on the Windows key and click on the “Device Manager“.

2. Then, right-click on the faulty device driver and tap on “Uninstall device“.

3. Then, again, click on “Uninstall” to uninstall the driver update from your system.

Just after uninstalling the device, reboot your computer. This will allow Windows to install the default driver for the device.
Disabling the Device
If uninstalling the device doesn’t work, there is no choice but to disable the device.
1. Open the Device Manager.
2. Then, right-click on the problematic driver and tap on “Disable device“.

3. Then, click on “Yes” to disable the device on your system.

After this, close the Device Manager window. Then restart the system yan you won’t face the BSOD issue again.
Fix 3 – Use the System Restore
1. Open the computer in Windows Recovery Environment.
2. Once you are in, tap on the “Advanced Options“.

3. Then, head this way –
Troubleshoot > Advanced Options
4. Now, click on “System Restore“.

Now, your computer will boot up the same System Restore screen you use regularly.
5. Here, there are two options. Either you have to use the “Recommended restore:” option.
6. Otherwise, you may also select the “Choose a different restore point“.

5. You can tick the “Show more restore points” box to see more restore points.

6. Here, choose the appropriate restore point.
7. Then, click on “Next” to proceed to the next step.

7. To start the system restore process, tap on “Finish“.

Finally, let your computer restore the system to the state when there was no ‘MAXIMUM_WAIT_OBJECT_EXCEEDED’ error message.
This should fix your problem for sure.