Many users have been reporting this error off-late while trying to download or play content from iTunes that says, iTunes Store Error Code 0x80092013, There was a problem downloading”. This error seems to be appearing only on Windows platform and can occur due to various reasons.
The error can either appear because the date and time is not set correctly, you may be using an outdated version of iTunes, or it can be the firewall settings that may be blocking the iTunes downloads. Besides, if you are using a VPN for your internet connection, that can also be one of the reasons why you are getting the error message. However, the good news is, this error can be fixed. Let’s see how.
Method 1: Through Internet Properties
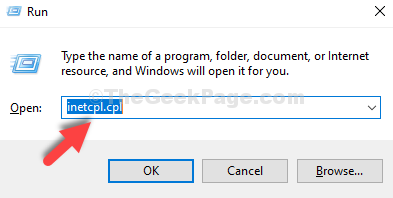
Step 1: Press the Windows + R keys together on your keyboard to open the Run command. Then type inetcpl.cpl in the search field and hit Enter.

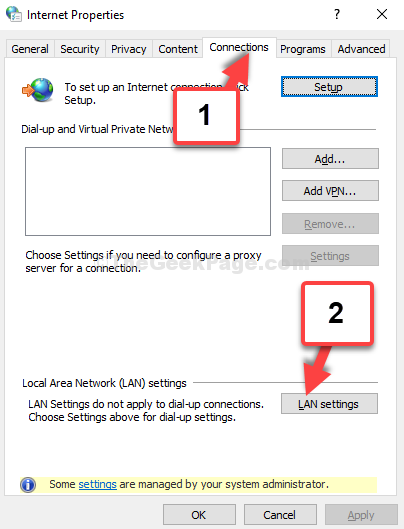
Step 2: In in the Internet Properties window, click on the Connections tab and click on LAN settings.

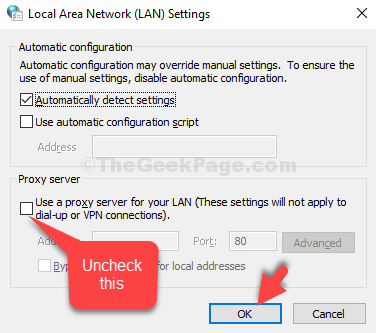
Step 3: In the LAN settings window, go to the Proxy server section, uncheck the box next to Use a proxy server for your LAN.
Click OK to save the changes and exit.

Now, try opening downloading and playing files in the iTunes library, it should work fine. If not, try the 2nd method.
Method 2: Through the Settings App
Step 1: Click on the Start button on your desktop and click on Settings in the context menu, located above the Power option.

Step 2: In the Settings window, click on Time and Language.

Step 3: In the next window, under the Date & time section, check if the Current date and time is correct.
If not, go to the Synchronize your clock section and click on Sync now.

Step 4: You can also turn off the Set time zone automatically option and set the Time zone manually.

Now, you must be able to download and play files from iTunes. If problem persists try the 3rd method.
Method 3: Through Control Panel
Step 1: Press the Windows + R keys together on your keyboard, type control firewall.cpl and hit Enter.

Step 2: In the Windows Defender Firewall window , click on Allow an app or feature through Windows Defender Firewall.

Step 3: Next, click on Change settings button.

Step 4: Now, scroll down and click on Allow another app.

Step 5: In the Add an app window, click on Browse.

Step 6: Then follow the below path to reach the iTunes folder:
- Click on the C drive shortcut on the left.
- Go to Program Files.
- Select iTunes.

Step 6: Now, click on the Add button.

Step 7: Under Allowed apps and features, make sure that the boxes next to iTunes are checked for both Public and Private.

That’s about it. You should no more face any issues to download or play content from iTunes library.