While installing a new software package (which comes in MSI format) the installation process may stall and throw up InstallShield error code 1722. You will see that the error message when the setup ends up an unexpected turn while installing the package on your machine. All you have to do to solve this issue is to follow these easy fixes on your system.
Workarounds–
1. You have to use an administrative account to install the application on your computer. Run the installer as an administrator.
2. Disable any antivirus temporarily on your computer.
Fix 1 – Using command prompt
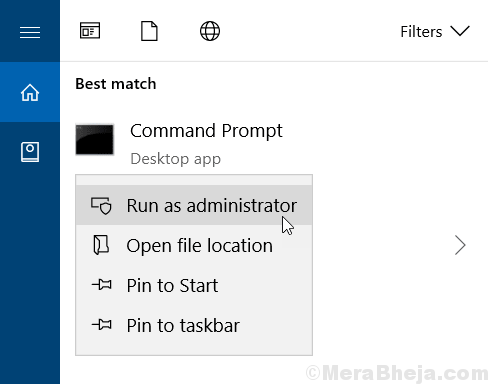
1. Search cmd in Windows 10 search box
2. Right click and run as administrator

3. Copy and paste the commands given below one by one and hit enter each time to execute them.
msiexec /unregister
msiexec /regserver
4. After that run the command given below
DISM.exe /Online /Cleanup-image /Restorehealth
Close the cmd window and reboot PC
Fix 2 – Modify the Windows Installer service
Adjust the Windows installer service to manual mode.
1. Press the Windows key+R keys together to open up the Run terminal.
2. After that, hit Enter.

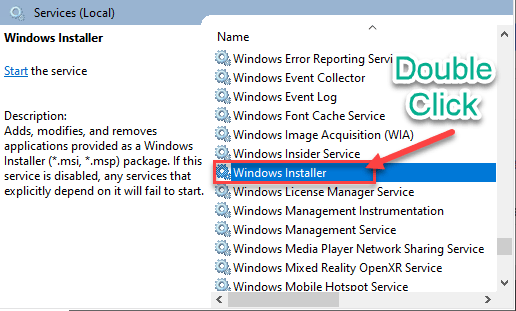
3. Simply, scroll down to find the “Windows Installer” service.
4. Now, double click on that service to modify it.

5. When the Windows Installer Properties window prevails, click on the drop-down beside the option ‘Startup type:‘ and set it to “Manual“.
6. If the service is not running, just click on “Start” to start the service.

7. Then, click on “Apply” and then click on “OK” to save the changes on your computer.

Close the Services screen. Again try to install the application on your computer.
Fix 3 – Run Install and Uninstall troubleshooter
Install and Uninstall troubleshooter can detect and fix any issue with the installer.
1. First of all, go to the MicrosoftProgram_Install_and_Uninstall.meta on your computer.
2. Next, click on “Download” to download it on your computer.

3. Next, go to the location on your computer where you have just downloaded the file.
3. After that, double click on “MicrosoftProgram_Install_and_Uninstall.meta” to run the troubleshooter.

4. In the Program Installer and Uninstaller window, click on “Next” to run the troubleshooter on your computer.

5. Here you will be asked “Are you having a problem installing or uninstalling a program?“, just click on “Installing“.

The troubleshooter will check various places like the registry for patch-related issues. Wait for a while.
6. Next, you will appear at the “Select the program you trying to install” window.
7. Just select the program you are facing this problem with, and then click on “Next“.
(If you can’t find the application, select “Not listed”.)

Follow the suggestions suggested by the troubleshooter to fix the issue.
Try to run the installer again.
Fix 4 – Rename two dll files
You have to rename two corrupt dll files and install the visual package again.
STEP 1 –
1. At first, go to this website to download the Visual C++ package.
2. Then, click on “Download“.

3. Now, choose the type of installer according to your computer specification*.
a. vcredist_arm – For the machine running on the ARM-based processors.
b. vcredist_x64 – x64 bit system
c. vcredist_x32 – x32 bit based system
4. Click on “Next” to start the download.

Once you have downloaded it, close the browser window.
NOTE–
Wondering how to know your system specification? Follow these steps.
1. Open the Run command, simply by pressing the Windows key+R keys.
2. Type “msinfo32” and click on “OK“.

3. In the System Information screen, see the ‘System Type:’ to know what type of system you are using.

STEP 2 –
1. At first, press Windows key+E keys together.
2. After that, go to this location –
For 32-bit system – C:\Windows\System32
For 64-bit system – C:\Windows\SysWOW64

3. Once you have appeared on the particular folder, look for these two dll files.
msvcp120.dll
msvcr120.dll
4. At first, right-click on the “msvcp120.dll” file and click on “Rename” to rename the file.
5. Rename the file as “msvcp120.dll_old“.

6. Same way, right-click on the “msvcr120.dll” and click on “Rename” to alter its name.
7. You can name it “msvcr120.dll_old“.

NOTE–
Do not delete any of the mentioned dll files. You can rename those back to their original names if this solution doesn’t resolve your issue.
STEP 3 –
Now you have to run the vcredist installer to install the package on your system.
1. Go to the folder where you have downloaded “vcredist“.
2. Then, double click on “vcredist” to run it.

3. Just click on “Repair” to repair the corrupted files.

This process will be complete in under a minute. Close the installer. Now, try to install the application once again.
Fix 5 – Unregister and re-register MSIEXEC
Unregister and re-register the msiexec process. This should fix any issue with the MSIEXEC.
1. At first, press “Windows key+X“.
2. After that, click on “Windows PowerShell (Admin)“.

3. Once you have opened the PowerShell window, type this set of commands one after another and hit Enter to execute these on the terminal.
msiexec /unreg
msiexec /regserver

This will unregister and re-register the service on your machine.
Close the PowerShell screen.
Fix 6 – Try installing the package in another location
If you are facing any problem installing the package in the default location (‘C:’ drive), we suggest you try installing the package on other drives of your system. Check if this works out for you.
Fix 7 – Install in safe mode
If any other application/service is interfering with the installation process, try installing the package in safe mode.
1. You have to boot your computer in safe mode. Open the Settings page.
2. Then, click on “Update and Security“.

2. At first. on the left-hand side, click on “Recovery“.
3. After that, under ‘Advanced Startup’, click on “Restart Now“.

This will start your computer in the Recovery Environment.
4. Once it does, simply click on “Advanced options“.

5. In the ‘Advanced options’ screen, you have to click on the “Startup Settings“.

6. To restart your computer with proper conditions, click on “Restart“.

7. Once you are in the Startup settings, press the F4 key to “Enable Safe Mode“.

After your system boots into the safe mode, try to install the package once more.
This should solve the problem.