While working on your computer, if the audio isn’t functioning properly, you could miss out on important online meetings with your colleagues, a video chat with your friend, or fail to upload a nicely made video tutorial. Therefore, before you get going with your important tasks, make sure that your Microphone is working properly.
Let’s see how to test if the Microphone in your Windows 10 system is working and is also recording properly.
Method 1: Through Settings App
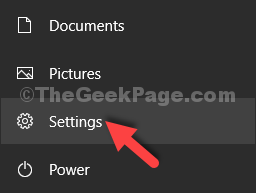
Step 1: Click on the Start button on your desktop and select Settings from the context menu, located above the Power option.

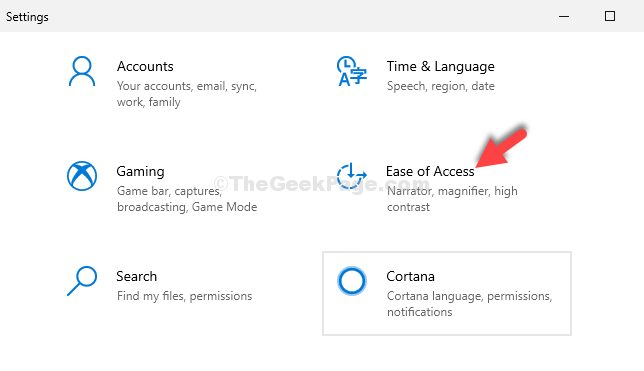
Step 2: In the Settings window, click on the Ease of Access option.

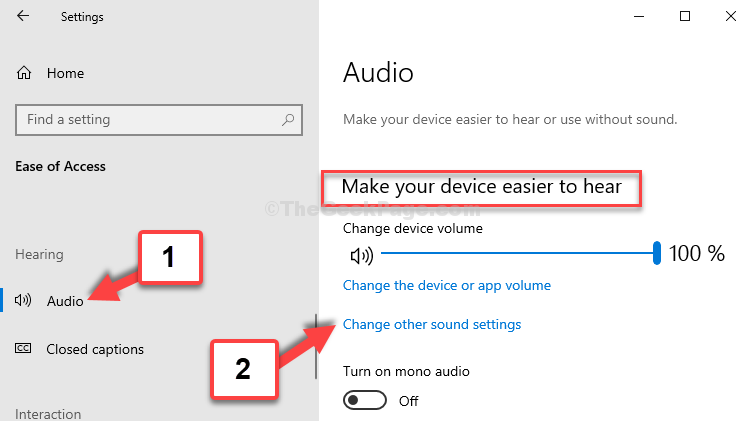
Step 3: Next, on the left side of the window, scroll down and click on Audio.
Now, on the right side of the pane, under the Make your device easy to hear section, click on Change other sound settings.

Step 4: In the Sound dialogue box, click on the Recordings tab, select Microphone and click the Configure button at the bottom.

Step 5: In the Control Panel window that opens, click on Start Speech Recognition on the right.

Step 6: This will open the Set up Speech Recognition window. Click Next.

Step 7: Next, select Other and click Next.

Step 8: Again, click on Next.

Step 9: In the next window, read the sentence as shown on the screen loudly to test the microphone. Once done, click Next.

Step 10. You are done setting up the Microphone. Now, you can either click Cancel in the next window, or continue to set up advanced functions like improving the computer’s ability to recognize spoken words by letting the computer to review documents.

You can now start using your computer’s microphone normally. You can also set up the microphone using the 2nd method.
Method 2: Through Control Panel
Step 1: Click on the Start button on your desktop and type Control Panel in the search field. Click on the result to open Control Panel home.

Step 2: In the Control Panel home, click on Ease of Access.

Step 3: Click on Speech Recognition on the right.

Step 4: Now, follow the same process through Step 5 to Step 10 as shown in Method 1.
You are done setting up the Microphone and your system audio should work fine now. You can also follow the 3rd method for quick set up.
Method 3: Through the Sound Icon on Taskbar
Step 1: Go to the speaker icon located on the bottom right corner of the Taskbar. Right-click on it and click on Sounds.

Step 2: It takes you to the same Sound dialogue box as shown in Step 4 of Method 1. From there on, follow the process through Step 4 to Step 10 as illustrated in Method 1.
That’ all. This should help you test and set up your Windows 10 microphone and your audio should work perfectly fine.