You may want to share a folder within your home network that connects a PC and a laptop. It’s a great way to share files with other users within the home network. This is far more convenient than sending and receiving emails or through a pen drive.
However convenient this may be, many users report finding that their Users folder can be viewed by public, irrespective of whether the PC owner allowed it or not. This can be scary and a breach to your privacy. In fact, it leaves your data vulnerable to attackers, offering them all your private data out in the open.
While this issue is specially noticed on those computers connected to a local network, it’s better to be safe than sorry. Fortunately, you can stop sharing a folder in Windows 10 to keep your data safe. Let’s see how.
Method 1: Through File Explorer
You can stop sharing folders through file Explorer in two ways. Let’s see how.
Solution 1: Through Folder Properties
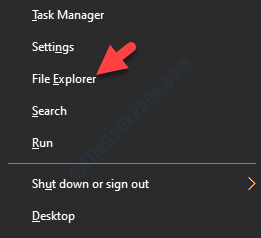
Step 1: Press the Windows + X keys together on your keyboard and select File Explorer from the context menu.

Step 2: In the File Explorer window and go to the folder which you want to stop sharing.
Here we want to stop sharing a folder that’s located in the D drive.
So, we will navigate to This PC and then open the D drive.

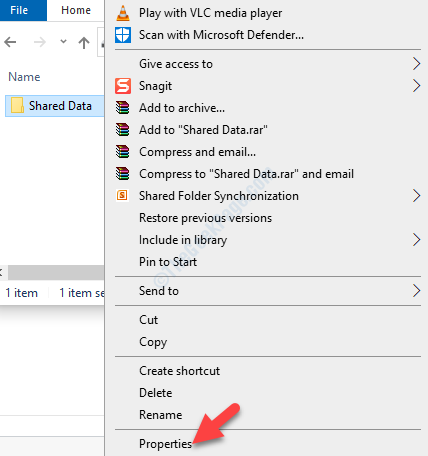
Step 3: Now, right-click on the folder (in the D drive) and select Properties.

Step 4: In the folder Properties window, select the Sharing tab, and click on the Advanced Sharing button.

Step 5: In the Advanced Sharing dialogue box, uncheck the box next to Share this folder.
Press Apply and then OK to save the changes and exit.

This will stop the sharing for the desired folder. Alternatively, you can try the 2nd way.
Solution 2: By Removing Access
Step 1: Press the Windows + E keys together on your keyboard to open the File Explorer.
Step 2: In the File Explorer window and go to the folder which you want to stop sharing.
Here we want to stop sharing a folder that’s located in the D drive.
So, we will navigate to This PC and then open the D drive.

Step 3: As the D drive folder opens, right-click on the shared folder and click on Give access to in the right-click menu.
Now, from the sub-menu, select Remove access.

This will help you stop sharing the specific folder, but in case you forgot where your shared folders are located or if you wish to remove different network shares at one go, you can follow the next methods.
Method 2: Through Shared Folders
Step 1: Press the Win + R keys together on your keyboard to open the Run command.
Step 2: In the Run command box, type fsmgmt.msc and hit OK to open the Shared Folder window.

Step 3: In the Shared Folder window, go to the left side of the pane, and select Shares. It will display all the shared folders on the local system, on the right side of the pane.
Go to the folder you want to stop sharing, right-click on it and select Stop Sharing from the right-click menu.
Step 4: The folder you selected will now be removed from the list.
This should help you stop sharing the desired folder, but if it doesn’t, follow the 3rd method.
Method 3: Using Command Prompt
Step 1: Go to the Windows icon button on the bottom left of your desktop and type Command Prompt in the search box.

Step 2: Right-click on the result and select Run as administrator from the right-click menu to open Command Prompt with admin rights.

Step 3:In the Command Prompt window, type the below command and hit Enter:
net share
This will pull up the list of folders that are being shared on your local network.

The 1st column shows the name of the shared folder/drive, and the 2nd column shows the location. Simply look for the shared folder that you want to remove/stop sharing.
Step 3: Execute the below command hit Enter to stop sharing a folder:
net share your_share_name /delete
So, for instance, we want to stop sharing Passwords folder here, the command will look like this:
net share Passwords /delete

This will successfully delete the desired folder that you want to stop sharing.
Step 4: If you want to stop sharing all shared folders at one go, run the below command:
net use * /delete

That’s it. You can successfully remove the desired shared folder by following any of the above methods.