In Windows 10, there are few folders that are created by system by default. These folders ( For Eg. Desktop, Documents, Downloads etc. ) are in the C:\ drive generally. As a good practice, we need to keep space in C drive for system to run efficiently. But sometimes, we end up using most of the space in C:\ drive slows down the performance of a computer. So What we can do is we shift these folder in other drive available. This article will guide you on how to make shift these folders.
How to make a copy of Desktop/Downloads in other drive in Windows 10.
Here, I am using one of the system created default folders (Desktop) in this example.
Step 1: Open File Explorer.
Press WinKey + E.
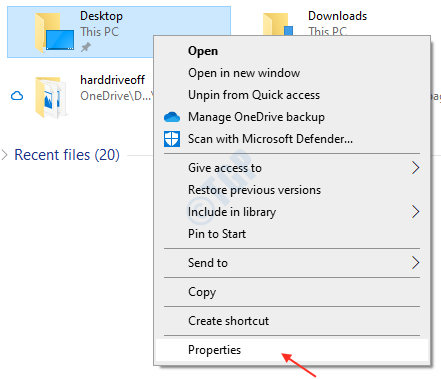
After it opens, Right click on the Desktop folder and click Properties.

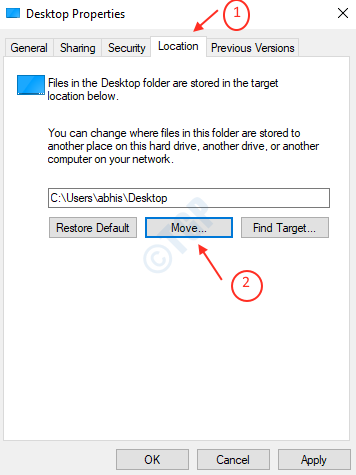
Step 2: In Properties, Go to Location tab.
Click Move as shown in the below image.

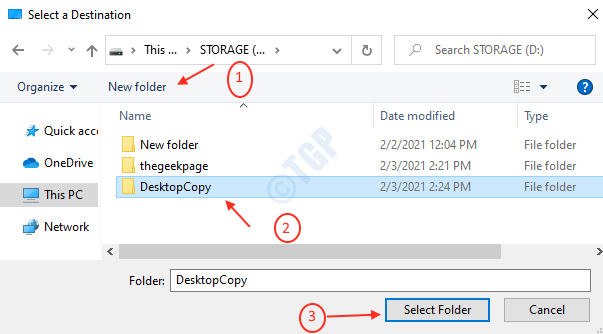
Step 3: After clicking Move, you can create a folder to which desktop should be copied.
For that, Click New folder and create it by giving a name like “DesktopCopy”.
Select this newly created folder and Click Select Folder.

Step 4: After selecting the folder, this will prompt you whether you want to move all files to new location?
Click Yes.

Yay! You have successfully created a copy of Desktop folder in D:\DesktopCopy like shown below.

If you want to restore the Desktop back again, Continue reading.
Step 1: Right Click on Desktop folder.
Click on Location tab and then click on Restore Default.

Step 2: It will ask you whether you like to create it ?
Click Yes.

Step 3: Click Yes for moving the files from other drive to C:\ drive location.

This is how you can restore the default folder back to its original location.
Hope this tutorial helped you in some way.
Thank you!