Because security threats are becoming more prevalent by the day, it is vital to provide an extra layer of protection to everything linked to the internet. It may be a laptop, an email account, or even a pen drive.
Have you ever questioned why some of your emails have vanished or why your account is sending a few unfamiliar emails? It’s possible that it’s due to a hacked account. The user must enable the two-step verification method for their email account at this point.
If you’re having trouble doing this, we’ve got you covered with this guide, which will teach you how to enable 2-step verification for your Microsoft account and add it to your Outlook desktop application on your Windows 11 system.
How to Setup 2-Step Verification and Add Microsoft Account in Outlook Desktop App
Here are a few steps which explain how to set up a 2-step verification process for your Microsoft account and then how to add it to the Outlook desktop app.
Enable 2-Step Verification Process for Microsoft Account
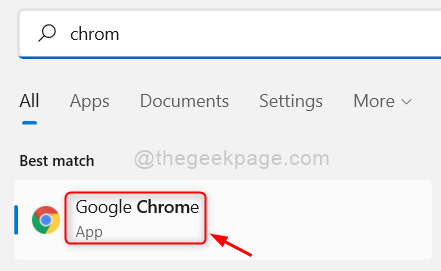
Step 1: Open Google Chrome browser by pressing windows key and typing google chrome.
Step 2: Select Google Chrome from the search results as shown below.

Step 3: In a new tab, copy and paste the below URL in the address bar and press Enter key as shown below.
https://account.microsoft.com/account
Step 4: Once the Sign in page appears, click Sign in button as shown below.

Step 5: Then, Enter the Microsoft Account email address and press Enter key.

Step 6: Now Enter the Password and hit the Enter key.

Step 7: Click Yes if you are using your own system and does not mind saving the credentials. Otherwise Click No as shown below.

Step 8: After logged in successfully, on the top bar click Security option as shown.

Step 9: Then, Click Get started under Advanced security options as shown below.

Step 10: Scroll down the page and click Turn on for activating Two-step verification under Additional security.

Step 11: After clicking turn on button, It will ask the user to verify your identity so click on email id to send the verification code as shown below.

Step 12: To get the verification code, go to your email inbox and open the mail sent by Microsoft with title Microsoft account security code. Copy the verification code by selecting it and pressing CTRL + C.
Step 13: Now paste the code by placing the cursor in the textbox and press CTRL+V and click Verify.

Step 14: Click Next to proceed.

Step 15: Click Cancel to avoid installing Microsoft Authenticator app on the system.

Step 16: Copy the new code by selecting it and pressing CTRL+C and pasting it in a notepad or any other editor for future use for sign in wherever required.
NOTE: Do not forget to save it. It is a crucial data.

Step 17: Tap Next to continue.

Step 18: Finally, Click Finish button to complete the 2-step verification process for the Microsoft Account.

Step 19: Close the browser if you want.
Now the Microsoft account has been turned on for 2-Step verification process under advanced security.
How to Add Microsoft Account with App Password in Outlook Desktop App
We will show you with briefly explained steps on how the user can get the app password and add Microsoft account in Outlook desktop app.
NOTE: This method is necessary for creating app password if the user is running Microsoft products lower than Office 16 version.
Step 1: Click Here to go to Microsoft Account Sign in page. It opens in a new tab.
Step 2: Once the Sign in page appears, click Sign in button as shown below.

Step 3: Then, Enter the Microsoft Account email address and press Enter key.

Step 4: Now Enter the Password and hit the Enter key.

Step 5: Click Yes if you are using your own system and does not mind saving the credentials. Otherwise Click No as shown below.

Step 6: After signed in, Click Security at the top as shown below.

Step 7: Then, Click Get started under Advanced security options for more security.

Step 8: Scroll down the page and click Create a new app password for creating a new app password as shown below.

Step 9: Select the App password as shown below and copy it and save it. After that, Click Done to close it.

Step 10: Next, open Outlook app on your system by pressing windows key and typing outlook.
Step 11: Select Outlook app from the search results as shown below.

Step 12: Enter the Email address of your Microsoft Account and click Connect as shown below.

NOTE: If Outlook app does not open the sign in page because of an account already being added to outlook, then go to File as shown below.

Then, Click Info on the left panel and click on dropdown account list and then select Add account option to open the Sign in window for adding another account in Outlook app as shown below.

Step 13: Next, when it prompts to add the password, please enter the newly created app password which was copied and saved earlier in Step 9 and then follow on screen instructions if any.
Step 14: After setting up the Outlook app, you can continue using it or close it.
That’s it.
Hope this post was informative and you found it helpful. Please leave us comments below.
Thank you.