Why use MS Word?
Microsoft Office is a Productivity Package and not a set of creative tools. MS Powerpoint is mostly used by everyone whenever needed. But, Even MS Word is widely used in creating word documents and can even be used to make a stunning logo. Let us look at why we should not ignore MS Word in creating a logo.
- Millions of people use it all across the world.
- It comes with a number of useful tools for editing text and images.
- Text and image (geometric forms) can be readily combined to create a balanced composition.
- It also allows you to move geometric shapes, SmartArt objects, and symbols around on a document page.
- A letterhead can be printed with a logo developed in Microsoft Word.
- You can easily play around with textures and backgrounds.
Microsoft Word offers a wide range of amazing fonts and shapes to create a logotype. When it comes to designing a logo, there is hardly a more convenient program for amateurs than MS Word. By combining different shapes, WordArt objects, words, and images, you can end up with a pretty good corporate design.
How to create a Logo?
I have borrowed the below logo from the internet so that it can be duplicated in MS Word. With this example, you will understand how Word tries to design a logo. MS Word cannot replicate it exactly, but it will try its best to design.

Prepare the Word Document
Step 1: Open a new MS Word Document.
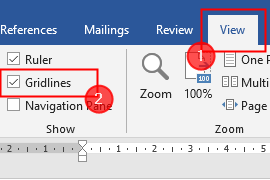
Step 2: Go to View > Gridlines.

NOTE: Gridlines help in aligning Shapes and other objects in the Word Document. You can see them only in the Print view.
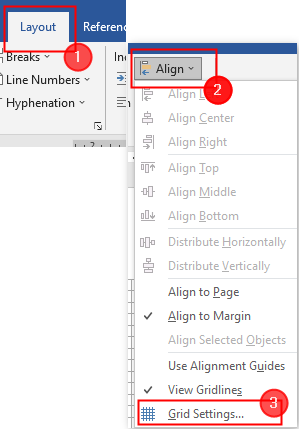
Step 3: Now, click Layout > Align > Grid Settings.

Step 4: Grid and Guides window opens. Make sure to tick the boxes against ” Snap objects to other objects” and ” Snap objects to grid when the gridlines are not displayed”. Lastly, Click OK.

Make sure, these settings are enabled and we will be ready before we insert the shapes and start designing.
Designing the Logo
Step 1: Go to Insert > Shapes > Oval.

Step 2: Draw the circle by right-clicking the mouse and dragging it. Change the color of the canvas to black by double-clicking on the shape.

Step 3: Again Insert > Shapes (Oval). Double click on the image to change its style and color. Here, I am changing the color of the second circle to White.

Step 3: Now, overlap the White circle on the black circle as shown below.

Step 4: Use the Arc and Line shapes to create a triangle as below. Make two copies of this triangle.

Step 5: Move these triangles to their positions as shown below.

Step 6: Now, click on Insert> WordArt. Type the letter “B” as shown below. Repeat the same for the next two letters.

NOTE: This is a simple step and is self-explanatory. You can also use the text box here.
Step 7: Finally, the logo created is shown below.

Step 8: Select all the shapes and text inserted by clicking “Shift+ left click“. Once all are selected, right-click and click on Group to join them together.

Step 9: Finally, save your logo as an image. But MS word cannot save them as images. To do this, click Insert > Screenshot > Screen clipping.

Other MS Word features that you can use in Logo Designing
ICONS


Thanks.
Comment below and let us know how this article helped you.