There are times when the users want to convert other audio files to MP3 and they happen to use software like Audacity for editing and converting it to an mp3 file. But while converting it using the Audacity, many windows users have faced a problem where they are unable to proceed and got an error message that said “The program can’t start because LAME_ENC.DLL is missing from your computer. Try reinstalling the program to fix the program“.
The Audacity software needs the LAME_ENC.dll for encoding files where LAME means Lame Aint an MP3 Encoder. The first and foremost reason is the lame_enc.dll file itself is missing because some users might have deleted it by mistake and also due to corrupted system files, old outdated audio drivers installed on the system, and so on.
This post shows all the possible fixes the users need to solve this problem. If you are also in the same situation then continue reading to learn more.
Fix 1 – locate the LAME_ENC.DLL file on Audacity software
This error mainly occurred because of lame_enc.dll file got deleted from the system, so let us see how to download from the internet safely and install it on the windows system with the steps explained below.
Step 1: Open any browser app on your system like google chrome.
Step 2: Open a new tab, type the following URL in the address bar, and press the Enter key.
https://lame.buanzo.org/#lamewindl
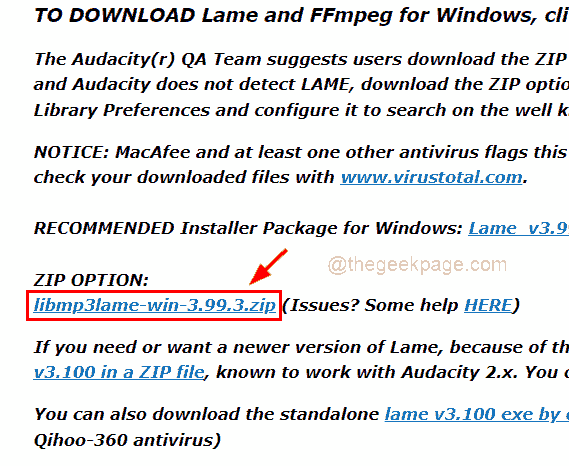
Step 3: Then, click the libmp3lame-win-3.99.3.zip link as shown below to start downloading the DLL file.
NOTE: This downloaded libmp3lame-win-3.99.3.zip file contains the lame_enc.dll file which is sourced from the LAME Sourceforge.net site because the lame_enc.dll file is not easily extracted from it.

Step 4: After it is downloaded, extract it or just double-click on the downloaded zip file to open it and then copy the file and paste it in some other folder.
Step 5: Next, open the Audacity software on your system.
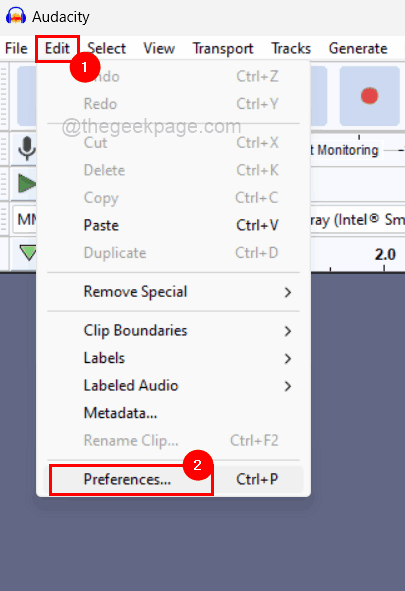
Step 6: Navigate through Edit on the top bar of the Audacity window and click Preferences from the list as shown below.

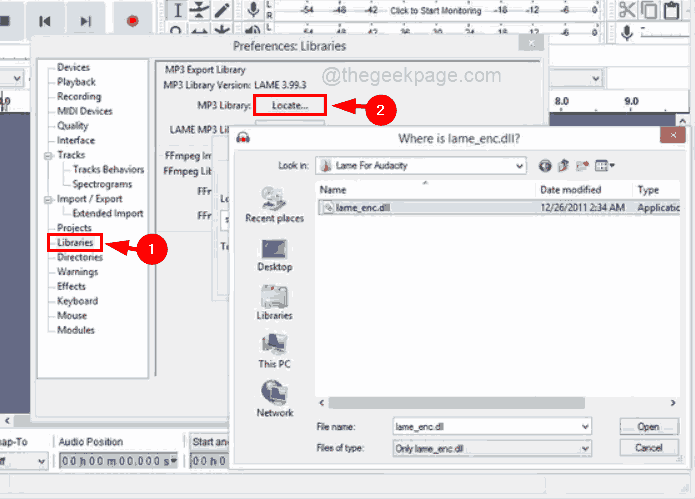
Step 7: On the Preferences window, click the Libraries option from the left menu as shown.
Step 8: Click the button named Locate under MP3 Export Library at the top on the right side of the Preferences window as shown in the below screenshot.
NOTE: If there is no locate button shown on your audacity then don’t worry since LAME MP3 has the latest built-in which came along with the Audacity software if it is newly installed on your system.

Step 11: Later browse to the lame_enc.dll file you had copy-pasted to some other folder and select it and click OK on the Preferences window and you are done.
Step 7: Now restart the system and after the system got launched, check if the issue still persists.
Fix 2 – Install the LAME_ENC.DLL file on the Windows system
Step 1: Open the web browser app on your system like google chrome.
Step 2: Then, open a new tab and type the below-given link in the address bar and press Enter key.
Step 3: Next, click the Download button which is green coloured as shown in the below screenshot.

Step 4: This will start downloading the tar.gz file on your system.

Step 5: After this gets downloaded, extract this file and get the lame_enc.dll file and copy it.
Step 6: Then, go to C:\Windows\SysWOW64 using the file explorer and paste the copied lame_enc.dll file into this folder.
Step 7: After that, close the folder and restart the system and see if the problem got fixed.
Fix 3 – Perform SFC Scan on your system
The corrupted system data files can also be the reason behind this error. The lame_enc.dll file may not be actually missing but the other corrupted files might be causing this problem on the Audacity software.
Here are the steps below to look for corrupted system files using the command prompt and system file checker.
Step 1: Press the Windows and R keys together to open the Run command box.
Step 2: Then, type cmd in it and press the CTRL, SHIFT and ENTER keys together to open an elevated Command Prompt window on the system.
NOTE: You have to accept the User Access Control Prompt to continue.

Step 3: Next, type sfc /scannow and hit Enter key to start scanning for the corrupted data files.
Step 4: You have to wait till the scanning is not completed, and once it is done, you will get to see all the corrupted system files if any are found.
NOTE: Please replace those corrupted files that are found.

Step 5: Otherwise it will just show ‘Windows Resource Protection did not find any integrity violations’.
Step 6: Now you can close the command prompt window.
Fix 4 – Update the Sound, video and game controllers drivers using Device Manager
Usually, it is ignored by the users to update the sound, video and game controller driver, which might be mismatched with the lame dll file because of getting outdated. So you might be experiencing this issue while converting any audio file to mp3 on your system.
So we recommend the users update the audio drivers using the device manager which is shown using the steps below.
Step 1: Press the Windows and X keys together on the keyboard to see the context menu list of the Start button.
Step 2: Then, press the M key to open the Device Manager window.
Step 3: Once the device manager window is open, double-click on the Sound, video and game controllers option to expand it to see all the drivers installed under it.
Step 4: Right-click on each driver and select the Update driver option from the context menu to update the driver as shown in the below image.
Step 5: Then, follow the onscreen instructions to complete the update process.

Step 6: Once all the audio drivers are updated, close the device manager.
Step 7: Now check if the problem got fixed.
Fix 5 – Restore the System using the System Restore feature on the system
Step 1: Open the Run command box by pressing the Windows + R keys together.
Step 2: Next, you must type rstrui in the textbox of the run command box and press the Enter key which opens the System Restore window.

Step 3: After the System Restore window opens, click Next at the bottom of the window as shown below to proceed.

Step 4: In this window, you will get to see all the system restore points that were created by the user when the system was running smoothly.
Step 5: Select any system restore point from the list and click Next.

Step 6: Then, in the next window confirm the system restore point that you have selected and click Finish to start restoring the system.

Step 7: After the system is restored, you might notice the problem is resolved.