Windows OS launched a new feature that allows games and apps to use the dedicated GPU instead of the Integrated Graphics Processor. This feature is also prevalent in the Windows 11. At the same time, most of the computers are equipped with two dedicated GPU along with a integrated graphics (Intel) unit if the motherboard supports the same.
While the dedicated GPU (Nvidia/AMD) is automatically used by games and apps, some games have a tendency to bypass the dedicated GPU and use the integrated GPU. But, as a gamer or while using an app, you may want to use the dedicated GPU for a smoother experience. But while playing the game or using an app you have no clue which graphics card is in use. While there has been solutions for the earlier Windows OS , with the launch of Windows 11, users are a bit confused with the changes in some features and Settings, making it challenging for them to use the dedicated GPU.
This post will guide through process on how to force your Game or App to use the dedicated GPU on Windows 11.
How to Select the Dedicated Graphics Card Through Settings
Step 1: Press the Win + I keys together on your keyboard to open the Settings app.
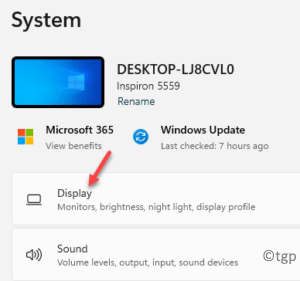
Step 2: In the Settings window, click on the System option on the left.
Step 3: Now, travel to the right side and click on Display.
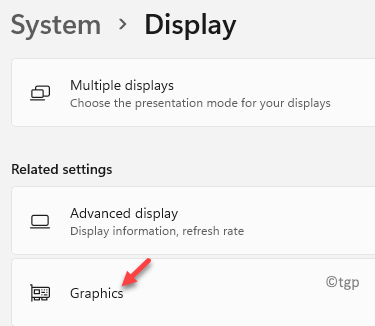
Step 4: In the Display settings screen, scroll down and click on Graphics.
Step 5: Next, in the Graphics screen, under the Custom options for apps section, go to Add an app.
Here, click on the Browse button below.
Step 6: Now, navigate to the location of the app (that you want should use the dedicated GPU) in the Windows Explorer and select it.
Here, we want the Windows Media Player to use the dedicated GPU and hence, selected the same from the File Explorer.
It will get added to the app list.
Step 7: Next, select the app from the app list in the Display > Graphics section and click on Options.
Step 8: This will open the Graphics preference pop-up window.
Here, select the High performance option.
Press Save to save the changes.
*Note – The Power saving option is assigned to the integrated GPU (Intel) of your PC by-default and the High performance option is for the dedicated GPU (Nvidia/AMD).
Now, exit the Settings app and next when you open the app, it will run using the dedicated GPU.
How to Force a Game to Pick the Dedicated Graphics Card
If it’s a game that you want should run using the dedicated graphics card like Nvidia, you can use this method to select the graphics card of your choice for the game. Follow the below instructions to enable the option for Nvidia video card:
Step 1: Launch the Nvidia Control Panel and navigate to the menu bar at the top.
Here, click on the View tab and select Add “Run with graphics processor” Option to Context Menu.
This will turn on the Run with graphics processor option and it will now appear in the right-click context menu.
Now, when you right-click on any app or game, you will see the Run with graphics processor option in the context menu.
Step 2: Now, go to the shortcut icon for the game on your desktop, right-click on it, select Run with graphics processor and then select High-performance Nvidia processor to run the select app using the dedicated GPU.


